
I get asked a lot which career at the highest level will earn sims the most money and XPs, in the table below I have put the amount they earn each time they complete a shift at the highest level in each career:
| CAREER | HOURS | HIGHEST LEVEL | SIMOLEONS | XPs |
|---|---|---|---|---|
| Artist | 7 hours | Level 5 | 1,260 | 1,740 |
| Athlete | 6 hours | Level 5 | 1,800 | 1,600 |
| Filmmaker* | 8 hours | Level 6 | 1,890 | 1,320 |
| Level 10 (specialised) | 2,100 | 2,040 | ||
| Firefighter | 9 hours | Level 5 | 1,500 | 1,500 |
| Medical Staff* | 12 hours | Level 6 | 1,890 | 1320 |
| Level 10 (specialised) | 2,100 | 1,920 | ||
| Musician | 7 hours | Level 5 | 1,750 | 1,250 |
| Police* | 8 hours | Level 6 | 1,640 | 1,200 |
| Level 10 (specialised) | 2,020 | 1,920 | ||
| Politician | 7 hours | Level 5 | 1,220 | 1,780 |
| Real Estate Agent | Levels 1-3= 7 hours
Levels 4-5= 5 hours |
Level 5 | 1,525 | 1,475 |
| Scientist | 8 hours | Level 5 | 1,400 | 1,560 |
| Teacher | Levels 1-3= 7 hours
Levels 4-5= 5 hours |
Level 5 | 1,045 | 1,955 |
P.S. thegirlwhogames.blog is now optimised for mobile devices which means you can navigate your way around the site while on the go easier than before!
Thanks for reading!
© COPYRIGHT PROTECTED
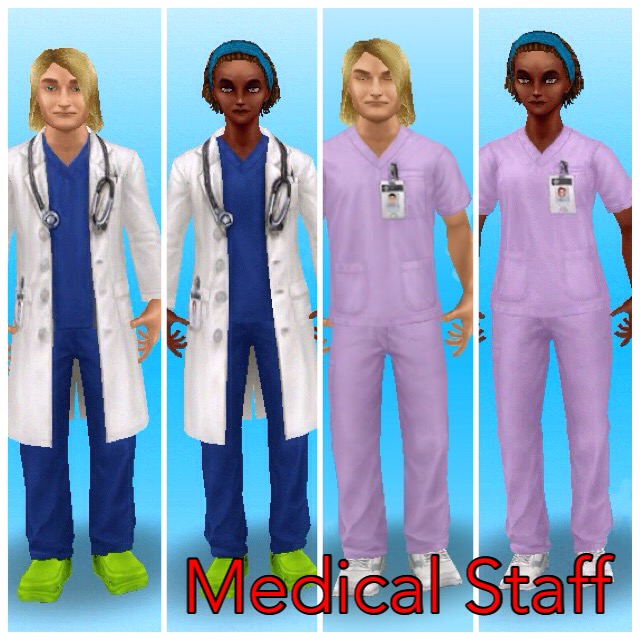
The Sims Freeplay- Profession Careers: Medical Staff
Once you build the Hospital you can begin the Medical Staff Career:

NOTE: the hospital is in downtown, you will need to complete the Simtown Express Quest to be able to access downtown
This is a profession career so its a little different from a normal career as you can actually go to work with 2 of your sims and help them during their work day!
You can either go to work with your sims or send them to work offsite, if you send them to work offsite this means you won’t see them at the hospital. But you can go to work with your sim if you select send alone or accompany sim and then they can help sims and earn resources (only two sims can be at the hospital at one time, all other sims with this career have to work offsite)
When you send a sim to work at the hospital sims will enter with bubbles above their heads, you need to click on this bubble and select one of the tasks that appears, the amount of grey sections there are tells you how many tasks you have to complete before you earn the reward that is pictured in the middle of the bubble:

Once you have built the hospital 3 workstations will already be unlocked (Janitor Closet, Admin and Physical Aid) so you can start helping sims by completing actions using these workstations, you will see options similar to the image below when you click on one of the bubbles:

Each of these tasks has to be completed in a different workstation so your sims perform cleaning duties using the janitor closet, you need to use the admin workstation to review charts and you test equipment using the physical aid workstation.
TIP: if you are unsure which workstation is required it tells you above the action!
Only one sim can use a workstation at one time (new tasks will be added when you unlock new workstations, keep reading for more information)
Each time your sims complete a task (that section will turn from grey to green) a hospital coin bubble will appear above their head, click this and they will earn hospital coins and XPs, the experience points are towards levelling up, so they will level up quicker than if you just sent them to work.
Once all the tasks have been completed all the grey sections will now appear green, click on this to receive your reward (the rewards are hospital coins and resources used to upgrade the different workstations at the hospital):

I am not going to go into too much detail about how to complete Profession Careers here, if you are still unsure check out my Guide to Profession Careers for more information on how they work!
HOURS
You can send your sims to work anytime for 12 hours but if you are helping sims they can finish early if they reach the quota, they need to help 15 sims (you need to complete all the tasks for a sim to have helped 1 sim) during their shift, then they will end their shift early and you earn extra hospital coins and resources. Both sims can help the same sims and each time one of them finishes helping a sim they will both have helped one sim:

If they are working offsite they will just work for 12 hours and they won’t earn any resources as they won’t be helping any sims.
LEVELS
All sims completing this career will be able to reach level 6:
| LEVEL | MONEY | XPs |
|---|---|---|
| 1 Intern | S1,250 | 360 |
| 2 Clerk | S1,400 | 650 |
| 3 Care Assistant | S1,550 | 980 |
| 4 Candy Striper | S1,660 | 1,030 |
| 5 Pre Med | S1,780 | 1,140 |
| 6 Pre Med | S1,890 | 1,320 |
Then only 2 sims, once they reach level 6 can choose to be either Nurse or Doctor, only one sim can be a Nurse and one sim can be a Doctor, all other sims will stay as level 6 pre med.
Nurse– when your sim specialises as the Nurse they can continue to level up and unlock more workstations:
| LEVEL | MONEY | XPs | WORKSTATION UNLOCKED |
|---|---|---|---|
| 6 Nurse Assistant | S1,920 | 1,200 | Pharmacy |
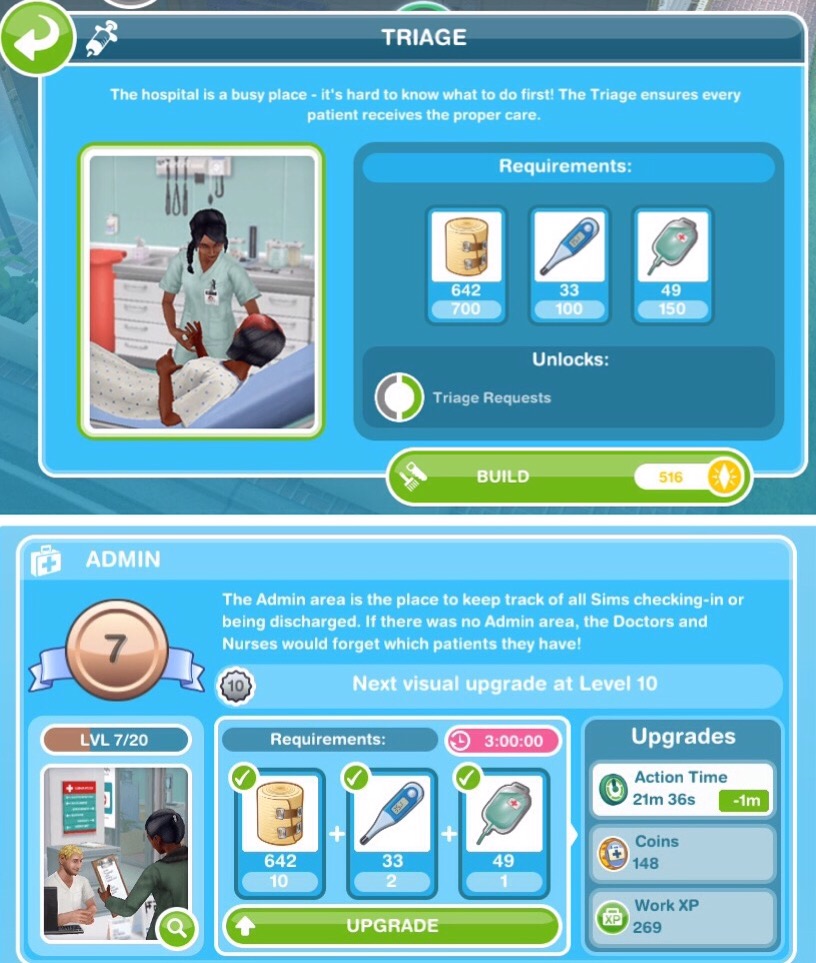
| 7 Nurse Practitioner | S1,920 | 1,380 | Triage |
| 8 Registered Nurse | S1,950 | 1,560 | Radiology |
| 9 Head Nurse | S2,000 | 1,740 | Ward |
| 10 Chief Nurse | S2,100 | 1,920 | – |
Once you unlock the workstation you have to use the resources to build it before you can help sims using these workstations, only the nurse will be able to complete tasks to help sims that require one of the workstations above. I will be going into detail about workstations later in this post.
Doctor– when your sim specialises as the Doctor they can continue to level up and unlock more workstations:
| LEVEL | MONEY | XPs | WORKSTATION UNLOCKED |
|---|---|---|---|
| 6 Resident | S1,920 | 1,500 | General Practice |
| 7 Practitioner | S1,920 | 1,500 | Psychiatrist’s Office |
| 8 Physician | S1,950 | 1,680 | Research Laboratory |
| 9 Surgeon | S2,000 | 1,860 | Surgery Room |
| 10 Chief Surgeon | S2,100 | 2,040 | – |
Once you unlock the workstation you have to use the resources to build it before you can help sims using these workstations, only the doctor will be able to complete tasks to help sims that require one of the workstations above. I will be going into detail about workstations later in this post.
When your sim specialises they have to fulfil profession badges before they can level up (check the occupations tab to find out what you need to do to complete this):

Each sim can only earn one badge per shift and you need all badges before you will be able to level up in this career
Badges needed:
| Level | Doctor | Nurse |
|---|---|---|
| 6 | Help 3 Sims | Help 3 Sims |
| 6 | Collect 5,000 coins | Collect 5,000 coins |
| 6 | Help 2 Important Sims | Help 2 Important Sims |
| 7 | Help 8 Sims | Help 8 Sims |
| 7 | Collect 10 Blood Pressure Resources | Collect 10 IV Drip Resources |
| 7 | Collect 6,000 coins | Collect 6,000 coins |
| 7 | Help 2 Important Sims | Help 2 Important Sims |
| 8 | Collect 15 Thermometer Resources | Collect 15 Thermometer Resources |
| 8 | Collect 7,000 coins | Collect 7,000 coins |
| 8 | Help 8 Sims | Help 8 Sims |
| 8 | Help 2 Important Sims | Help 2 Important Sims |
| 8 | Collect 3 Heart Monitor Resources | Collect 3 X-Rays Resources |
| 9 | Collect 8,000 coins | Collect 8,000 coins |
| 9 | Help 7 Sims | Help 7 Sims |
| 9 | Help 2 Important Sims | Help 2 Important Sims |
| 9 | Collect 5 Heart Monitor Resources | Collect 5 X-Rays Resources |
| 9 | Collect 10,000 coins | Collect 10,000 coins |
| 9 | Help 8 Sims | Help 8 Sims |
If you don’t manage to complete a badge in a shift the progress for that badge will reset and you will have to start again on the next shift (for example, if your task is to help 2 important sims and you only help one, in your next shift it will reset so you will have to help 2 important sims in that shift to get the badge)
Each level requires you to complete more badges, you cannot level up until all the badges have been collected.
Who are the important sims I need to help to get a badge?
These are the sims with question marks in the bubbles above their heads:

When you reach level 10 in a profession career you unlock the work outfit in that specialist for a female and male adult sim to wear at any time, you can find these in the wardrobe under outfits:
Remember:
- You can only go to work with 2 sims at a time, all other sims in this career will work offsite so you won’t see them during the day
- Only one sim can use a workstation at one time
- If you don’t know how Profession Careers work read my guide
Workstations
The workstations require resources to upgrade them so the time an action takes will decrease and the coins and XPs you earn for each action will increase. The resources are shown below:

Some resources are not unlocked yet, build new workstations to unlock them
 You can see the resources you have in the second tab of the professions menu under storage (you can access this using the button in the top left hand corner of your screen when you are at the hospital)
In the professions menu you can see:
- Workplace Overview- here you can see the workstations you have currently unlocked, what level you are on and what resources you need to upgrade them
- Storage- this is where you see your current resources collected and on the right hand side is your hospital coins, the hospital coins are used to increase your storage if you need to and trade for resources (which is in the next tab)
- Resource Exchange- here you can either spin for resources using simoleons or LPs for the mega spin as well as trade hospital coins for resources
The tables below show the upgrade resources needed, the time each upgrade will take and the time an action takes and the amount of coins and XPs you earn when you complete each action, only one of these will upgrade each time so if the time taken decreases then the amount of coins and XPs you earn will stay the same until you upgrade again and then the amount of coins you earn will increase while the time taken and XPs will stay the same.
NOTE: you can only upgrade one workstation at a time unless you are VIP
If you don’t have the amount of resources you need it will say it costs LPs, when you have the right amount of resources you can build/ upgrade the workstation without LPs (you know you have all the resources you need when there are ticks next to all the resources):
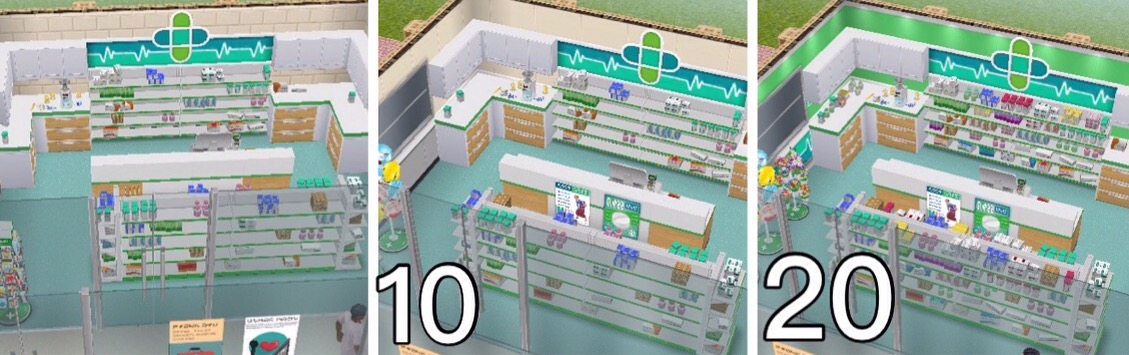
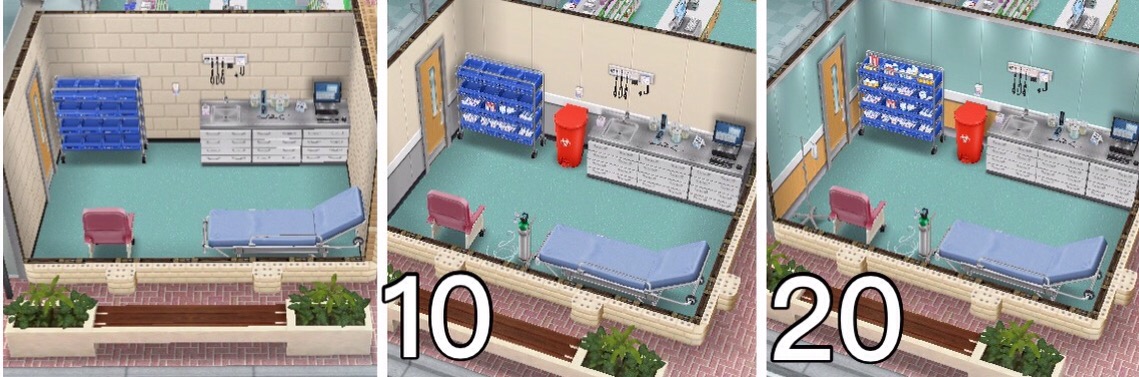
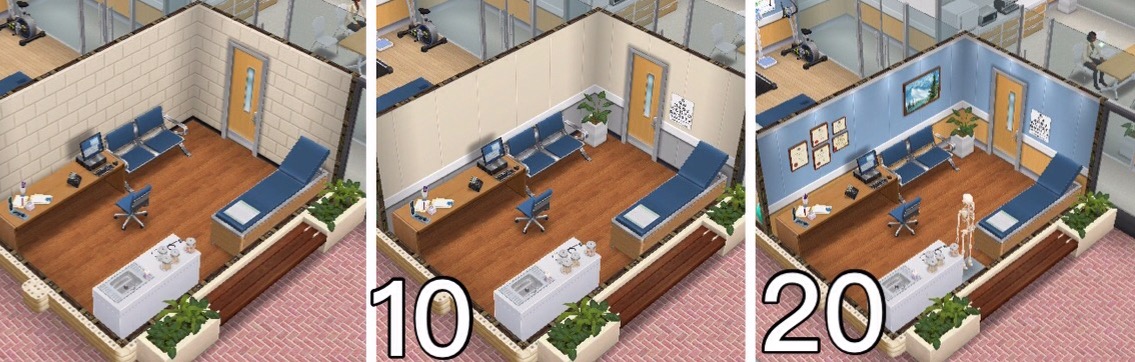
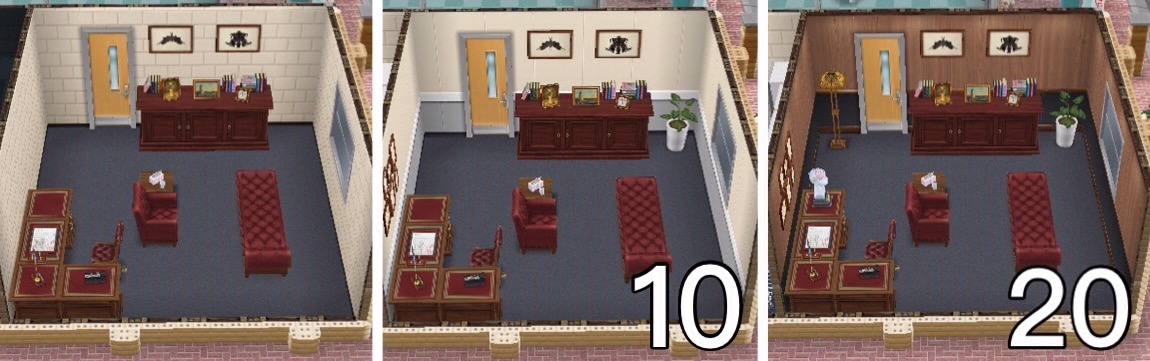
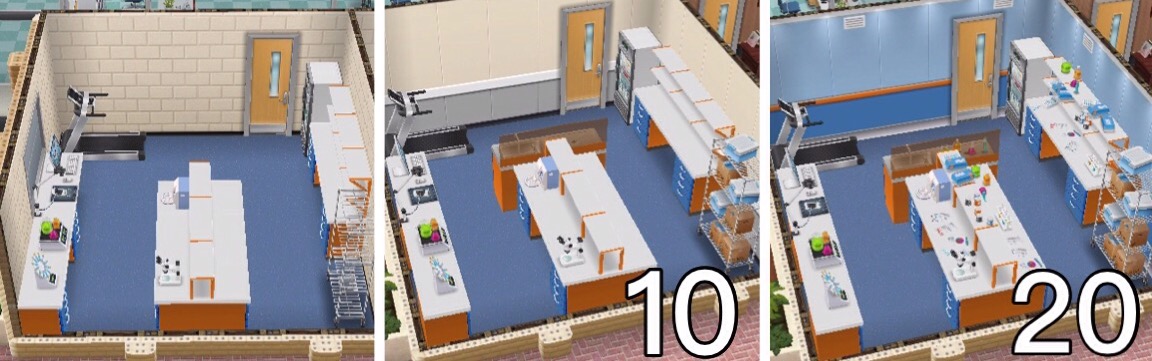
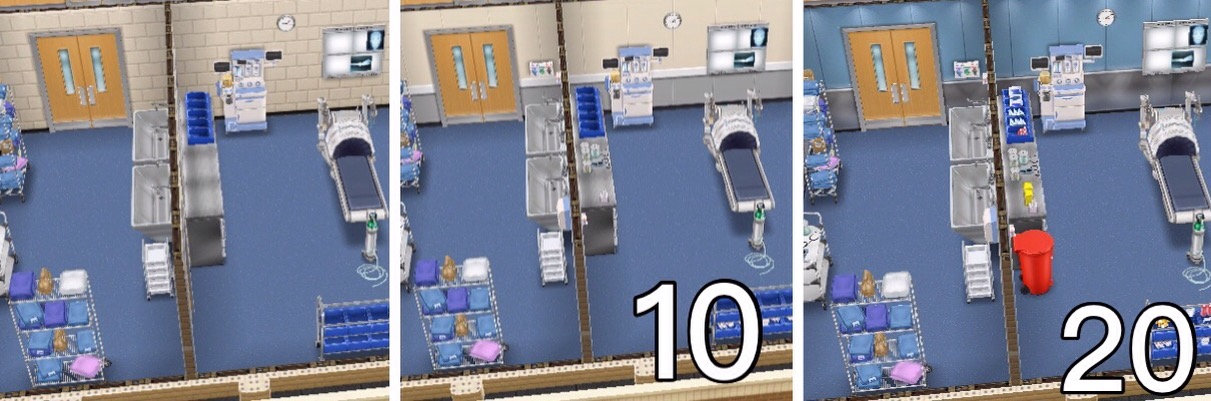
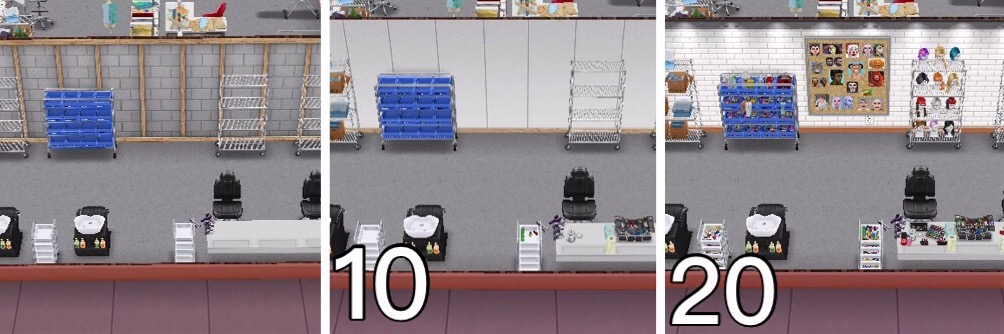
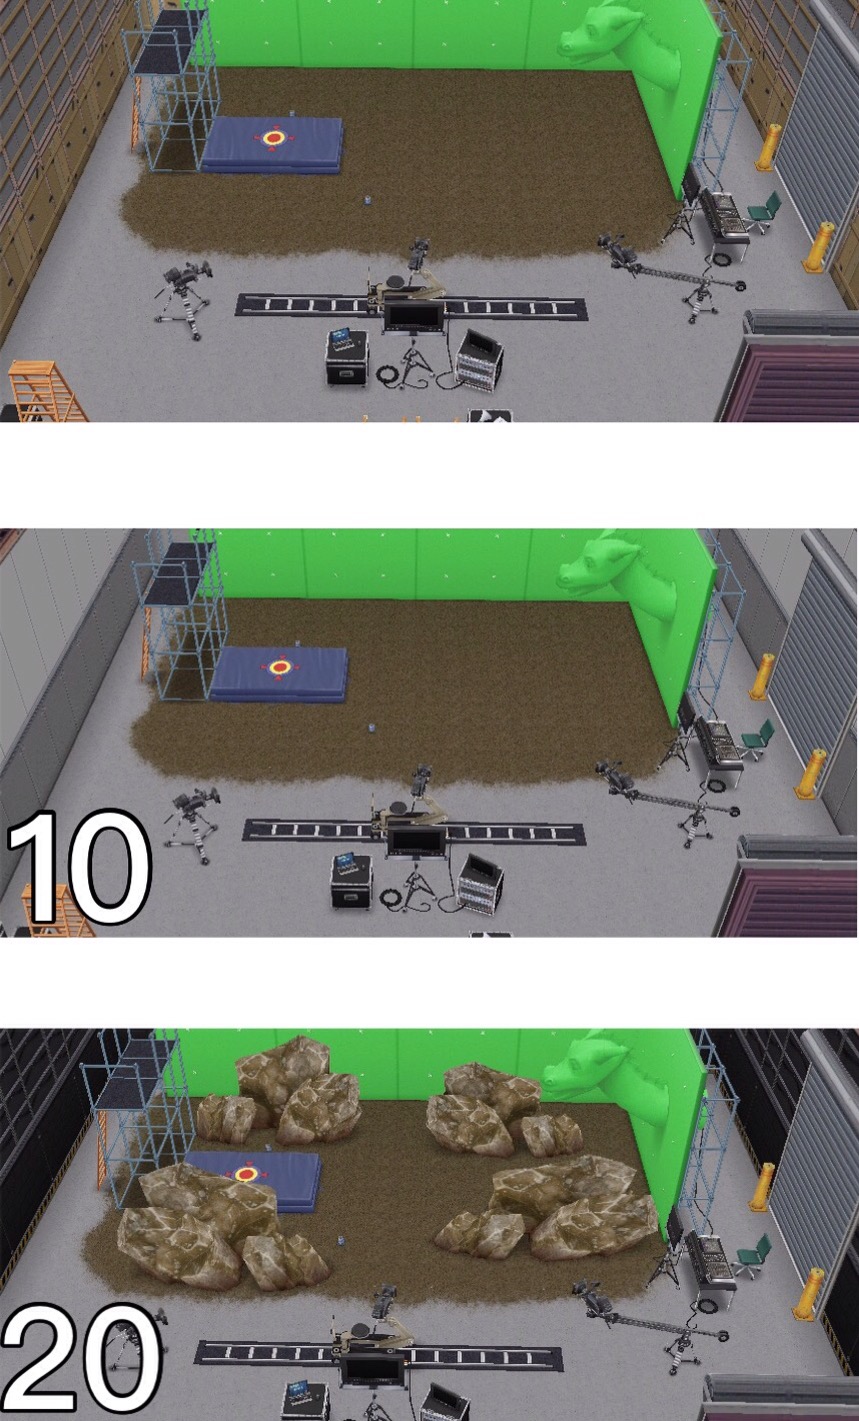
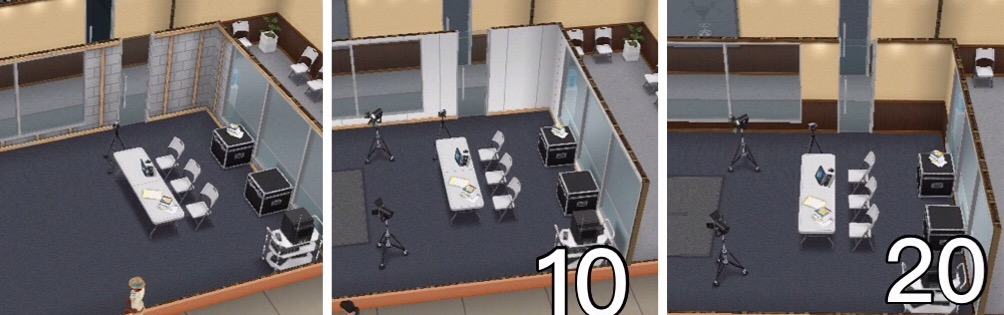
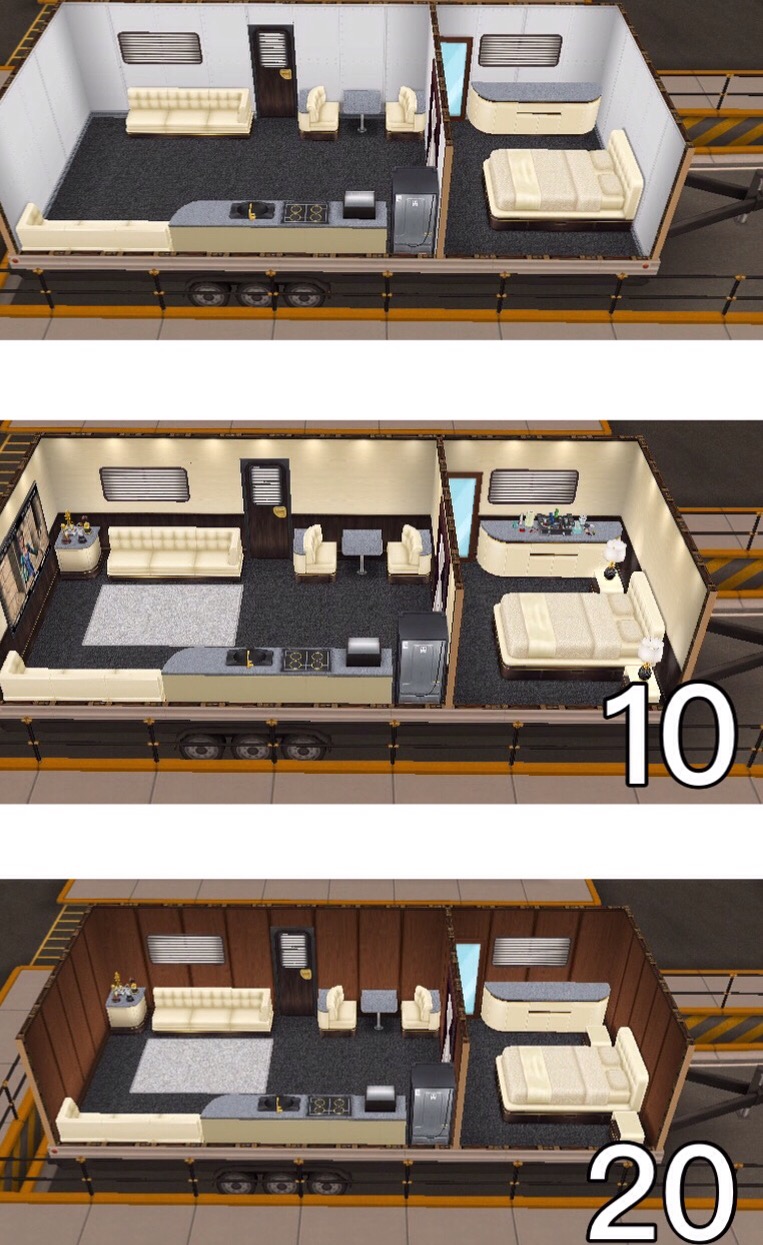
 When you upgrade each workstation to level 10 and 20 there will be a visual upgrade to the workstation, those pictures are shown below the table.
Janitor Closet– already built
| UPGRADE | UPGRADE | ACTION | ACTION | ACTION | |
|---|---|---|---|---|---|
| RESOURCES NEEDED | TIME TAKEN | TIME TAKEN | COINS REWARD | XP REWARD | |
| 1 |
|
5 seconds | 18 minutes | 115 | 180 |
| 2 |
|
1 hour | 17 minutes 6 seconds | 115 | 180 |
| 3 |
|
1 hour 15 minutes | 17 minutes 6 seconds | 121 | 180 |
| 4 |
|
1 hour 30 minutes | 17 minutes 6 seconds | 121 | 189 |
| 5 |
|
1 hour 45 minutes | 16 minutes 12 seconds | 121 | 189 |
| 6 |
|
2 hours | 16 minutes 12 seconds | 126 | 189 |
| 7 |
|
3 hours | 16 minutes 12 seconds | 126 | 198 |
| 8 |
|
4 hours | 15 minutes 18 seconds | 126 | 198 |
| 9 |
|
5 hours | 15 minutes 18 seconds | 132 | 198 |
| 10 | VISUAL UPGRADE
|
5 hours 30 minutes | 15 minutes 18 seconds | 132 | 207 |
| 11 |
|
6 hours | 14 minutes 24 seconds | 132 | 207 |
| 12 |
|
6 hours 30 minutes | 14 minutes 24 seconds | 138 | 207 |
| 13 |
|
7 hours | 14 minutes 24 seconds | 138 | 216 |
| 14 |
|
7 hours 30 minutes | 13 minutes 30 seconds | 138 | 216 |
| 15 |
|
8 hours | 13 minutes 30 seconds | 144 | 216 |
| 16 |
|
8 hours 30 minutes | 13 minutes 30 seconds | 144 | 225 |
| 17 |
|
9 hours | 12 minutes 36 seconds | 144 | 225 |
| 18 |
|
9 hours 30 minutes | 12 minutes 36 seconds | 149 | 225 |
| 19 |
|
10 hours | 12 minutes 36 seconds | 149 | 234 |
| 20 | VISUAL UPGRADE
& UPGRADE COMPLETE! |
– | 11 minutes 42 seconds | 149 | 234 |

Admin– already built
| UPGRADE | UPGRADE | ACTION | ACTION | ACTION | |
|---|---|---|---|---|---|
| RESOURCES NEEDED | TIME TAKEN | TIME TAKEN | COINS REWARD | XP REWARD | |
| 1 |
|
5 seconds | 24 minutes | 135 | 245 |
| 2 |
|
1 hour | 22 minutes 48 seconds | 135 | 245 |
| 3 |
|
1 hour 15 minutes | 22 minutes 48 seconds | 142 | 245 |
| 4 |
|
1 hour 30 minutes | 22 minutes 48 seconds | 142 | 257 |
| 5 |
|
1 hour 45 minutes | 21 minutes 36 seconds | 142 | 257 |
| 6 |
|
2 hours | 21 minutes 36 seconds | 148 | 257 |
| 7 |
|
3 hours | 21 minutes 36 seconds | 148 | 269 |
| 8 |
|
4 hours | 20 minutes 24 seconds | 148 | 269 |
| 9 |
|
5 hours | 20 minutes 24 seconds | 155 | 269 |
| 10 | VISUAL UPGRADE
|
5 hours 30 minutes | 20 minutes 24 seconds | 155 | 282 |
| 11 |
|
6 hours | 19 minutes 12 seconds | 155 | 282 |
| 12 |
|
6 hours 30 minutes | 19 minutes 12 seconds | 162 | 282 |
| 13 |
|
7 hours | 19 minutes 12 seconds | 162 | 294 |
| 14 |
|
7 hours 30 minutes | 18 minutes | 162 | 294 |
| 15 |
|
8 hours | 18 minutes | 169 | 294 |
| 16 |
|
8 hours 30 minutes | 18 minutes | 169 | 306 |
| 17 |
|
9 hours | 16 minutes 48 seconds | 169 | 306 |
| 18 |
|
9 hours 30 minutes | 16 minutes 48 seconds | 175 | 306 |
| 19 |
|
10 hours | 16 minutes 48 seconds | 175 | 318 |
| 20 | VISUAL UPGRADE
& UPGRADE COMPLETE! |
– | 15 minutes 36 seconds | 175 | 318 |

Physical Aid– already built
| UPGRADE | UPGRADE | ACTION | ACTION | ACTION | |
|---|---|---|---|---|---|
| RESOURCES NEEDED | TIME TAKEN | TIME TAKEN | COINS REWARD | XP REWARD | |
| 1 |
|
5 seconds | 30 minutes | 170 | 300 |
| 2 |
|
1 hour | 28 minutes 30 seconds | 170 | 300 |
| 3 |
|
1 hour 15 minutes | 28 minutes 30 seconds | 178 | 300 |
| 4 |
|
1 hour 30 minutes | 28 minutes 30 seconds | 178 | 315 |
| 5 |
|
1 hour 45 minutes | 27 minutes | 178 | 315 |
| 6 |
|
2 hours | 27 minutes | 187 | 315 |
| 7 |
|
3 hours | 27 minutes | 187 | 330 |
| 8 |
|
4 hours | 25 minutes 30 seconds | 187 | 330 |
| 9 |
|
5 hours | 25 minutes 30 seconds | 195 | 330 |
| 10 | VISUAL UPGRADE
|
5 hours 30 minutes | 25 minutes 30 seconds | 195 | 345 |
| 11 |
|
6 hours | 24 minutes | 195 | 345 |
| 12 |
|
6 hours 30 minutes | 24 minutes | 204 | 345 |
| 13 |
|
7 hours | 24 minutes | 204 | 360 |
| 14 |
|
7 hours 30 minutes | 22 minutes 30 seconds | 204 | 360 |
| 15 |
|
8 hours | 22 minutes 30 seconds | 212 | 360 |
| 16 |
|
8 hours 30 minutes | 22 minutes 30 seconds | 212 | 375 |
| 17 |
|
9 hours | 21 minutes | 212 | 375 |
| 18 |
|
9 hours 30 minutes | 21 minutes | 221 | 375 |
| 19 |
|
10 hours | 21 minutes | 221 | 390 |
| 20 | VISUAL UPGRADE
& UPGRADE COMPLETE! |
– | 19 minutes 30 seconds | 221 | 390 |

Nurse Workstations:
Pharmacy– reach level 6 Nurse to unlock:
- Costs 600 Bandage and 90 Thermometer to build, takes 6 hours
- Once built you can collect the IV Drip resource
| UPGRADE | UPGRADE | ACTION | ACTION | ACTION | |
|---|---|---|---|---|---|
| RESOURCES NEEDED | TIME TAKEN | TIME TAKEN | COINS REWARD | XP REWARD | |
| 1 |
|
5 seconds | 38 minutes | 200 | 405 |
| 2 |
|
1 hour | 36 minutes 6 seconds | 200 | 405 |
| 3 |
|
1 hour 15 minutes | 36 minutes 6 seconds | 210 | 405 |
| 4 |
|
1 hour 30 minutes | 36 minutes 6 seconds | 210 | 425 |
| 5 |
|
1 hour 45 minutes | 34 minutes 12 seconds | 210 | 425 |
| 6 |
|
2 hours | 34 minutes 12 seconds | 220 | 425 |
| 7 |
|
3 hours | 34 minutes 12 seconds | 220 | 445 |
| 8 |
|
4 hours | 32 minutes 18 seconds | 220 | 445 |
| 9 |
|
5 hours | 32 minutes 18 seconds | 230 | 445 |
| 10 | VISUAL UPGRADE
|
5 hours 30 minutes | 32 minutes 18 seconds | 230 | 466 |
| 11 |
|
6 hours | 30 minutes 24 seconds | 230 | 466 |
| 12 |
|
6 hours 30 minutes | 30 minutes 24 seconds | 240 | 466 |
| 13 |
|
7 hours | 30 minutes 24 seconds | 240 | 486 |
| 14 |
|
7 hours 30 minutes | 28 minutes 30 seconds | 240 | 486 |
| 15 |
|
8 hours | 28 minutes 30 seconds | 250 | 486 |
| 16 |
|
8 hours 30 minutes | 28 minutes 30 seconds | 250 | 506 |
| 17 |
|
9 hours | 26 minutes 36 seconds | 250 | 506 |
| 18 |
|
9 hours 30 minutes | 26 minutes 36 seconds | 260 | 506 |
| 19 |
|
10 hours | 26 minutes 36 seconds | 260 | 526 |
| 20 | VISUAL UPGRADE
& UPGRADE COMPLETE! |
– | 24 minutes 42 seconds | 260 | 526 |
Triage– reach level 7 Nurse to unlock:
- Costs 700 Bandage, 100 Thermometer and 150 IV Drip to build, takes 12 hours
| UPGRADE | UPGRADE | ACTION | ACTION | ACTION | |
|---|---|---|---|---|---|
| RESOURCES
NEEDED |
TIME | TIME | COINS | XP | |
| 1 |
3 Bandage |
5 seconds | 45 minutes | 240 | 495 |
| 2 | 5 Bandage 12 Medical Chart 1 Thermometer |
1 hour | 42 minutes
45 seconds |
240 | 495 |
| 3 | 8 Bandage 18 Medical Chart 1 Thermometer |
1 hour
15 minutes |
42 minutes
45 seconds |
252 | 495 |
| 4 | 10 Bandage 23 Medical Chart 2 Thermometer |
1 hour
30 minutes |
42 minutes
45 seconds |
252 | 520 |
| 5 | 12 Bandage 29 Medical Chart 2 Thermometer |
1 hour
45 minutes |
40 minutes
30 seconds |
252 | 520 |
| 6 | 15 Bandage 2 Thermometer 1 IV Drip |
2 hours | 40 minutes
30 seconds |
264 | 520 |
| 7 | 17 Bandage 3 Thermometer 1 IV Drip |
3 hours | 40 minutes
30 seconds |
264 | 544 |
| 8 | 20 Bandage 3 Thermometer 1 IV Drip |
4 hours | 38 minutes
15 seconds |
264 | 544 |
| 9 | 4 Thermometer 1 IV Drip 1 Blood Pressure |
5 hours | 38 minutes
15 seconds |
276 | 544 |
| 10 | VISUAL UPGRADE4 Thermometer 2 IV Drip 1 Blood Pressure |
5 hours
30 minutes |
38 minutes
15 seconds |
276 | 569 |
| 11 | 4 Thermometer 2 IV Drip 1 Blood Pressure |
6 hours | 36 minutes | 276 | 569 |
| 12 | 2 IV Drip 1 X-Ray 1 Blood Pressure |
6 hours
30 minutes |
36 minutes | 288 | 569 |
| 13 | 2 IV Drip 1 X-Ray 1 Blood Pressure |
7 hours | 36 minutes | 288 | 594 |
| 14 | 1 X-Ray 1 Blood Pressure 1 Heart Monitor |
7 hours
30 minutes |
33 minutes
45 seconds |
288 | 594 |
| 15 | 1 X-Ray 1 Blood Pressure 2 Heart Monitor |
8 hours | 33 minutes
45 seconds |
300 | 594 |
| 16 | 1 X-Ray 1 Blood Pressure 1 Golden Medkit |
8 hours
30 minutes |
33 minutes
45 seconds |
300 | 619 |
| 17 | 1 X-Ray 2 Blood Pressure 1 Golden Medkit |
9 hours | 31 minutes
30 seconds |
300 | 619 |
| 18 | 1 X-Ray 2 Blood Pressure 1 Golden Medkit |
9 hours
30 minutes |
31 minutes
30 seconds |
312 | 619 |
| 19 | 1 X-Ray 2 Blood Pressure 2 Golden Medkit |
10 hours | 31 minutes
30 seconds |
312 | 643 |
| 20 | VISUAL UPGRADE & UPGRADE COMPLETE! |
– | 29 minutes
15 seconds |
312 | 643 |
Radiology– reach level 8 Nurse to unlock:
- Costs 850 Bandage, 225 IV Drip and 150 Blood Pressure to build, takes 1 day
- Once built you can collect the X-Rays resource
| UPGRADE | UPGRADE | ACTION | ACTION | ACTION | |
|---|---|---|---|---|---|
| RESOURCES NEEDED | TIME TAKEN | TIME TAKEN | COINS REWARD | XP REWARD | |
| 1 |
|
5 seconds | 1 hour | 300 | 650 |
| 2 |
|
1 hour | 57 minutes | 300 | 650 |
| 3 |
|
1 hour 15 minutes | 57 minutes | 315 | 650 |
| 4 |
|
1 hour 30 minutes | 57 minutes | 315 | 682 |
| 5 |
|
1 hour 45 minutes | 54 minutes | 315 | 682 |
| 6 |
|
2 hours | 54 minutes | 330 | 682 |
| 7 |
|
3 hours | 54 minutes | 330 | 715 |
| 8 |
|
4 hours | 51 minutes | 330 | 715 |
| 9 |
|
5 hours | 51 minutes | 345 | 715 |
| 10 | VISUAL UPGRADE
|
5 hours 30 minutes | 51 minutes | 345 | 747 |
| 11 |
|
6 hours | 48 minutes | 345 | 747 |
| 12 |
|
6 hours 30 minutes | 48 minutes | 360 | 747 |
| 13 |
|
7 hours | 48 minutes | 360 | 780 |
| 14 |
|
7 hours 30 minutes | 45 minutes | 360 | 780 |
| 15 |
|
8 hours | 45 minutes | 375 | 780 |
| 16 |
|
8 hours 30 minutes | 45 minutes | 375 | 812 |
| 17 |
|
9 hours | 42 minutes | 375 | 812 |
| 18 |
|
9 hours 30 minutes | 42 minutes | 390 | 812 |
| 19 |
|
10 hours | 42 minutes | 390 | 845 |
| 20 | VISUAL UPGRADE
& UPGRADE COMPLETE! |
– | 39 minutes | 390 | 845 |
 Ward– reach level 9 Nurse to unlock:
- Costs 1,000 Bandage, 50 X-Rays and 3 Golden Medkit to build, takes 2 days
| UPGRADE | UPGRADE | ACTION | ACTION | ACTION | |
|---|---|---|---|---|---|
| RESOURCES NEEDED | TIME TAKEN | TIME TAKEN | COINS REWARD | XP REWARD | |
| 1 |
|
5 seconds | 1 hour 20 minutes | 415 | 800 |
| 2 |
|
1 hour | 1 hour 16 minutes | 415 | 800 |
| 3 |
|
1 hour 15 minutes | 1 hour 16 minutes | 436 | 800 |
| 4 |
|
1 hour 30 minutes | 1 hour 16 minutes | 436 | 840 |
| 5 |
|
1 hour 45 minutes | 1 hour 12 minutes | 436 | 840 |
| 6 |
|
2 hours | 1 hour 12 minutes | 456 | 840 |
| 7 |
|
3 hours | 1 hour 12 minutes | 456 | 880 |
| 8 |
|
4 hours | 1 hour 8 minutes | 456 | 880 |
| 9 |
|
5 hours | 1 hour 8 minutes | 477 | 880 |
| 10 | VISUAL UPGRADE
|
5 hours 30 minutes | 1 hour 8 minutes | 477 | 920 |
| 11 |
|
6 hours | 1 hour 4 minutes | 477 | 920 |
| 12 |
|
6 hours 30 minutes | 1 hour 4 minutes | 498 | 920 |
| 13 |
|
7 hours | 1 hour 4 minutes | 498 | 960 |
| 14 |
|
7 hours 30 minutes | 1 hour | 498 | 960 |
| 15 |
|
8 hours | 1 hour | 519 | 960 |
| 16 |
|
8 hours 30 minutes | 1 hour | 519 | 1,000 |
| 17 |
|
9 hours | 56 minutes | 519 | 1,000 |
| 18 |
|
9 hours 30 minutes | 56 minutes | 539 | 1,000 |
| 19 |
|
10 hours | 56 minutes | 539 | 1,040 |
| 20 | VISUAL UPGRADE
& UPGRADE COMPLETE! |
– | 52 minutes | 539 | 1,040 |

Doctor Workstations:
General Practice– reach level 6 Doctor to unlock:
- Costs 600 Medical Chart and 90 Thermometer to build, takes 6 hours
- Once built you can collect the Blood Pressure resource
| UPGRADE | UPGRADE | ACTION | ACTION | ACTION | |
|---|---|---|---|---|---|
| RESOURCES NEEDED | TIME TAKEN | TIME TAKEN | COINS REWARD | XP REWARD | |
| 1 |
|
5 seconds | 38 minutes | 200 | 405 |
| 2 |
|
1 hour | 36 minutes 6 seconds | 200 | 405 |
| 3 |
|
1 hour 15 minutes | 36 minutes 6 seconds | 210 | 405 |
| 4 |
|
1 hour 30 minutes | 36 minutes 6 seconds | 210 | 425 |
| 5 |
|
1 hour 45 minutes | 34 minutes 12 seconds | 210 | 425 |
| 6 |
|
2 hours | 34 minutes 12 seconds | 220 | 425 |
| 7 |
|
3 hours | 34 minutes 12 seconds | 220 | 445 |
| 8 |
|
4 hours | 32 minutes 18 seconds | 220 | 445 |
| 9 |
|
5 hours | 32 minutes 18 seconds | 230 | 445 |
| 10 | VISUAL UPGRADE
|
5 hours 30 minutes | 32 minutes 18 seconds | 230 | 466 |
| 11 |
|
6 hours | 30 minutes 24 seconds | 230 | 466 |
| 12 |
|
6 hours 30 minutes | 30 minutes 24 seconds | 240 | 466 |
| 13 |
|
7 hours | 30 minutes 24 seconds | 240 | 486 |
| 14 |
|
7 hours 30 minutes | 28 minutes 30 seconds | 240 | 486 |
| 15 |
|
8 hours | 28 minutes 30 seconds | 250 | 486 |
| 16 |
|
8 hours 30 minutes | 28 minutes 30 seconds | 250 | 506 |
| 17 |
|
9 hours | 26 minutes 36 seconds | 250 | 506 |
| 18 |
|
9 hours 30 minutes | 26 minutes 36 seconds | 260 | 506 |
| 19 |
|
10 hours | 26 minutes 36 seconds | 260 | 526 |
| 20 | VISUAL UPGRADE
& UPGRADE COMPLETE! |
– | 24 minutes 42 seconds | 260 | 526 |
 Psychiatrist’s Office– reach level 7 Doctor to unlock:
- Costs 700 Medical Chart, 100 Thermometer and 150 Blood Pressure to build, takes 12 hours
| UPGRADE | UPGRADE | ACTION | ACTION | ACTION | |
|---|---|---|---|---|---|
| RESOURCES
NEEDED |
TIME | TIME | COINS | XP | |
| 1 | 6 Bandage 3 Medical Chart |
5 seconds | 45 minutes | 240 | 495 |
| 2 | 12 Bandage 5 Medical Chart 1 Thermometer |
1 hour | 42 minutes
45 seconds |
240 | 495 |
| 3 | 18 Bandage 8 Medical Chart 1 Thermometer |
1 hour
15 minutes |
42 minutes
45 seconds |
252 | 495 |
| 4 | 23 Bandage 10 Medical Chart 2 Thermometer |
1 hour
30 minutes |
42 minutes
45 seconds |
252 | 520 |
| 5 | 29 Bandage 12 Medical Chart 2 Thermometer |
1 hour
45 minutes |
40 minutes
30 seconds |
252 | 520 |
| 6 | 15 Medical Chart 2 Thermometer 1 Blood Pressure |
2 hours | 40 minutes
30 seconds |
264 | 520 |
| 7 | 17 Medical Chart 3 Thermometer 1 Blood Pressure |
3 hours | 40 minutes
30 seconds |
264 | 544 |
| 8 | 20 Medical Chart 3 Thermometer 1 Blood Pressure |
4 hours | 38 minutes
15 seconds |
264 | 544 |
| 9 | 4 Thermometer 1 IV Drip 1 Blood Pressure |
5 hours | 38 minutes
15 seconds |
276 | 544 |
| 10 | VISUAL UPGRADE4 Thermometer 1 IV Drip 2 Blood Pressure |
5 hours
30 minutes |
38 minutes
15 seconds |
276 | 569 |
| 11 | 4 Thermometer 1 IV Drip 2 Blood Pressure |
6 hours | 36 minutes | 276 | 569 |
| 12 | 1 IV Drip 2 Blood Pressure 1 Heart Monitor |
6 hours
30 minutes |
36 minutes | 288 | 569 |
| 13 | 1 IV Drip 2 Blood Pressure 1 Heart Monitor |
7 hours | 36 minutes | 288 | 594 |
| 14 | 1 IV Drip 1 X-Ray 1 Heart Monitor |
7 hours
30 minutes |
33 minutes
45 seconds |
288 | 594 |
| 15 | 1 IV Drip 2 X-Ray 1 Heart Monitor |
8 hours | 33 minutes
45 seconds |
300 | 594 |
| 16 | 1 IV Drip 1 Heart Monitor 1 Golden Medkit |
8 hours
30 minutes |
33 minutes
45 seconds |
300 | 619 |
| 17 | 2 IV Drip 1 Heart Monitor 1 Golden Medkit |
9 hours | 31 minutes
30 seconds |
300 | 619 |
| 18 | 2 IV Drip 1 Heart Monitor 1 Golden Medkit |
9 hours
30 minutes |
31 minutes
30 seconds |
312 | 619 |
| 19 | 2 IV Drip 1 Heart Monitor 2 Golden Medkit |
10 hours | 31 minutes
30 seconds |
312 | 643 |
| 20 | VISUAL UPGRADE & UPGRADE COMPLETE! |
– | 29 minutes
15 seconds |
312 | 643 |
 Research Laboratory– reach level 8 Doctor to unlock:
- Costs 850 Medical Chart, 150 IV Drip and 225 Blood Pressure to build, takes 1 day
- Once built you can collect the Heart Monitor resource
| UPGRADE | UPGRADE | ACTION | ACTION | ACTION | |
|---|---|---|---|---|---|
| RESOURCES NEEDED | TIME TAKEN | TIME TAKEN | COINS REWARD | XP REWARD | |
| 1 |
|
5 seconds | 1 hour | 300 | 650 |
| 2 |
|
1 hour | 57 minutes | 300 | 650 |
| 3 |
|
1 hour 15 minutes | 57 minutes | 315 | 650 |
| 4 |
|
1 hour 30 minutes | 57 minutes | 315 | 682 |
| 5 |
|
1 hour 45 minutes | 54 minutes | 315 | 682 |
| 6 |
|
2 hours | 54 minutes | 330 | 682 |
| 7 |
|
3 hours | 54 minutes | 330 | 715 |
| 8 |
|
4 hours | 51 minutes | 330 | 715 |
| 9 |
|
5 hours | 51 minutes | 345 | 715 |
| 10 | VISUAL UPGRADE
|
5 hours 30 minutes | 51 minutes | 345 | 747 |
| 11 |
|
6 hours | 48 minutes | 345 | 747 |
| 12 |
|
6 hours 30 minutes | 48 minutes | 360 | 747 |
| 13 |
|
7 hours | 48 minutes | 360 | 780 |
| 14 |
|
7 hours 30 minutes | 45 minutes | 360 | 780 |
| 15 |
|
8 hours | 45 minutes | 375 | 780 |
| 16 |
|
8 hours 30 minutes | 45 minutes | 375 | 812 |
| 17 |
|
9 hours | 42 minutes | 375 | 812 |
| 18 |
|
9 hours 30 minutes | 42 minutes | 390 | 812 |
| 19 |
|
10 hours | 42 minutes | 390 | 845 |
| 20 | VISUAL UPGRADE
& UPGRADE COMPLETE! |
– | 39 minutes | 390 | 845 |
 Surgery Room– reach level 9 Doctor to unlock:
- Costs 1,000 Medical Chart, 50 Heart Monitor and 3 Golden Medkit to build, takes 2 days
| UPGRADE | UPGRADE | ACTION | ACTION | ACTION | |
|---|---|---|---|---|---|
| RESOURCES NEEDED | TIME TAKEN | TIME TAKEN | COINS REWARD | XP REWARD | |
| 1 |
|
5 seconds | 1 hour 20 minutes | 415 | 800 |
| 2 |
|
1 hour | 1 hour 16 minutes | 415 | 800 |
| 3 |
|
1 hour 15 minutes | 1 hour 16 minutes | 436 | 800 |
| 4 |
|
1 hour 30 minutes | 1 hour 16 minutes | 436 | 840 |
| 5 |
|
1 hour 45 minutes | 1 hour 12 minutes | 436 | 840 |
| 6 |
|
2 hours | 1 hour 12 minutes | 456 | 840 |
| 7 |
|
3 hours | 1 hour 12 minutes | 456 | 880 |
| 8 |
|
4 hours | 1 hour 8 minutes | 456 | 880 |
| 9 |
|
5 hours | 1 hour 8 minutes | 477 | 880 |
| 10 | VISUAL UPGRADE
|
5 hours 30 minutes | 1 hour 8 minutes | 477 | 920 |
| 11 |
|
6 hours | 1 hour 4 minutes | 477 | 920 |
| 12 |
|
6 hours 30 minutes | 1 hour 4 minutes | 498 | 920 |
| 13 |
|
7 hours | 1 hour 4 minutes | 498 | 960 |
| 14 |
|
7 hours 30 minutes | 1 hour | 498 | 960 |
| 15 |
|
8 hours | 1 hour | 519 | 960 |
| 16 |
|
8 hours 30 minutes | 1 hour | 519 | 1,000 |
| 17 |
|
9 hours | 56 minutes | 519 | 1,000 |
| 18 |
|
9 hours 30 minutes | 56 minutes | 539 | 1,000 |
| 19 |
|
10 hours | 56 minutes | 539 | 1,040 |
| 20 | VISUAL UPGRADE
& UPGRADE COMPLETE! |
– | 52 minutes | 539 | 1,040 |
NOTE: you can only upgrade one workstation at a time unless you are VIP
Are there items for my home that can increase my sims job level? So far there isn’t anything for the medical staff career
Orange Suitcase? Can’t send your sims to work?
 This is because you have already sent them to work once today, if you are VIP level 1 you can send them to work twice in a day (this will cost you 15LPs still if you are VIP)
Wait until tomorrow and you will be able to send them to work again without being VIP.
Do I need to be VIP to use the hospital?
NO! If you are VIP you can send your sims to work twice a day (VIP level 1), upgrade more than one workstation at a time (VIP level 7) and use the mega spin (VIP level 2) but you do not have to be VIP
Got questions about Professions? Check out the FAQs here before asking!
Other Profession Careers: Police & Filmmaker
Thanks for reading!
THE SIMS FREEPLAY
©THEGIRLWHOGAMES.BLOG
The Sims Freeplay- Profession Careers: Filmmaker
Once you build the Movie Studio you can begin the Filmmaker career:

This is a profession career so its a little different from a normal career as you can actually go to work with 2 of your sims and help them during their work day!
You can either go to work with your sims or send them to work offsite, if you send them to work offsite this means you won’t see them at the movie studio. But you can go to work with your sim if you select send sim alone or accompany sim and then they can help sims and earn resources (only two sims can be at the movie studio at one time, all other sims with this career have to work offsite)
When you send a sim to work at the movie studio sims will enter with bubbles above their heads, you need to click on this bubble and select one of the tasks that appears, the amount of grey sections there are tells you how many tasks you have to complete before you earn the reward that is pictured in the middle of the bubble:

Once you have built the movie studio 3 workstations will already be unlocked (Security Booth, Catering Area and Golf Cart) so you can start helping sims by completing actions using these workstations, you will see options similar to the image below when you click on one of the bubbles:
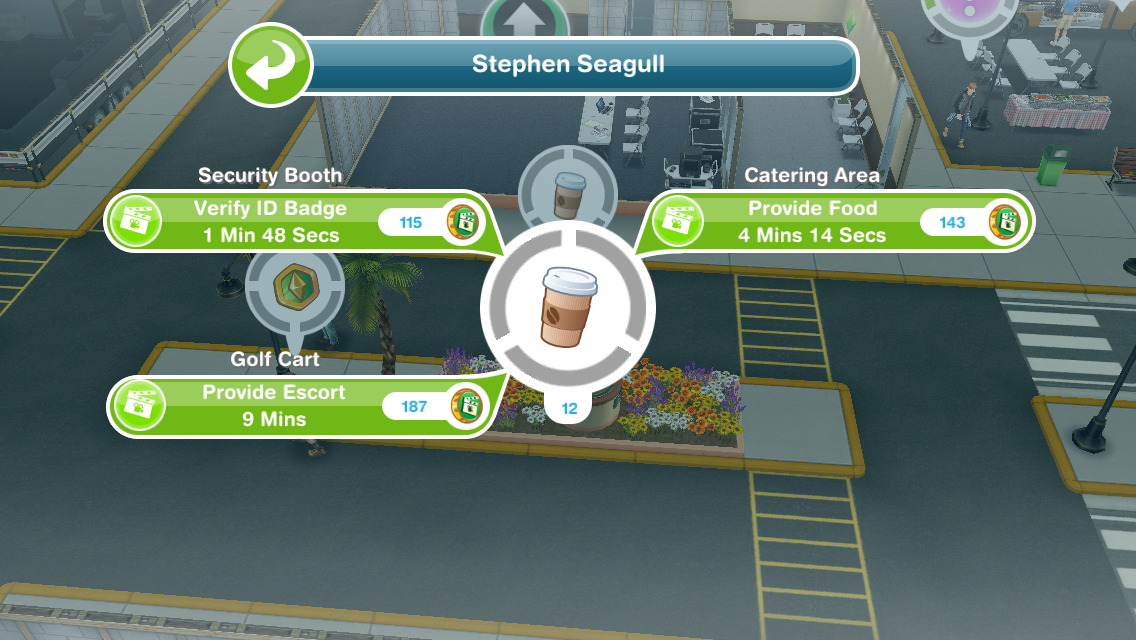
Each of these tasks has to be completed in a different workstation so verify ID badge has to take place using the security booth, provide food uses the catering area and provide escort uses the golf cart
TIP: if you are unsure which workstation is required it tells you above the action!
Only one sim can use a workstation at one time (new tasks will be added when you unlock new workstations, keep reading for more information)
Each time your sims complete a task (that section will turn from grey to green) a movie coin bubble will appear above their head, click this and they will earn movie coins and XPs, the experience points are towards levelling up, so they will level up quicker than if you just sent them to work.
Once all the tasks have been completed all the grey sections will now appear green, click on this to receive your reward (the rewards are movie coins and resources used to upgrade the different workstations at the movie studio):

I am not going to go into too much detail about how to complete Profession Careers here, if you are still unsure check out my Guide to Profession Careers for more information on how they work!
HOURS
You can send your sims to work anytime for 8 hours but if you are helping sims they can finish early if they reach the quota, they need to help 15 sims (you need to complete all the tasks for a sim to have helped 1 sim) during their shift, then they will end their shift early and you earn extra movie coins and resources. Both sims can help the same sims and each time one of them finishes helping a sim they will both have helped one sim:

If they are working offsite they will just work for 8 hours and they won’t earn any resources as they won’t be helping any sims.
LEVELS
All sims completing this career will be able to reach level 6:
| LEVEL | MONEY | XPs |
|---|---|---|
| 1 Tea Maker | S1,310 | 360 |
| 2 Set Cleaner | S1,430 | 650 |
| 3 Runner | S1,520 | 980 |
| 4 Extra | S1,670 | 1,030 |
| 5 Assistant | S1,860 | 1,140 |
| 6 Assistant | S1,890 | 1,320 |
Then only 2 sims, once they reach level 6 can choose to be either a Director or Performer only one sim can be a director and one sim can be a performer, all other sims will stay as level 6 assistant.
Director– when your sim specialises as the Director they can continue to level up and unlock more workstations:
| LEVEL | MONEY | XPs | WORKSTATION UNLOCKED |
|---|---|---|---|
| 6 Production Assistant | S1,890 | 1,320 | Costume Department |
| 7 Script Supervisor | S1,920 | 1,500 | Hair and Makeup Department |
| 8 First Assistant Director | S1,950 | 1,680 | Stunt Set |
| 9 Production Manager | S1,980 | 1,860 | Directors’s Trailer |
| 10 Director | S2,010 | 2,040 | – |
Once you unlock the workstation you have to use the resources to build it before you can help sims using these workstations, only the director will be able to complete tasks to help sims that require one of the workstations above. I will be going into detail about workstations later in this post.
Performer– when your sim specialises as the Performer they can continue to level up and unlock more workstations:
| LEVEL | MONEY | XPs | WORKSTATION UNLOCKED |
|---|---|---|---|
| 6 Stand In Actor | S1,890 | 1,320 | Audition Room |
| 7 Soap Actor | S1,920 | 1,500 | Voice Over Booth |
| 8 B Movie Actor | S1,950 | 1,680 | Film Set |
| 9 Lead Actor | S1,980 | 1,860 | A List Celebrity Trailer |
| 10 A List Actor | S2,010 | 2,040 | – |
Once you unlock the workstation you have to use the resources to build it before you can help sims using these workstations, only the performer will be able to complete tasks to help sims that require one of the workstations above. I will be going into detail about workstations later in this post.
When your sim specialises they have to fulfil profession badges before they can level up (check the occupations tab to find out what you need to do to complete this):

Each sim can only earn one badge per shift and you need all badges before you will be able to level up in this career
Badges needed:
| Level | Director | Performer |
|---|---|---|
| 6 | Help 3 Sims | Help 3 Sims |
| 6 | Collect 5,000 coins | Collect 5,000 coins |
| 6 | Help 2 Important Sims | Help 2 Important Sims |
| 7 | Help 11 Sims | Help 11 Sims |
| 7 | Collect 10 Award Statue Resources | Collect 10 Ticket Stub Resources |
| 7 | Collect 6,000 coins | Collect 6,000 coins |
| 7 | Help 2 Important Sims | Help 2 Important Sims |
| 8 | Collect 20 3D Glasses Resources | Collect 20 3D Glasses Resources |
| 8 | Collect 7,000 coins | Collect 7,000 coins |
| 8 | Help 12 Sims | Help 12 Sims |
| 8 | Help 2 Important Sims | Help 2 Important Sims |
| 8 | Collect 3 Film Reel Resources | Collect 3 Script Resources |
| 9 | Collect 8,000 coins | Collect 8,000 coins |
| 9 | Help 7 Sims | Help 7 Sims |
| 9 | Help 2 Important Sims | Help 2 Important Sims |
| 9 | Collect 5 Film Reel Resources | Collect 5 Script Resources |
| 9 | Collect 10,000 coins | Collect 10,000 coins |
| 9 | Help 8 Sims | Help 8 Sims |
If you don’t manage to complete a badge in a shift the progress for that badge will reset and you will have to start again on the next shift (for example, if your task is to help 2 important sims and you only help one, in your next shift it will reset so you will have to help 2 important sims in that shift to get the badge)
Each level requires you to complete more badges, you cannot level up until all the badges have been collected.
Who are the important sims I need to help to get a badge?
These are the sims with question marks in the bubbles above their heads:

When you reach level 10 in a profession career you unlock the work outfit in that specialist for a female and male adult sim to wear at any time, you can find these in the wardrobe under outfits:

Remember:
- You can only go to work with 2 sims at a time, all other sims in this career will work offsite so you won’t see them during the day
- Only one sim can use a workstation at one time
- If you don’t know how Profession Careers work read my guide
Workstations
The workstations require resources to upgrade them so the time an action takes will decrease and the coins and XPs you earn for each action will increase. The resources are shown below:

Some resources are not unlocked yet, build new workstations to unlock them
 You can see the resources you have in the second tab of the professions menu under storage (you can access this using the button in the top left hand corner of your screen when you are at the movie studio)
In the professions menu you can see:
- Workplace Overview- here you can see the workstations you have currently unlocked, what level you are on and what resources you need to upgrade them
- Storage- this is where you see your current resources collected and on the right hand side is your movie coins, the movie coins are used to increase your storage if you need to and trade for resources (which is in the next tab)
- Resource Exchange- here you can either spin for resources using simoleons or LPs for the mega spin as well as trade movie coins for resources
The tables below show the upgrade resources needed, the time each upgrade will take and the time an action takes and the amount of coins and XPs you earn when you complete each action, only one of these will upgrade each time so if the time taken decreases then the amount of coins and XPs you earn will stay the same until you upgrade again and then the amount of coins you earn will increase while the time taken and XPs will stay the same.
NOTE: you can only upgrade one workstation at a time unless you are VIP
If you don’t have the amount of resources you need it will say it costs LPs, when you have the right amount of resources you can build/ upgrade the workstation without LPs (you know you have all the resources you need when there are ticks next to all the resources):
 When you upgrade each workstation to level 10 and 20 there will be a visual upgrade to the workstation, those pictures are shown below the table.
Security Booth– already built
| UPGRADE | UPGRADE | ACTION | ACTION | ACTION | |
|---|---|---|---|---|---|
| RESOURCES NEEDED | TIME TAKEN | TIME TAKEN | COINS REWARD | XP REWARD | |
| 1 |
|
5 seconds | 2 minutes | 105 | 75 |
| 2 |
|
1 hour | 1 minute 54 seconds | 105 | 75 |
| 3 |
|
1 hour 15 minutes | 1 minute 54 seconds | 110 | 75 |
| 4 |
|
1 hour 30 minutes | 1 minute 54 seconds | 110 | 79 |
| 5 |
|
1 hour 45 minutes | 1 minute 48 seconds | 110 | 79 |
| 6 |
|
2 hours | 1 minute 48 seconds | 115 | 79 |
| 7 |
|
3 hours | 1 minute 48 seconds | 115 | 82 |
| 8 |
|
4 hours | 1 minute 42 seconds | 115 | 82 |
| 9 |
|
5 hours | 1 minute 42 seconds | 121 | 82 |
| 10 | VISUAL UPGRADE
|
5 hours 30 minutes | 1 minute 42 seconds | 121 | 86 |
| 11 |
|
6 hours | 1 minute 36 seconds | 121 | 86 |
| 12 |
|
6 hours 30 minutes | 1 minute 36 seconds | 126 | 86 |
| 13 |
|
7 hours | 1 minute 36 seconds | 126 | 90 |
| 14 |
|
7 hours 30 minutes | 1 minute 30 seconds | 126 | 90 |
| 15 |
|
8 hours | 1 minute 30 seconds | 131 | 90 |
| 16 |
|
8 hours 30 minutes | 1 minute 30 seconds | 131 | 94 |
| 17 |
|
9 hours | 1 minute 24 seconds | 131 | 94 |
| 18 |
|
9 hours 30 minutes | 1 minute 24 seconds | 136 | 94 |
| 19 |
|
10 hours | 1 minute 24 seconds | 136 | 97 |
| 20 | VISUAL UPGRADE
& UPGRADE COMPLETE! |
– | 1 minute 18 seconds | 136 | 97 |

Catering Area– already built
| UPGRADE | UPGRADE | ACTION | ACTION | ACTION | |
|---|---|---|---|---|---|
| RESOURCES NEEDED | TIME TAKEN | TIME TAKEN | COINS REWARD | XP REWARD | |
| 1 |
|
5 seconds | 5 minutes | 130 | 100 |
| 2 |
|
1 hour | 4 minutes 45 seconds | 130 | 100 |
| 3 |
|
1 hour 15 minutes | 4 minutes 45 seconds | 137 | 100 |
| 4 |
|
1 hour 30 minutes | 4 minutes 45 seconds | 137 | 105 |
| 5 |
|
1 hour 45 minutes | 4 minutes 30 seconds | 137 | 105 |
| 6 |
|
2 hours | 4 minutes 30 seconds | 143 | 105 |
| 7 |
|
3 hours | 4 minutes 30 seconds | 143 | 110 |
| 8 |
|
4 hours | 4 minutes 15 seconds | 143 | 110 |
| 9 |
|
5 hours | 4 minutes 15 seconds | 149 | 110 |
| 10 | VISUAL UPGRADE
|
5 hours 30 minutes | 4 minutes 15 seconds | 149 | 115 |
| 11 |
|
6 hours | 4 minutes | 149 | 115 |
| 12 |
|
6 hours 30 minutes | 4 minutes | 156 | 115 |
| 13 |
|
7 hours | 4 minutes | 156 | 120 |
| 14 |
|
7 hours 30 minutes | 3 minutes 45 seconds | 156 | 120 |
| 15 |
|
8 hours | 3 minutes 45 seconds | 162 | 120 |
| 16 |
|
8 hours 30 minutes | 3 minutes 45 seconds | 162 | 125 |
| 17 |
|
9 hours | 3 minutes 30 seconds | 162 | 125 |
| 18 |
|
9 hours 30 minutes | 3 minutes 30 seconds | 169 | 125 |
| 19 |
|
10 hours | 3 minutes 30 seconds | 169 | 130 |
| 20 | VISUAL UPGRADE
& UPGRADE COMPLETE! |
– | 3 minutes 15 seconds | 169 | 130 |

Golf Cart– already built
| UPGRADE | UPGRADE | ACTION | ACTION | ACTION | |
|---|---|---|---|---|---|
| RESOURCES NEEDED | TIME TAKEN | TIME TAKEN | COINS REWARD | XP REWARD | |
| 1 |
|
5 seconds | 10 minutes | 170 | 165 |
| 2 |
|
1 hour | 9 minutes 30 seconds | 170 | 165 |
| 3 |
|
1 hour 15 minutes | 9 minutes 30 seconds | 178 | 165 |
| 4 |
|
1 hour 30 minutes | 9 minutes 30 seconds | 178 | 173 |
| 5 |
|
1 hour 45 minutes | 9 minutes | 178 | 173 |
| 6 |
|
2 hours | 9 minutes | 187 | 173 |
| 7 |
|
3 hours | 9 minutes | 187 | 181 |
| 8 |
|
4 hours | 8 minutes 30 seconds | 187 | 181 |
| 9 |
|
5 hours | 8 minutes 30 seconds | 195 | 181 |
| 10 | VISUAL UPGRADE
|
5 hours 30 minutes | 8 minutes 30 seconds | 195 | 190 |
| 11 |
|
6 hours | 8 minutes | 195 | 190 |
| 12 |
|
6 hours 30 minutes | 8 minutes | 204 | 190 |
| 13 |
|
7 hours | 8 minutes | 204 | 198 |
| 14 |
|
7 hours 30 minutes | 7 minutes 30 seconds | 204 | 198 |
| 15 |
|
8 hours | 7 minutes 30 seconds | 212 | 198 |
| 16 |
|
8 hours 30 minutes | 7 minutes 30 seconds | 212 | 206 |
| 17 |
|
9 hours | 7 minutes | 212 | 206 |
| 18 |
|
9 hours 30 minutes | 7 minutes | 221 | 206 |
| 19 |
|
10 hours | 7 minutes | 221 | 214 |
| 20 | VISUAL UPGRADE
& UPGRADE COMPLETE! |
– | 6 minutes 30 seconds | 221 | 214 |

Director Workstations:
Costume Department– reach level 6 Director to unlock:
-
- Costs 600 Popcorn and 140 3D Glasses to build, takes 6 hours
- Once built you can collect the Award Statue resource
| UPGRADE | UPGRADE | ACTION | ACTION | ACTION | |
|---|---|---|---|---|---|
| RESOURCES NEEDED | TIME TAKEN | TIME TAKEN | COINS REWARD | XP REWARD | |
| 1 |
|
5 seconds | 30 minutes | 255 | 330 |
| 2 |
|
1 hour | 28 minutes 30 seconds | 255 | 330 |
| 3 |
|
1 hour 15 minutes | 28 minutes 30 seconds | 268 | 330 |
| 4 |
|
1 hour 30 minutes | 28 minutes 30 seconds | 268 | 346 |
| 5 |
|
1 hour 45 minutes | 27 minutes | 268 | 346 |
| 6 |
|
2 hours | 27 minutes | 280 | 346 |
| 7 |
|
3 hours | 27 minutes | 280 | 363 |
| 8 |
|
4 hours | 25 minutes 30 seconds | 280 | 363 |
| 9 |
|
5 hours | 25 minutes 30 seconds | 293 | 363 |
| 10 | VISUAL UPGRADE
|
5 hours 30 minutes | 25 minutes 30 seconds | 293 | 379 |
| 11 |
|
6 hours | 24 minutes | 293 | 379 |
| 12 |
|
6 hours 30 minutes | 24 minutes | 306 | 379 |
| 13 |
|
7 hours | 24 minutes | 306 | 396 |
| 14 |
|
7 hours 30 minutes | 22 minutes 30 seconds | 306 | 396 |
| 15 |
|
8 hours | 22 minutes 30 seconds | 319 | 396 |
| 16 |
|
8 hours 30 minutes | 22 minutes 30 seconds | 319 | 412 |
| 17 |
|
9 hours | 21 minutes | 319 | 412 |
| 18 |
|
9 hours 30 minutes | 21 minutes | 331 | 412 |
| 19 |
|
10 hours | 21 minutes | 331 | 429 |
| 20 | VISUAL UPGRADE
& UPGRADE COMPLETE! |
– | 19 minutes 30 seconds | 331 | 429 |

Hair and Makeup Department– reach level 7 Director to unlock:
- Costs 700 Popcorn, 150 3D Glasses and 200 Award Statue to build, takes 12 hours
| UPGRADE | UPGRADE | ACTION | ACTION | ACTION | |
|---|---|---|---|---|---|
| RESOURCES NEEDED | TIME TAKEN | TIME TAKEN | COINS REWARD | XP REWARD | |
| 1 |
|
5 seconds | 50 minutes | 300 | 550 |
| 2 |
|
1 hour | 47 minutes 30 seconds | 300 | 550 |
| 3 |
|
1 hour 15 minutes | 47 minutes 30 seconds | 315 | 550 |
| 4 |
|
1 hour 30 minutes | 47 minutes 30 seconds | 315 | 578 |
| 5 |
|
1 hour 45 minutes | 45 minutes | 315 | 578 |
| 6 |
|
2 hours | 45 minutes | 330 | 578 |
| 7 |
|
3 hours | 45 minutes | 330 | 605 |
| 8 |
|
4 hours | 42 minutes 30 seconds | 330 | 605 |
| 9 |
|
5 hours | 42 minutes 30 seconds | 345 | 605 |
| 10 | VISUAL UPGRADE
|
5 hours 30 minutes | 42 minutes 30 seconds | 345 | 632 |
| 11 |
|
6 hours | 40 minutes | 345 | 632 |
| 12 |
|
6 hours 30 minutes | 40 minutes | 360 | 632 |
| 13 |
|
7 hours | 40 minutes | 360 | 660 |
| 14 |
|
7 hours 30 minutes | 37 minutes 30 seconds | 360 | 660 |
| 15 |
|
8 hours | 37 minutes 30 seconds | 375 | 660 |
| 16 |
|
8 hours 30 minutes | 37 minutes 30 seconds | 375 | 687 |
| 17 |
|
9 hours | 35 minutes | 375 | 687 |
| 18 |
|
9 hours 30 minutes | 35 minutes | 390 | 687 |
| 19 |
|
10 hours | 35 minutes | 390 | 715 |
| 20 | VISUAL UPGRADE
& UPGRADE COMPLETE! |
– | 32 minutes 30 seconds | 390 | 715 |
Stunt Set– reach level 8 Director to unlock:
- Costs 800 Popcorn, 150 Ticket Stub and 200 Award Statue to build, takes 1 day
- Once built you can collect the Film Reel resource
| UPGRADE | UPGRADE | ACTION | ACTION | ACTION | |
|---|---|---|---|---|---|
| RESOURCES NEEDED | TIME TAKEN | TIME TAKEN | COINS REWARD | XP REWARD | |
| 1 |
|
5 seconds | 1 hour 20 minutes | 465 | 925 |
| 2 |
|
1 hour | 1 hour 16 minutes | 465 | 925 |
| 3 |
|
1 hour 15 minutes | 1 hour 16 minutes | 488 | 925 |
| 4 |
|
1 hour 30 minutes | 1 hour 16 minutes | 488 | 971 |
| 5 |
|
1 hour 45 minutes | 1 hour 12 minutes | 488 | 971 |
| 6 |
|
2 hours | 1 hour 12 minutes | 511 | 971 |
| 7 |
|
3 hours | 1 hour 12 minutes | 511 | 1,017 |
| 8 |
|
4 hours | 1 hour 8 minutes | 511 | 1,017 |
| 9 |
|
5 hours | 1 hour 8 minutes | 535 | 1,017 |
| 10 | VISUAL UPGRADE
|
5 hours 30 minutes | 1 hour 8 minutes | 535 | 1,064 |
| 11 |
|
6 hours | 1 hour 4 minutes | 535 | 1,064 |
| 12 |
|
6 hours 30 minutes | 1 hour 4 minutes | 558 | 1,064 |
| 13 |
|
7 hours | 1 hour 4 minutes | 558 | 1,110 |
| 14 |
|
7 hours 30 minutes | 1 hour | 558 | 1,110 |
| 15 |
|
8 hours | 1 hour | 581 | 1,110 |
| 16 |
|
8 hours 30 minutes | 1 hour | 581 | 1,156 |
| 17 |
|
9 hours | 56 minutes | 581 | 1,156 |
| 18 |
|
9 hours 30 minutes | 56 minutes | 604 | 1,156 |
| 19 |
|
10 hours | 56 minutes | 604 | 1,202 |
| 20 | VISUAL UPGRADE
& UPGRADE COMPLETE! |
– | 52 minutes | 604 | 1,202 |
Director’s Trailer– reach level 9 Director to unlock:
- Costs 1,000 Popcorn, 75 Film Reel and 3 Golden Clapper to build, takes 2 days
| UPGRADE | UPGRADE | ACTION | ACTION | ACTION | |
|---|---|---|---|---|---|
| RESOURCES NEEDED | TIME TAKEN | TIME TAKEN | COINS REWARD | XP REWARD | |
| 1 |
|
5 seconds | 2 hours 10 minutes | 650 | 1,150 |
| 2 |
|
1 hour | 2 hours 3 minutes | 650 | 1,150 |
| 3 |
|
1 hour 15 minutes | 2 hours 3 minutes | 682 | 1,150 |
| 4 |
|
1 hour 30 minutes | 2 hours 3 minutes | 682 | 1,208 |
| 5 |
|
1 hour 45 minutes | 1 hour 57 minutes | 682 | 1,208 |
| 6 |
|
2 hours | 1 hour 57 minutes | 715 | 1,208 |
| 7 |
|
3 hours | 1 hour 57 minutes | 715 | 1,265 |
| 8 |
|
4 hours | 1 hour 50 minutes | 715 | 1,265 |
| 9 |
|
5 hours | 1 hour 50 minutes | 747 | 1,265 |
| 10 | VISUAL UPGRADE
|
5 hours 30 minutes | 1 hour 50 minutes | 747 | 1,322 |
| 11 |
|
6 hours | 1 hour 44 minutes | 747 | 1,322 |
| 12 |
|
6 hours 30 minutes | 1 hour 44 minutes | 780 | 1,322 |
| 13 |
|
7 hours | 1 hour 44 minutes | 780 | 1,380 |
| 14 |
|
7 hours 30 minutes | 1 hour 37 minutes | 780 | 1,380 |
| 15 |
|
8 hours | 1 hour 37 minutes | 812 | 1,380 |
| 16 |
|
8 hours 30 minutes | 1 hour 37 minutes | 812 | 1,437 |
| 17 |
|
9 hours | 1 hour 31 minutes | 812 | 1,437 |
| 18 |
|
9 hours 30 minutes | 1 hour 31 minutes | 845 | 1,437 |
| 19 |
|
10 hours | 1 hour 31 minutes | 845 | 1,495 |
| 20 | VISUAL UPGRADE
& UPGRADE COMPLETE! |
– | 1 hour 24 minutes | 845 | 1,495 |

Performer Workstations:
Audition Room– reach level 6 Performer to unlock:
- Costs 600 Coffee and 140 3D Glasses to build, takes 6 hours
- Once built you can collect the Ticket Stub resource
| UPGRADE | UPGRADE | ACTION | ACTION | ACTION | |
|---|---|---|---|---|---|
| RESOURCES NEEDED | TIME TAKEN | TIME TAKEN | COINS REWARD | XP REWARD | |
| 1 |
|
5 seconds | 30 minutes | 255 | 330 |
| 2 |
|
1 hour | 28 minutes 30 seconds | 255 | 330 |
| 3 |
|
1 hour 15 minutes | 28 minutes 30 seconds | 268 | 330 |
| 4 |
|
1 hour 30 minutes | 28 minutes 30 seconds | 268 | 346 |
| 5 |
|
1 hour 45 minutes | 27 minutes | 268 | 346 |
| 6 |
|
2 hours | 27 minutes | 280 | 346 |
| 7 |
|
3 hours | 27 minutes | 280 | 363 |
| 8 |
|
4 hours | 25 minutes 30 seconds | 280 | 363 |
| 9 |
|
5 hours | 25 minutes 30 seconds | 293 | 363 |
| 10 | VISUAL UPGRADE
|
5 hours 30 minutes | 25 minutes 30 seconds | 293 | 379 |
| 11 |
|
6 hours | 24 minutes | 293 | 379 |
| 12 |
|
6 hours 30 minutes | 24 minutes | 306 | 379 |
| 13 |
|
7 hours | 24 minutes | 306 | 396 |
| 14 |
|
7 hours 30 minutes | 22 minutes 30 seconds | 306 | 396 |
| 15 |
|
8 hours | 22 minutes 30 seconds | 319 | 396 |
| 16 |
|
8 hours 30 minutes | 22 minutes 30 seconds | 319 | 412 |
| 17 |
|
9 hours | 21 minutes | 319 | 412 |
| 18 |
|
9 hours 30 minutes | 21 minutes | 331 | 412 |
| 19 |
|
10 hours | 21 minutes | 331 | 429 |
| 20 | VISUAL UPGRADE
& UPGRADE COMPLETE! |
– | 19 minutes 30 seconds | 331 | 429 |
Voice-over Booth– reach level 7 Performer to unlock:
- Costs 700 Coffee, 150 3D Glasses and 200 Ticket Stub to build, takes 12 hours
| UPGRADE | UPGRADE | ACTION | ACTION | ACTION | |
|---|---|---|---|---|---|
| RESOURCES NEEDED | TIME TAKEN | TIME TAKEN | COINS REWARD | XP REWARD | |
| 1 |
|
5 seconds | 50 minutes | 300 | 550 |
| 2 |
|
1 hour | 47 minutes 30 seconds | 300 | 550 |
| 3 |
|
1 hour 15 minutes | 47 minutes 30 seconds | 315 | 550 |
| 4 |
|
1 hour 30 minutes | 47 minutes 30 seconds | 315 | 578 |
| 5 |
|
1 hour 45 minutes | 45 minutes | 315 | 578 |
| 6 |
|
2 hours | 45 minutes | 330 | 578 |
| 7 |
|
3 hours | 45 minutes | 330 | 605 |
| 8 |
|
4 hours | 42 minutes 30 seconds | 330 | 605 |
| 9 |
|
5 hours | 42 minutes 30 seconds | 345 | 605 |
| 10 | VISUAL UPGRADE
|
5 hours 30 minutes | 42 minutes 30 seconds | 345 | 632 |
| 11 |
|
6 hours | 40 minutes | 345 | 632 |
| 12 |
|
6 hours 30 minutes | 40 minutes | 360 | 632 |
| 13 |
|
7 hours | 40 minutes | 360 | 660 |
| 14 |
|
7 hours 30 minutes | 37 minutes 30 seconds | 360 | 660 |
| 15 |
|
8 hours | 37 minutes 30 seconds | 375 | 660 |
| 16 |
|
8 hours 30 minutes | 37 minutes 30 seconds | 375 | 687 |
| 17 |
|
9 hours | 35 minutes | 375 | 687 |
| 18 |
|
9 hours 30 minutes | 35 minutes | 390 | 687 |
| 19 |
|
10 hours | 35 minutes | 390 | 715 |
| 20 | VISUAL UPGRADE
& UPGRADE COMPLETE! |
– | 32 minutes 30 seconds | 390 | 715 |

Film Set– reach level 8 Performer to unlock:
- Costs 800 Coffee, 200 Ticket Stub and 150 Award Statue to build, takes 1 day
- Once built you can collect the Script resource
| UPGRADE | UPGRADE | ACTION | ACTION | ACTION | |
|---|---|---|---|---|---|
| RESOURCES NEEDED | TIME TAKEN | TIME TAKEN | COINS REWARD | XP REWARD | |
| 1 |
|
5 seconds | 1 hour 20 minutes | 465 | 925 |
| 2 |
|
1 hour | 1 hour 16 minutes | 465 | 925 |
| 3 |
|
1 hour 15 minutes | 1 hour 16 minutes | 488 | 925 |
| 4 |
|
1 hour 30 minutes | 1 hour 16 minutes | 488 | 971 |
| 5 |
|
1 hour 45 minutes | 1 hour 12 minutes | 488 | 971 |
| 6 |
|
2 hours | 1 hour 12 minutes | 511 | 971 |
| 7 |
|
3 hours | 1 hour 12 minutes | 511 | 1,017 |
| 8 |
|
4 hours | 1 hour 8 minutes | 511 | 1,017 |
| 9 |
|
5 hours | 1 hour 8 minutes | 535 | 1,017 |
| 10 | VISUAL UPGRADE
|
5 hours 30 minutes | 1 hour 8 minutes | 535 | 1,064 |
| 11 |
|
6 hours | 1 hour 4 minutes | 535 | 1,064 |
| 12 |
|
6 hours 30 minutes | 1 hour 4 minutes | 558 | 1,064 |
| 13 |
|
7 hours | 1 hour 4 minutes | 558 | 1,110 |
| 14 |
|
7 hours 30 minutes | 1 hour | 558 | 1,110 |
| 15 |
|
8 hours | 1 hour | 581 | 1,110 |
| 16 |
|
8 hours 30 minutes | 1 hour | 581 | 1,156 |
| 17 |
|
9 hours | 56 minutes | 581 | 1,156 |
| 18 |
|
9 hours 30 minutes | 56 minutes | 604 | 1,156 |
| 19 |
|
10 hours | 56 minutes | 604 | 1,202 |
| 20 | VISUAL UPGRADE
& UPGRADE COMPLETE! |
– | 52 minutes | 604 | 1,202 |

A-list Celebrity Trailer– reach level 9 Performer to unlock:
- Costs 1,000 Coffee, 75 Script and 3 Golden Clapper to build, takes 2 days
| UPGRADE | UPGRADE | ACTION | ACTION | ACTION | |
|---|---|---|---|---|---|
| RESOURCES NEEDED | TIME TAKEN | TIME TAKEN | COINS REWARD | XP REWARD | |
| 1 |
|
5 seconds | 2 hour 10 minutes | 650 | 1,150 |
| 2 |
|
1 hour | 2 hours 3 minutes | 650 | 1,150 |
| 3 |
|
1 hour 15 minutes | 2 hours 3 minutes | 682 | 1,150 |
| 4 |
|
1 hour 30 minutes | 2 hours 3 minutes | 682 | 1,208 |
| 5 |
|
1 hour 45 minutes | 1 hour 57 minutes | 682 | 1,208 |
| 6 |
|
2 hours | 1 hour 57 minutes | 715 | 1,208 |
| 7 |
|
3 hours | 1 hour 57 minutes | 715 | 1,265 |
| 8 |
|
4 hours | 1 hour 50 minutes | 715 | 1,265 |
| 9 |
|
5 hours | 1 hour 50 minutes | 747 | 1,265 |
| 10 | VISUAL UPGRADE
|
5 hours 30 minutes | 1 hour 50 minutes | 747 | 1,322 |
| 11 |
|
6 hours | 1 hour 44 minutes | 747 | 1,322 |
| 12 |
|
6 hours 30 minutes | 1 hour 44 minutes | 780 | 1,322 |
| 13 |
|
7 hours | 1 hour 44 minutes | 780 | 1,380 |
| 14 |
|
7 hours 30 minutes | 1 hour 37 minutes | 780 | 1,380 |
| 15 |
|
8 hours | 1 hour 37 minutes | 812 | 1,380 |
| 16 |
|
8 hours 30 minutes | 1 hour 37 minutes | 812 | 1,437 |
| 17 |
|
9 hours | 1 hour 31 minutes | 812 | 1,437 |
| 18 |
|
9 hours 30 minutes | 1 hour 31 minutes | 845 | 1,437 |
| 19 |
|
10 hours | 1 hour 31 minutes | 845 | 1,495 |
| 20 | VISUAL UPGRADE
& UPGRADE COMPLETE! |
– | 1 hour 24 minutes | 845 | 1,495 |
NOTE: you can only upgrade one workstation at a time unless you are VIP
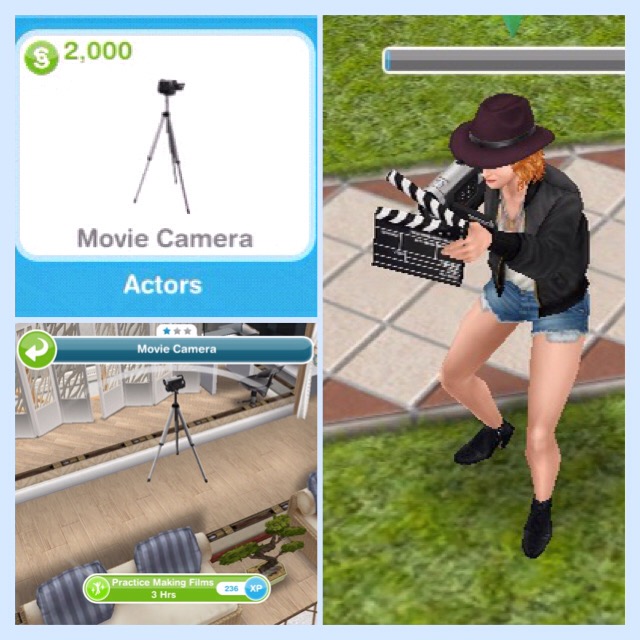
Are there items for my home that can increase my sims job level?
Yes, you can buy the movie camera from promotions r us, it costs S2,000, once placed in a house you can practice making films for 3 hours to level up quicker.
Orange Suitcase? Can’t send your sims to work?
This is because you have already sent them to work once today, if you are VIP level 1 you can send them to work twice in a day (this will cost you 15LPs still if you are VIP)
Wait until tomorrow and you will be able to send them to work again without being VIP.
Do I need to be VIP to use the movie studio?
NO! If you are VIP you can send your sims to work twice a day (VIP level 1), upgrade more than one workstation at a time (VIP level 7) and use the mega spin (VIP level 2) but you do not have to be VIP
Got questions about Professions? Check out the FAQs here before asking!
Other Profession Careers: Police & Medical Staff
THE SIMS FREEPLAY
©THEGIRLWHOGAMES.BLOG
The Sims Freeplay- Profession Careers: Police
Once you build the Police Station you can begin the Police Career:

This is a profession career so it is a little different from a normal career as you can actually go to work with 2 of your sims and help them during their work day!
You can either go to work with your sims or send them to work offsite, if you send them to work offsite this means you won’t see them at the police station. But you can go to work with your sim if you select send alone or accompany sim and then they can help sims and earn resources (only two sims can be at the police station at one time, all other sims with this career have to work offsite)
When you send a sim to work at the police station sims will enter with bubbles above their heads, you need to click on this bubble and select one of the tasks that appears, the amount of grey sections there are tells you how many tasks you have to complete before you earn the reward that is pictured in the middle of the bubble:

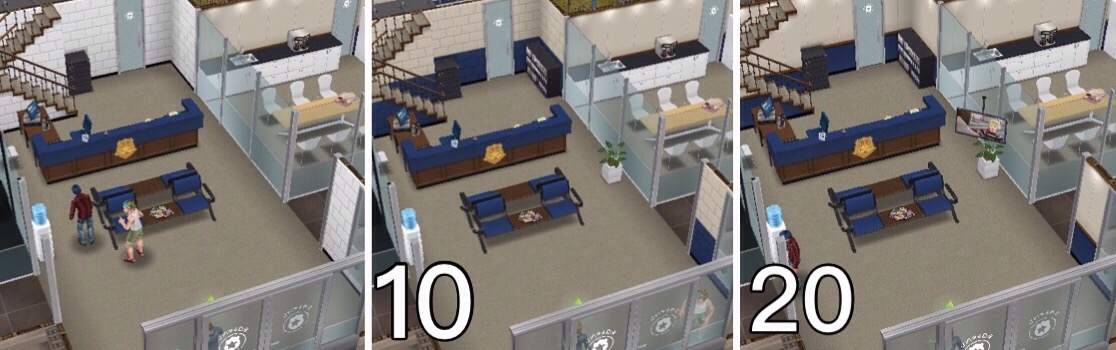
Once you have built the police station 3 workstations will already be unlocked (Front Desk, Training Center and Surveillance Van) so you can start helping sims by completing actions using these workstations, you will see options similar to the image below when you click on one of the bubbles:

Each of these has to be completed in a different workstation so file police report is at the front desk, receive motivation is in the training center and check police video is in the surveillance van
TIP: if you are unsure which workstation is required it tells you above the action!
Only one sim can use a workstation at one time (new tasks will be added when you unlock new workstations, keep reading for more information)
Each time your sims complete a task (that section will turn from grey to green) a police coin bubble will appear above their head, click this and they will earn police coins and XPs, the experience points are towards levelling up, so they will level up quicker than if you just sent them to work.
Once all the tasks have been completed all the grey sections will now appear green, click on this to receive your reward (the rewards are police coins and resources used to upgrade the different workstations at the police station):

I am not going to go into too much detail about how to complete Profession Careers here, if you are still unsure check out my Guide to Profession Careers for more information on how they work!
HOURS
You can send your sims to work anytime for 8 hours but if you are helping sims they can finish early if they reach the quota, they need to help 25 sims (you need to complete all the tasks for a sim to have helped one sim) during their shift, then they will end their shift early and you earn extra police coins and resources. Both sims can help the same sims and each time one of them finishes helping a sim they will both have helped one sim:

If they are working offsite they will just work for 8 hours and they won’t earn any resources as they won’t be helping any sims.
LEVELS
All sims completing this career will be able to reach level 6:
| LEVEL | MONEY | XPs |
|---|---|---|
| 1 Cadet | S1,165 | 300 |
| 2 Deputy | S1,260 | 480 |
| 3 Trooper | S1,355 | 660 |
| 4 Corporal | S1,450 | 840 |
| 5 Sergeant | S1,545 | 1020 |
| 6 Sergeant | S1,640 | 1200 |
Then only 2 sims, once they reach level 6 can choose to be either Metro Police or Special Agent, only one sim can be metro police and one sim can be special agent, all other sims will stay as level 6 sergeant.
Metro Police– when your sim specialises as Metro Police they can continue to level up and unlock more workstations:
| LEVEL | MONEY | XPs | WORKSTATION UNLOCKED |
|---|---|---|---|
| 6 Patrol Sim | S1,640 | 1,200 | Squad Car |
| 7 Lieutenant | S1,735 | 1,380 | Jail Cells |
| 8 Captain | S1,830 | 1,560 | K-9 Unit |
| 9 Division Chief | S1,925 | 1,740 | Chiefs Office |
| 10 Police Commissioner | S2,020 | 1,920 | – |
Once you unlock the workstation you have to use the resources to build it before you can help sims using these workstations, only the metro police will be able to complete tasks to help sims that require one of the workstations above. I will be going into detail about workstations later in this post.
Special Agent– when your sim specialises as a Special Agent they can continue to level up and unlock more workstations:
| LEVEL | MONEY | XPs | WORKSTATION UNLOCKED |
|---|---|---|---|
| 6 Investigator | S1,640 | 1,200 | Interview Room |
| 7 Detective | S1,735 | 1,380 | Sketch Room |
| 8 Super Sleuth | S1,830 | 1,560 | Forensics Lab |
| 9 Secret Agent | S1,925 | 1,740 | Division 51 |
| 10 Sim-In-Black | S2,020 | 1,920 | – |
Once you unlock the workstation you have to use the resources to build it before you can help sims using these workstations, only the special agent will be able to complete tasks to help sims that require one of the workstations above. I will be going into detail about workstations later in this post.
When your sim specialises they have to fulfil profession badges before they can level up (check the occupations tab to find out what you need to do to complete this):

Each sim can only earn one badge per shift and you need all badges before you will be able to level up in this career
Badges needed:
| Level | Metro | Special Agent |
|---|---|---|
| 6 | Help 3 Sims | Help 3 Sims |
| 6 | Collect 5,000 coins | Collect 5,000 coins |
| 6 | Help 2 Important Sims | Help 2 Important Sims |
| 7 | Help 16 Sims | Help 16 Sims |
| 7 | Collect 10 Handcuff Resources | Collect 10 Fingerprint Resources |
| 7 | Collect 6,000 coins | Collect 6,000 coins |
| 7 | Help 2 Important Sims | Help 2 Important Sims |
| 8 | Collect 20 Donut Resources | Collect 20 Donut Resources |
| 8 | Collect 7,000 coins | Collect 7,000 coins |
| 8 | Help 18 Sims | Help 18 Sims |
| 8 | Help 2 Important Sims | Help 2 Important Sims |
| 8 | Collect 3 Police Tape Resources | Collect 3 Recorder Resources |
| 9 | Collect 8,000 coins | Collect 8,000 coins |
| 9 | Help 7 Sims | Help 7 Sims |
| 9 | Help 2 Important Sims | Help 2 Important Sims |
| 9 | Collect 5 Police Tape Resources | Collect 5 Recorder Resources |
| 9 | Collect 10,000 coins | Collect 10,000 coins |
| 9 | Help 8 Sims | Help 8 Sims |
If you don’t manage to complete a badge in a shift the progress for that badge will reset and you will have to start again on the next shift (for example, if your task is to help 2 important sims and you only help one, in your next shift it will reset so you will have to help 2 important sims in that shift to get the badge)
Each level requires you to complete more badges, you cannot level up until all the badges have been collected.
Who are the important sims I need to help to get a badge?
These are the sims with question marks in the bubbles above their heads:

When you reach level 10 in a profession career you unlock the work outfit in that specialist for a female and male adult sim to wear at any time, you can find these in the wardrobe under outfits:

Remember:
- You can only go to work with 2 sims at a time, all other sims in this career will work offsite so you won’t see them during the day
- Only one sim can use a workstation at one time
- If you don’t know how Profession Careers work read my guide
Workstations
The workstations require resources to upgrade them so the time an action takes will decrease and the coins and XPs you earn for each action will increase. The resources are shown below:

Some resources are not unlocked yet, build new workstations to unlock them
 You can see the resources you have in the second tab of the professions menu under storage (you can access this using the button in the top left hand corner of your screen when you are at the police station)
In the professions menu you can see:
- Workplace Overview- here you can see the workstations you have currently unlocked, what level you are on and what resources you need to upgrade them
- Storage- this is where you see your current resources collected and on the right hand side is your police coins, the police coins are used to increase your storage if you need to and trade for resources (which is in the next tab)
- Resource Exchange- here you can either spin for resources using simoleons or LPs for the mega spin as well as trade police coins for resources
The tables below show the upgrade resources needed, the time each upgrade will take and the time an action takes and the amount of coins and XP you earn when you complete each action, only one of these will upgrade each time so if the time taken decreases then the amount of coins and XP you earn will stay the same until you upgrade again and then the amount of coins you earn will increase while the time taken and XP will stay the same.
NOTE: you can only upgrade one workstation at a time unless you are VIP
If you don’t have the amount of resources you need it will say it costs LP, when you have the right amount of resources you can build/ upgrade the workstation without LP (you know you have all the resources you need when there are ticks next to all the resources):  When you upgrade each workstation to level 10 and 20 there will be a visual upgrade to the workstation, those pictures are shown below each of the tables.
Front Desk– already built
| UPGRADE | UPGRADE | ACTION | ACTION | ACTION | |
|---|---|---|---|---|---|
| RESOURCES NEEDED | TIME TAKEN | TIME TAKEN | COINS REWARD | XP REWARD | |
| 1 |
|
5 seconds | 1 minute | 80 | 60 |
| 2 |
|
5 minutes | 57 seconds | 80 | 60 |
| 3 |
|
10 minutes | 57 seconds | 84 | 60 |
| 4 |
|
15 minutes | 57 seconds | 84 | 63 |
| 5 |
|
25 minutes | 54 seconds | 84 | 63 |
| 6 |
|
35 minutes | 54 seconds | 88 | 63 |
| 7 |
|
50 minutes | 54 seconds | 88 | 66 |
| 8 |
|
1 hour 5 minutes | 51 seconds | 88 | 66 |
| 9 |
|
1 hour 20 minutes | 51 seconds | 92 | 66 |
| 10 | VISUAL UPGRADE
|
1 hour 50 minutes | 51 seconds | 92 | 69 |
| 11 |
|
2 hours | 48 seconds | 92 | 69 |
| 12 |
|
2 hours 25 minutes | 48 seconds | 96 | 69 |
| 13 |
|
2 hours 50 minutes | 48 seconds | 96 | 72 |
| 14 |
|
3 hours 15 minutes | 45 seconds | 96 | 72 |
| 15 |
|
3 hours 45 minutes | 45 seconds | 100 | 72 |
| 16 |
|
4 hours 15 minutes | 45 seconds | 100 | 75 |
| 17 |
|
4 hours 50 minutes | 42 seconds | 100 | 75 |
| 18 |
|
5 hours 25 minutes | 42 seconds | 104 | 75 |
| 19 |
|
6 hours | 42 seconds | 104 | 78 |
| 20 | VISUAL UPGRADE
& UPGRADE COMPLETE! |
– | 39 seconds | 104 | 78 |
Training Center– already built
| UPGRADE | UPGRADE | ACTION | ACTION | ACTION | |
|---|---|---|---|---|---|
| RESOURCES NEEDED | TIME TAKEN | TIME TAKEN | COINS REWARD | XP REWARD | |
| 1 |
|
5 seconds | 2 minutes | 120 | 80 |
| 2 |
|
5 minutes | 1 minute 54 seconds | 120 | 80 |
| 3 |
|
10 minutes | 1 minute 54 seconds | 126 | 80 |
| 4 |
|
15 minutes | 1 minute 54 seconds | 126 | 84 |
| 5 |
|
25 minutes | 1 minute 48 seconds | 126 | 84 |
| 6 |
|
35 minutes | 1 minute 48 seconds | 132 | 84 |
| 7 |
|
50 minutes | 1 minute 48 seconds | 132 | 88 |
| 8 |
|
1 hour 5 minutes | 1 minute 42 seconds | 132 | 88 |
| 9 |
|
1 hour 20 minutes | 1 minute 42 seconds | 138 | 88 |
| 10 | VISUAL UPGRADE
|
1 hour 40 minutes | 1 minute 42 seconds | 138 | 92 |
| 11 |
|
2 hours | 1 minute 36 seconds | 138 | 92 |
| 12 |
|
2 hours 25 minutes | 1 minute 36 seconds | 144 | 92 |
| 13 |
|
2 hours 50 minutes | 1 minute 36 seconds | 144 | 96 |
| 14 |
|
3 hours 15 minutes | 1 minute 30 seconds | 144 | 96 |
| 15 |
|
3 hours 45 minutes | 1 minute 30 seconds | 150 | 96 |
| 16 |
|
4 hours 15 minutes | 1 minute 30 seconds | 150 | 100 |
| 17 |
|
4 hours 50 minutes | 1 minute 24 seconds | 150 | 100 |
| 18 |
|
5 hours 25 minutes | 1 minute 24 seconds | 156 | 100 |
| 19 |
|
6 hours | 1 minute 24 seconds | 156 | 104 |
| 20 | VISUAL UPGRADE
& UPGRADE COMPLETE! |
– | 1 minute 18 seconds | 156 | 104 |

Surveillance Van– already built
| UPGRADE | UPGRADE | ACTION | ACTION | ACTION | |
|---|---|---|---|---|---|
| RESOURCES NEEDED | TIME TAKEN | TIME TAKEN | COINS REWARD | XP REWARD | |
| 1 |
|
5 seconds | 5 minutes | 150 | 120 |
| 2 |
|
5 minutes | 4 minutes 45 seconds | 150 | 120 |
| 3 |
|
10 minutes | 4 minutes 45 seconds | 158 | 120 |
| 4 |
|
15 minutes | 4 minutes 45 seconds | 158 | 126 |
| 5 |
|
25 minutes | 4 minutes 30 seconds | 158 | 126 |
| 6 |
|
35 minutes | 4 minutes 30 seconds | 165 | 126 |
| 7 |
|
50 minutes | 4 minutes 30 seconds | 165 | 132 |
| 8 |
|
1 hour 5 minutes | 4 minutes 15 seconds | 165 | 132 |
| 9 |
|
1 hour 20 minutes | 4 minutes 15 seconds | 172 | 132 |
| 10 | VISUAL UPGRADE
|
1 hour 40 minutes | 4 minutes 15 seconds | 172 | 138 |
| 11 |
|
2 hours | 4 minutes | 172 | 138 |
| 12 |
|
2 hours 25 minutes | 4 minutes | 180 | 138 |
| 13 |
|
2 hours 50 minutes | 4 minutes | 180 | 144 |
| 14 |
|
3 hours 15 minutes | 3 minutes 45 seconds | 180 | 144 |
| 15 |
|
3 hours 45 minutes | 3 minutes 45 seconds | 187 | 144 |
| 16 |
|
4 hours 15 minutes | 3 minutes 45 seconds | 187 | 150 |
| 17 |
|
4 hours 50 minutes | 3 minutes 30 seconds | 187 | 150 |
| 18 |
|
5 hours 25 minutes | 3 minutes 30 seconds | 195 | 150 |
| 19 |
|
6 hours | 3 minutes 30 seconds | 195 | 156 |
| 20 | VISUAL UPGRADE
& UPGRADE COMPLETE! |
– | 3 minutes 15 seconds | 195 | 156 |
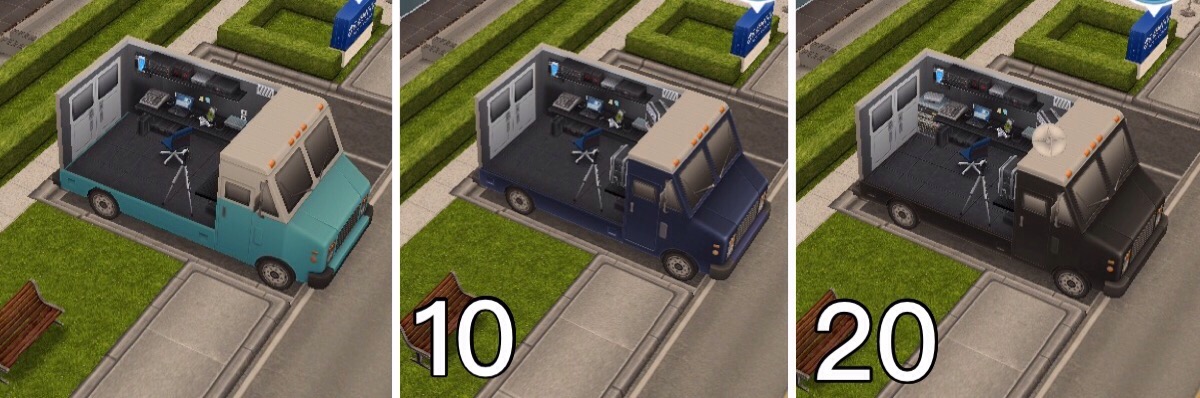
Metro Police Workstations:
Squad Car– reach level 6 Metro Police to unlock:
- Costs 800 Flashlight and 140 Doughnuts to build, takes 6 hours
- Once built you can collect the Handcuffs resource
| UPGRADE | UPGRADE | ACTION | ACTION | ACTION | |
|---|---|---|---|---|---|
| RESOURCES NEEDED | TIME TAKEN | TIME TAKEN | COINS REWARD | XP REWARD | |
| 1 |
|
5 seconds | 10 minutes | 200 | 200 |
| 2 |
|
5 minutes | 9 minutes 30 seconds | 200 | 200 |
| 3 |
|
10 minutes | 9 minutes 30 seconds | 210 | 200 |
| 4 |
|
15 minutes | 9 minutes 30 seconds | 210 | 210 |
| 5 |
|
25 minutes | 9 minutes | 210 | 210 |
| 6 |
|
35 minutes | 9 minutes | 220 | 210 |
| 7 |
|
50 minutes | 9 minutes | 220 | 220 |
| 8 |
|
1 hour 5 minutes | 8 minutes 30 seconds | 220 | 220 |
| 9 |
|
1 hour 20 minutes | 8 minutes 30 seconds | 230 | 220 |
| 10 | VISUAL UPGRADE
|
1 hour 40 minutes | 8 minutes 30 seconds | 230 | 230 |
| 11 |
|
2 hours | 8 minutes | 230 | 230 |
| 12 |
|
2 hours 25 minutes | 8 minutes | 240 | 230 |
| 13 |
|
2 hours 50 minutes | 8 minutes | 240 | 240 |
| 14 |
|
3 hours 15 minutes | 7 minutes 30 seconds | 240 | 240 |
| 15 |
|
3 hours 45 minutes | 7 minutes 30 seconds | 250 | 240 |
| 16 |
|
4 hours 15 minutes | 7 minutes 30 seconds | 250 | 250 |
| 17 |
|
4 hours 50 minutes | 7 minutes | 250 | 250 |
| 18 |
|
5 hours 25 minutes | 7 minutes | 260 | 250 |
| 19 |
|
6 hours | 7 minutes | 260 | 260 |
| 20 | VISUAL UPGRADE
& UPGRADE COMPLETE! |
– | 6 minutes 30 seconds | 260 | 260 |

Jail Cells– reach level 7 Metro Police to unlock:
- Costs 1000 Flashlight and 160 Doughnuts to build, takes 12 hours
| UPGRADE | UPGRADE | ACTION | ACTION | ACTION | |
|---|---|---|---|---|---|
| RESOURCES NEEDED | TIME TAKEN | TIME TAKEN | COINS REWARD | XP REWARD | |
| 1 |
|
5 seconds | 15 minutes | 250 | 260 |
| 2 |
|
5 minutes | 14 minutes 15 seconds | 250 | 260 |
| 3 |
|
10 minutes | 14 minutes 15 seconds | 263 | 260 |
| 4 |
|
15 minutes | 14 minutes 15 seconds | 263 | 273 |
| 5 |
|
25 minutes | 13 minutes 30 seconds | 263 | 273 |
| 6 |
|
35 minutes | 13 minutes 30 seconds | 275 | 273 |
| 7 |
|
50 minutes | 13 minutes 30 seconds | 275 | 286 |
| 8 |
|
1 hour 5 minutes | 12 minutes 45 seconds | 275 | 286 |
| 9 |
|
1 hour 20 minutes | 12 minutes 45 seconds | 287 | 286 |
| 10 | VISUAL UPGRADE
|
1 hour 40 minutes | 12 minutes 45 seconds | 287 | 299 |
| 11 |
|
2 hours | 12 minutes | 287 | 299 |
| 12 |
|
2 hours 25 minutes | 12 minutes | 300 | 299 |
| 13 |
|
2 hours 50 minutes | 12 minutes | 300 | 312 |
| 14 |
|
3 hours 15 minutes | 11 minutes 15 seconds | 300 | 312 |
| 15 |
|
3 hours 45 minutes | 11 minutes 15 seconds | 312 | 312 |
| 16 |
|
4 hours 15 minutes | 11 minutes 15 seconds | 312 | 325 |
| 17 |
|
4 hours 50 minutes | 10 minutes 30 seconds | 312 | 325 |
| 18 |
|
5 hours 25 minutes | 10 minutes 30 seconds | 325 | 325 |
| 19 |
|
6 hours | 10 minutes 30 seconds | 325 | 338 |
| 20 | VISUAL UPGRADE
& UPGRADE COMPLETE! |
– | 9 minutes 45 seconds | 325 | 338 |

K-9 Unit– reach level 8 Metro Police to unlock:
- Costs 1250 Flashlight, 320 Handcuffs and 225 Fingerprints to build, takes 1 day
- Once built you can collect the Police Tape resource
| UPGRADE | UPGRADE | ACTION | ACTION | ACTION | |
|---|---|---|---|---|---|
| RESOURCES NEEDED | TIME TAKEN | TIME TAKEN | COINS REWARD | XP REWARD | |
| 1 |
|
5 seconds | 1 hour | 400 | 780 |
| 2 |
|
5 minutes | 57 minutes | 400 | 780 |
| 3 |
|
10 minutes | 57 minutes | 420 | 780 |
| 4 |
|
15 minutes | 57 minutes | 420 | 819 |
| 5 |
|
25 minutes | 54 minutes | 420 | 819 |
| 6 |
|
35 minutes | 54 minutes | 440 | 819 |
| 7 |
|
50 minutes | 54 minutes | 440 | 858 |
| 8 |
|
1 hour 5 minutes | 51 minutes | 440 | 858 |
| 9 |
|
1 hour 20 minutes | 51 minutes | 460 | 858 |
| 10 | VISUAL UPGRADE
|
1 hour 40 minutes | 51 minutes | 460 | 897 |
| 11 |
|
2 hours | 48 minutes | 460 | 897 |
| 12 |
|
2 hours 25 minutes | 48 minutes | 480 | 897 |
| 13 |
|
2 hours 50 minutes | 48 minutes | 480 | 936 |
| 14 |
|
3 hours 15 minutes | 45 minutes | 480 | 936 |
| 15 |
|
3 hours 45 minutes | 45 minutes | 500 | 936 |
| 16 |
|
4 hours 15 minutes | 45 minutes | 500 | 975 |
| 17 |
|
4 hours 50 minutes | 42 minutes | 500 | 975 |
| 18 |
|
5 hours 25 minutes | 42 minutes | 520 | 975 |
| 19 |
|
6 hours | 42 minutes | 520 | 1014 |
| 20 | VISUAL UPGRADE
& UPGRADE COMPLETE! |
– | 39 minutes | 520 | 1014 |
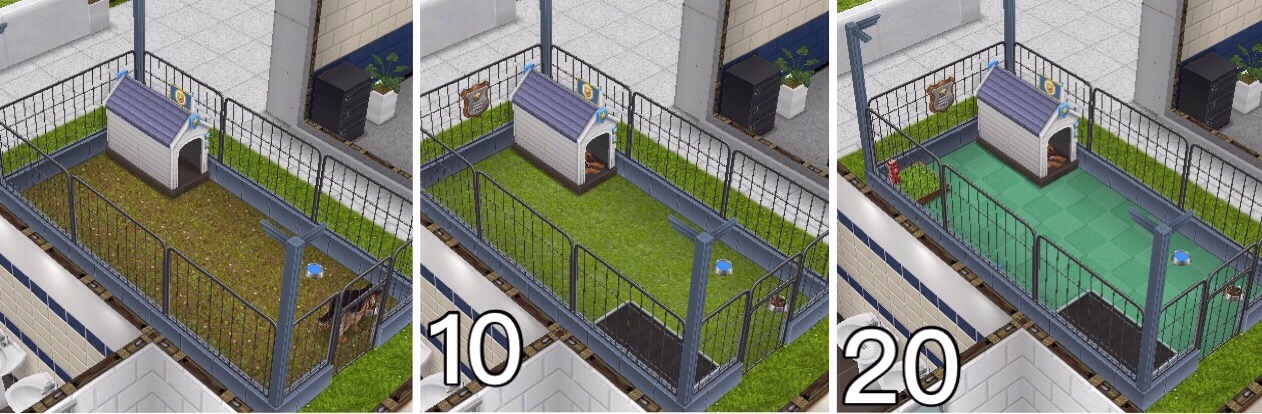
Chiefs Office– reach level 9 Metro Police to unlock:
- Costs 1750 Flashlight, 85 Police Tape and 5 Golden Shield to build, takes 2 days
| UPGRADE | UPGRADE | ACTION | ACTION | ACTION | |
|---|---|---|---|---|---|
| RESOURCES NEEDED | TIME TAKEN | TIME TAKEN | COINS REWARD | XP REWARD | |
| 1 |
|
5 seconds | 2 hours 30 minutes | 800 | 1,950 |
| 2 |
|
5 minutes | 2 hours 22 minutes | 800 | 1,950 |
| 3 |
|
10 minutes | 2 hours 22 minutes | 840 | 1,950 |
| 4 |
|
15 minutes | 2 hours 22 minutes | 840 | 2,047 |
| 5 |
|
25 minutes | 2 hours 15 minutes | 840 | 2,047 |
| 6 |
|
35 minutes | 2 hours 15 minutes | 880 | 2,047 |
| 7 |
|
50 minutes | 2 hours 15 minutes | 880 | 2,145 |
| 8 |
|
1 hour 5 minutes | 2 hours 7 minutes | 880 | 2,145 |
| 9 |
|
1 hour 20 minutes | 2 hours 7 minutes | 920 | 2,145 |
| 10 | VISUAL UPGRADE
|
1 hour 40 minutes | 2 hours 7 minutes | 920 | 2,242 |
| 11 |
|
2 hours | 2 hours | 920 | 2,242 |
| 12 |
|
2 hours 25 minutes | 2 hours | 960 | 2,242 |
| 13 |
|
2 hours 50 minutes | 2 hours | 960 | 2,340 |
| 14 |
|
3 hours 15 minutes | 1 hour 52 minutes | 960 | 2,340 |
| 15 |
|
3 hours 45 minutes | 1 hour 52 minutes | 1,000 | 2,340 |
| 16 |
|
4 hours 15 minutes | 1 hour 52 minutes | 1,000 | 2,437 |
| 17 |
|
4 hours 50 minutes | 1 hour 45 minutes | 1,000 | 2,437 |
| 18 |
|
5 hours 25 minutes | 1 hour 45 minutes | 1,040 | 2,437 |
| 19 |
|
6 hours | 1 hour 45 minutes | 1,040 | 2,535 |
| 20 | VISUAL UPGRADE
& UPGRADE COMPLETE! |
– | 1 hour 37 minutes | 1,040 | 2,535 |

Special Agent Workstations:
Interview Room– reach level 6 Special Agent to unlock:
- Costs 800 Radio and 140 Doughnuts to build, takes 6 hours
- Once built you can collect the Fingerprints resource
| UPGRADE | UPGRADE | ACTION | ACTION | ACTION | |
|---|---|---|---|---|---|
| RESOURCES NEEDED | TIME TAKEN | TIME TAKEN | COINS REWARD | XP REWARD | |
| 1 |
|
5 seconds | 10 minutes | 200 | 200 |
| 2 |
|
5 minutes | 9 minutes 30 seconds | 200 | 200 |
| 3 |
|
10 minutes | 9 minutes 30 seconds | 210 | 200 |
| 4 |
|
15 minutes | 9 minutes 30 seconds | 210 | 210 |
| 5 |
|
25 minutes | 9 minutes | 210 | 210 |
| 6 |
|
35 minutes | 9 minutes | 220 | 210 |
| 7 |
|
50 minutes | 9 minutes | 220 | 220 |
| 8 |
|
1 hour 5 minutes | 8 minutes 30 seconds | 220 | 220 |
| 9 |
|
1 hour 20 minutes | 8 minutes 30 seconds | 230 | 220 |
| 10 | VISUAL UPGRADE
|
1 hour 40 minutes | 8 minutes 30 seconds | 230 | 230 |
| 11 |
|
2 hours | 8 minutes | 230 | 230 |
| 12 |
|
2 hours 25 minutes | 8 minutes | 240 | 230 |
| 13 |
|
2 hours 50 minutes | 8 minutes | 240 | 240 |
| 14 |
|
3 hours 15 minutes | 7 minutes 30 seconds | 240 | 240 |
| 15 |
|
3 hours 45 minutes | 7 minutes 30 seconds | 250 | 240 |
| 16 |
|
4 hours 15 minutes | 7 minutes 30 seconds | 250 | 250 |
| 17 |
|
4 hours 50 minutes | 7 minutes | 250 | 250 |
| 18 |
|
5 hours 25 minutes | 7 minutes | 260 | 250 |
| 19 |
|
6 hours | 7 minutes | 260 | 260 |
| 20 | VISUAL UPGRADE
& UPGRADE COMPLETE! |
– | 6 minutes 30 seconds | 260 | 260 |

Sketch Room– reach level 7 Special Agent to unlock:
- Costs 1000 Radio and 160 Doughnuts to build, takes 12 hours
| UPGRADE | UPGRADE | ACTION | ACTION | ACTION | |
|---|---|---|---|---|---|
| RESOURCES NEEDED | TIME TAKEN | TIME TAKEN | COINS REWARD | XP REWARD | |
| 1 |
|
5 seconds | 15 minutes | 250 | 260 |
| 2 |
|
5 minutes | 14 minutes 15 seconds | 250 | 260 |
| 3 |
|
10 minutes | 14 minutes 15 seconds | 263 | 260 |
| 4 |
|
15 minutes | 14 minutes 15 seconds | 263 | 273 |
| 5 |
|
25 minutes | 13 minutes 30 seconds | 263 | 273 |
| 6 |
|
35 minutes | 13 minutes 30 seconds | 275 | 273 |
| 7 |
|
50 minutes | 13 minutes 30 seconds | 275 | 286 |
| 8 |
|
1 hour 5 minutes | 12 minutes 45 seconds | 275 | 286 |
| 9 |
|
1 hour 20 minutes | 12 minutes 45 seconds | 287 | 286 |
| 10 | VISUAL UPGRADE
|
1 hour 40 minutes | 12 minutes 45 seconds | 287 | 299 |
| 11 |
|
2 hours | 12 minutes | 287 | 299 |
| 12 |
|
2 hours 25 minutes | 12 minutes | 300 | 299 |
| 13 |
|
2 hours 50 minutes | 12 minutes | 300 | 312 |
| 14 |
|
3 hours 15 minutes | 11 minutes 15 seconds | 300 | 312 |
| 15 |
|
3 hours 45 minutes | 11 minutes 15 seconds | 312 | 312 |
| 16 |
|
4 hours 15 minutes | 11 minutes 15 seconds | 312 | 325 |
| 17 |
|
4 hours 50 minutes | 10 minutes 30 seconds | 312 | 325 |
| 18 |
|
5 hours 25 minutes | 10 minutes 30 seconds | 325 | 325 |
| 19 |
|
6 hours | 10 minutes 30 seconds | 325 | 338 |
| 20 | VISUAL UPGRADE
& UPGRADE COMPLETE! |
– | 9 minutes 45 seconds | 325 | 338 |

Forensics Lab– reach level 8 Special Agent to unlock:
- Costs 1250 Radio, 225 Handcuffs and 320 Fingerprints to build, takes 1 day
- Once built you can collect the Recorder resource
| UPGRADE | UPGRADE | ACTION | ACTION | ACTION | |
|---|---|---|---|---|---|
| RESOURCES NEEDED | TIME TAKEN | TIME TAKEN | COINS REWARD | XP REWARD | |
| 1 |
|
5 seconds | 1 hour | 400 | 780 |
| 2 |
|
5 minutes | 57 minutes | 400 | 780 |
| 3 |
|
10 minutes | 57 minutes | 420 | 780 |
| 4 |
|
15 minutes | 57 minutes | 420 | 819 |
| 5 |
|
25 minutes | 54 minutes | 420 | 819 |
| 6 |
|
35 minutes | 54 minutes | 440 | 819 |
| 7 |
|
50 minutes | 54 minutes | 440 | 858 |
| 8 |
|
1 hour 5 minutes | 51 minutes | 440 | 858 |
| 9 |
|
1 hour 20 minutes | 51 minutes | 460 | 858 |
| 10 | VISUAL UPGRADE
|
1 hour 40 minutes | 51 minutes | 460 | 897 |
| 11 |
|
2 hours | 48 minutes | 460 | 897 |
| 12 |
|
2 hours 25 minutes | 48 minutes | 480 | 897 |
| 13 |
|
2 hours 50 minutes | 48 minutes | 480 | 936 |
| 14 |
|
3 hours 15 minutes | 45 minutes | 480 | 936 |
| 15 |
|
3 hours 45 minutes | 45 minutes | 500 | 936 |
| 16 |
|
4 hours 15 minutes | 45 minutes | 500 | 975 |
| 17 |
|
4 hours 50 minutes | 42 minutes | 500 | 975 |
| 18 |
|
5 hours 25 minutes | 42 minutes | 520 | 975 |
| 19 |
|
6 hours | 42 minutes | 520 | 1,014 |
| 20 | VISUAL UPGRADE
& UPGRADE COMPLETE! |
– | 39 minutes | 520 | 1,014 |
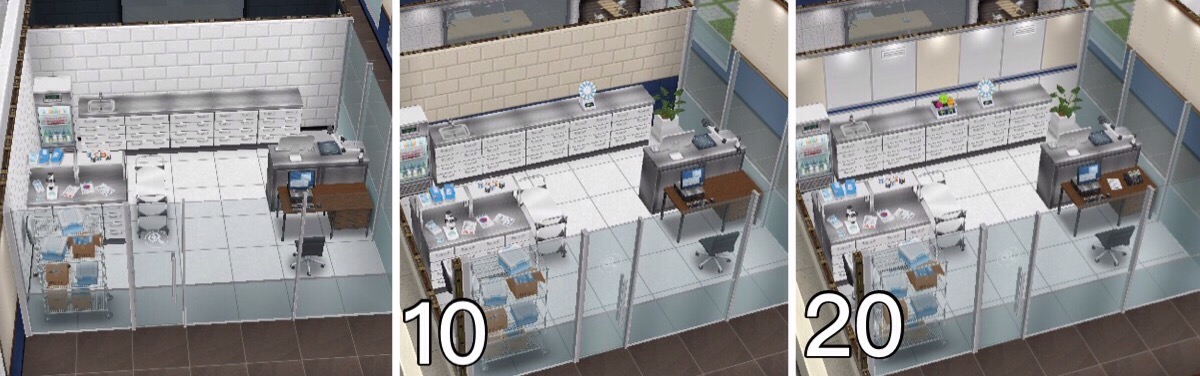
Division 51– reach level 9 Special Agent to unlock:
- Costs 1750 Radio, 85 Recorder and 5 Golden Shield to build, takes 2 days
| UPGRADE | UPGRADE | ACTION | ACTION | ACTION | |
|---|---|---|---|---|---|
| RESOURCES NEEDED | TIME TAKEN | TIME TAKEN | COINS REWARD | XP REWARD | |
| 1 |
|
5 seconds | 2 hours 30 minutes | 800 | 1,950 |
| 2 |
|
5 minutes | 2 hours 22 minutes | 800 | 1,950 |
| 3 |
|
10 minutes | 2 hours 22 minutes | 840 | 1,950 |
| 4 |
|
15 minutes | 2 hours 22 minutes | 840 | 2,047 |
| 5 |
|
25 minutes | 2 hours 15 minutes | 840 | 2,047 |
| 6 |
|
35 minutes | 2 hours 15 minutes | 880 | 2,047 |
| 7 |
|
50 minutes | 2 hours 15 minutes | 880 | 2,145 |
| 8 |
|
1 hour 5 minutes | 2 hours 7 minutes | 880 | 2,145 |
| 9 |
|
1 hour 20 minutes | 2 hours 7 minutes | 920 | 2,145 |
| 10 | VISUAL UPGRADE
|
1 hour 40 minutes | 2 hours 7 minutes | 920 | 2,242 |
| 11 |
|
2 hours | 2 hours | 920 | 2,242 |
| 12 |
|
2 hours 25 minutes | 2 hours | 960 | 2,242 |
| 13 |
|
2 hours 50 minutes | 2 hours | 960 | 2,340 |
| 14 |
|
3 hours 15 minutes | 1 hour 52 minutes | 960 | 2,340 |
| 15 |
|
3 hours 45 minutes | 1 hour 52 minutes | 1,000 | 2,340 |
| 16 |
|
4 hours 15 minutes | 1 hour 52 minutes | 1,000 | 2,437 |
| 17 |
|
4 hours 50 minutes | 1 hour 45 minutes | 1,000 | 2,437 |
| 18 |
|
5 hours 25 minutes | 1 hour 45 minutes | 1,040 | 2,437 |
| 19 |
|
6 hours | 1 hour 45 minutes | 1,040 | 2,535 |
| 20 | VISUAL UPGRADE
& UPGRADE COMPLETE! |
– | 1 hour 37 minutes | 1,040 | 2,535 |

NOTE: you can only upgrade one workstation at a time unless you are VIP
Are there items for my home that can increase my sims job level? So far there isn’t anything for the police career
Orange Suitcase? Can’t send your sims to work?
This is because you have already sent them to work once today, if you are VIP level 1 you can send them to work twice in a day (this will cost you 15LP still if you are VIP)
Wait until tomorrow and you will be able to send them to work again without being VIP.
Do I need to be VIP to use the police station?
NO! If you are VIP you can send your sims to work twice a day (VIP level 1), upgrade more than one workstation at a time (VIP level 7) and use the mega spin (VIP level 2) but you do not have to be VIP
Got questions about Professions? Check out the FAQs here before asking!
Other Profession Careers: Filmmaker & Medical Staff
THE SIMS FREEPLAY
©THEGIRLWHOGAMES.BLOG
The Sims Freeplay- How Much Does it Cost to Build a Workplace? (Workplace Price Increases)
This has been a much requested post, it has just taken me a while to get all the information collected for it! This post shows how much it costs to build each workplace and the time it takes as these factors increase each time you build a workplace.
NOTE: this table included the profession workplaces (police station, movie studio and hospital) and Simtown High School.
NOTE: the amount of sims needed has been removed as you no longer need to have a certain amount of sims to build a workplace
| WORKPLACES BUILT SO FAR | TIME | COST (SIMOLEONS) |
|---|---|---|
| 0 | 2 minutes 30 seconds | 500 |
| 1 | 2 hours | 500 |
| 2 | 4 hours | 600 |
| 3 | 8 hours | 2,500 |
| 4 | 12 hours | 2,500 |
| 5 | 16 hours | 5,000 |
| 6 | 1 day | 10,000 |
| 7 | 1 day 4 hours | 20,000 |
| 8 | 1 day 8 hours | 100,000 |
| 9 | 1 day 12 hours | 150,000 |
| 10 | 1 day 12 hours | 600,000 |
| 11 | 1 day 12 hours | 1,000,000 |
However some workplaces that you have to build during a quest do not follow this pattern, some may be completely different while others such as the Simtown Elementary take a certain amount of time to build and this doesn’t change but the cost still increases each time you build a workplace.
Does building a workplace increase the price and time for simtown businesses or houses? No, building a workplace only increases the requirements for building another workplace, it will not affect a business or house. If you build a business then the requirements will increase for the next business only and if you built a house only the time and cost for building a new house will increase.
You can find the table for Businesses here
