Early Access to Beta Provided by EA/ Firemonkeys (Presented by EA Creator Network) may differ from actual version
Update available from 25th July 10:30pm UTC
Head to MidTown to create the best café ever and take part in some summer themed events in the Hot Simmerin’ Summer update, keep reading for more information
MIDTOWN
MidTown Café is a new business venue where you can hire staff, upgrade equipment, and grow your café to be the most talked about business in the new map location, MidTown! There is no rush to start this event, it will be available until you are ready to begin.Read my Guide to MidTown Café post for more information
The Holiday Home Live Event (available now) will begin on the 5th August for 10 days, complete in the time limit to unlock Holiday Home themed items and the Summer Staycation House Template
NEW & RETURNING INFLUENCE ISLAND EVENTS
Influence Island Season 28: Urban Outdoors (available now) starts on the 25th July for 10 days
Facial hair, tops, pants and shoes for male teen sims and outfits for female teen sims
Star Ratings and Prices:
0 Star Rating: Orange Geometric Rugs (S77,350) Pink Geometric Rugs (7LP) Red Plastic Crate Table (S56,550) White Plastic Crate Table (5LP) Oak Retro Coffee Table (S65,160) Pine Retro Coffee Table (6LP) Cream Single Clear Shutters (S87,130) Beige Single Clear Shutters (8LP) Oak 2-Pole String Lights S76,920) Oak 3-Pole String Lights (S53,980) Pine 2-Pole String Lights (7LP) Pine 3-Pole String Lights (5LP)
1 Star Rating: Orange Round Ottoman (S139,040) Oak Retro Armchair (S90,850) Silver Spray Paint Supplies (S75,180) Bold Abstract Dance Floor (S209,530) Blue Street Art Wings (S114,640) Silver Retro Boombox (S155,550) Bold Abstract Roller Rink (S298,020) Brown Retro Basketball Hoop (S291,710)
2 Star Rating: White Round Ottoman (13LP) Pine Retro Armchair (9LP) Gold Spray Paint Supplies (7LP) Pastel Abstract Dance Floor (20LP) Pastel Street Art Wings (11LP) Black Retro Boombox (15LP) Pastel Abstract Roller Rink (27LP) Cream Retro Basketball Hoop (29LP)
RETURNING- Influence Island Season 4: Moroccan Kitchen (not available yet) starts on the 25th August for 10 days
If you started it before but didn’t finish it you will start from the beginning (the clan progress will also be reset), if you unlocked any of the prizes before you will earn a free one of each in buy mode and any create a sim items will earn you SP instead
NEW SIMCHASE EVENTS
SimChase Season 45: Summer Sand-Off (available now) starts on the 25th July for 9 days
Outfits, headwear, shoes and swimwear for female adult sims
Star Ratings and Prices:
0 Star Rating: Oak Round Rattan Sidetable (S67,570) White Round Rattan Sidetable (6LP) Oak Beach Trim Umbrella (S89,620) Gold Beach Trim Umbrella (8LP) Oak Rope Tin Lantern (S81,030) Pine Rope Tin Lantern (8LP) Oak Crate Coffee Table (S94,620) Pine Crate Coffee Table (8LP)
1 Star Rating: Orange Juice Collection (S65,110) Oak Beach Recliner (S243,090) Orange Juice Display (S56,690) Sunset Striped Beach Towel (S74,030) Oak Crate Sofa Corner (S85,200) Oak Crate Sofa (S92,020) White Potted Tall Monstera (S86,390) Oak Crate Double Sofa (S107,670) Oak Crate Triple Sofa (S119,120) Purple Water Slide (S320,570) Orange Mobile Ice Cream (S261,150) Oak Volleyball Net (S226,960)
2 Star Rating: Pink Juice Collection (6LP) Cream Beach Recliner (24LP) Grapefruit Juice Display (5LP) Orange Striped Beach Towel (7LP) Pine Crate Sofa Corner (8LP) Pine Crate Sofa (9LP) Cream Potted Tall Monstera (8LP) Pine Crate Double Sofa (10LP) Pine Crate Triple Sofa (11LP) Red Water Slide (32LP) Pastel Mobile Ice Cream (26LP) Pine Volleyball Net (22LP)
SimChase Season 46: Parental Provocation (not available yet) starts on the 15th August for 7 days
Maternity outfits for pregnant sims and shoes for female adult sims
Star Ratings and Prices:
0 Star Rating: Beige Geometric Rug (S65,400) Pink Geometric Rug (6LP) Yellow Leaf Mobile (S68,870) Pink Leaf Mobile (6LP)
1 Star Rating: Beige Animal Soft Toys (S43,390) Oak Elephant Laundry Basket (S89,900) Brown Cover Beanbag (S38,970) Oak Retro Toy Shelf (S67,660) Oak Wicker Hamper (S107,150) Oak Rocking Chair (S148,260) Brown Retro Change Table (S97,930) Oak Tepee Cot (S79,280) Oak Instant Camera Stand (S174,460)
2 Star Rating: Gray Animal Soft Toys (4LP) Cream Elephant Laundry Basket (8LP) Pink Cover Beanbag (3LP) Pine Retro Toy Shelf (6LP) Pine Wicker Hamper (10LP) Pine Rocking Chair (14LP) Cream Retro Change Table (9LP) Pine Tepee Cot (7LP) Pine Instant Camera Stand (15LP)
NEW PREGNANCY EVENT
There are new time limited prizes when you complete the 9 day pregnancy event in the time limit and earn the baby bonus between the 19th- 27th August
If you start the 9 day pregnancy event anytime during the time frame you have the chance of earning the maternity items in that pack if you complete the event in the time limit, for example if you start a pregnancy event on the 27th August and complete in the time limit you will earn the items above
You need to have completed the first pregnancy event in the A Bump-y Ride Quest before you can earn the maternity prizes
Returning Events?
The Fine Dining Live Event (not available yet) will return on the 22nd August for 10 days, complete in the time limit to unlock restaurant themed items and the Fine Dining House Template
What else?
You can earn double rewards from the paperboy between the 26th-30th July and 1st-5th September
Update Videos:
Guide to MidTown Café:
My Café Tour [MidTown Café]:
Holiday Home Live Event Prizes:
Summer Staycation House Tour [Holiday Home Live Event Grand Prize]:
Early Access to Beta Provided by EA/ Firemonkeys (Presented by EA Creator Network)
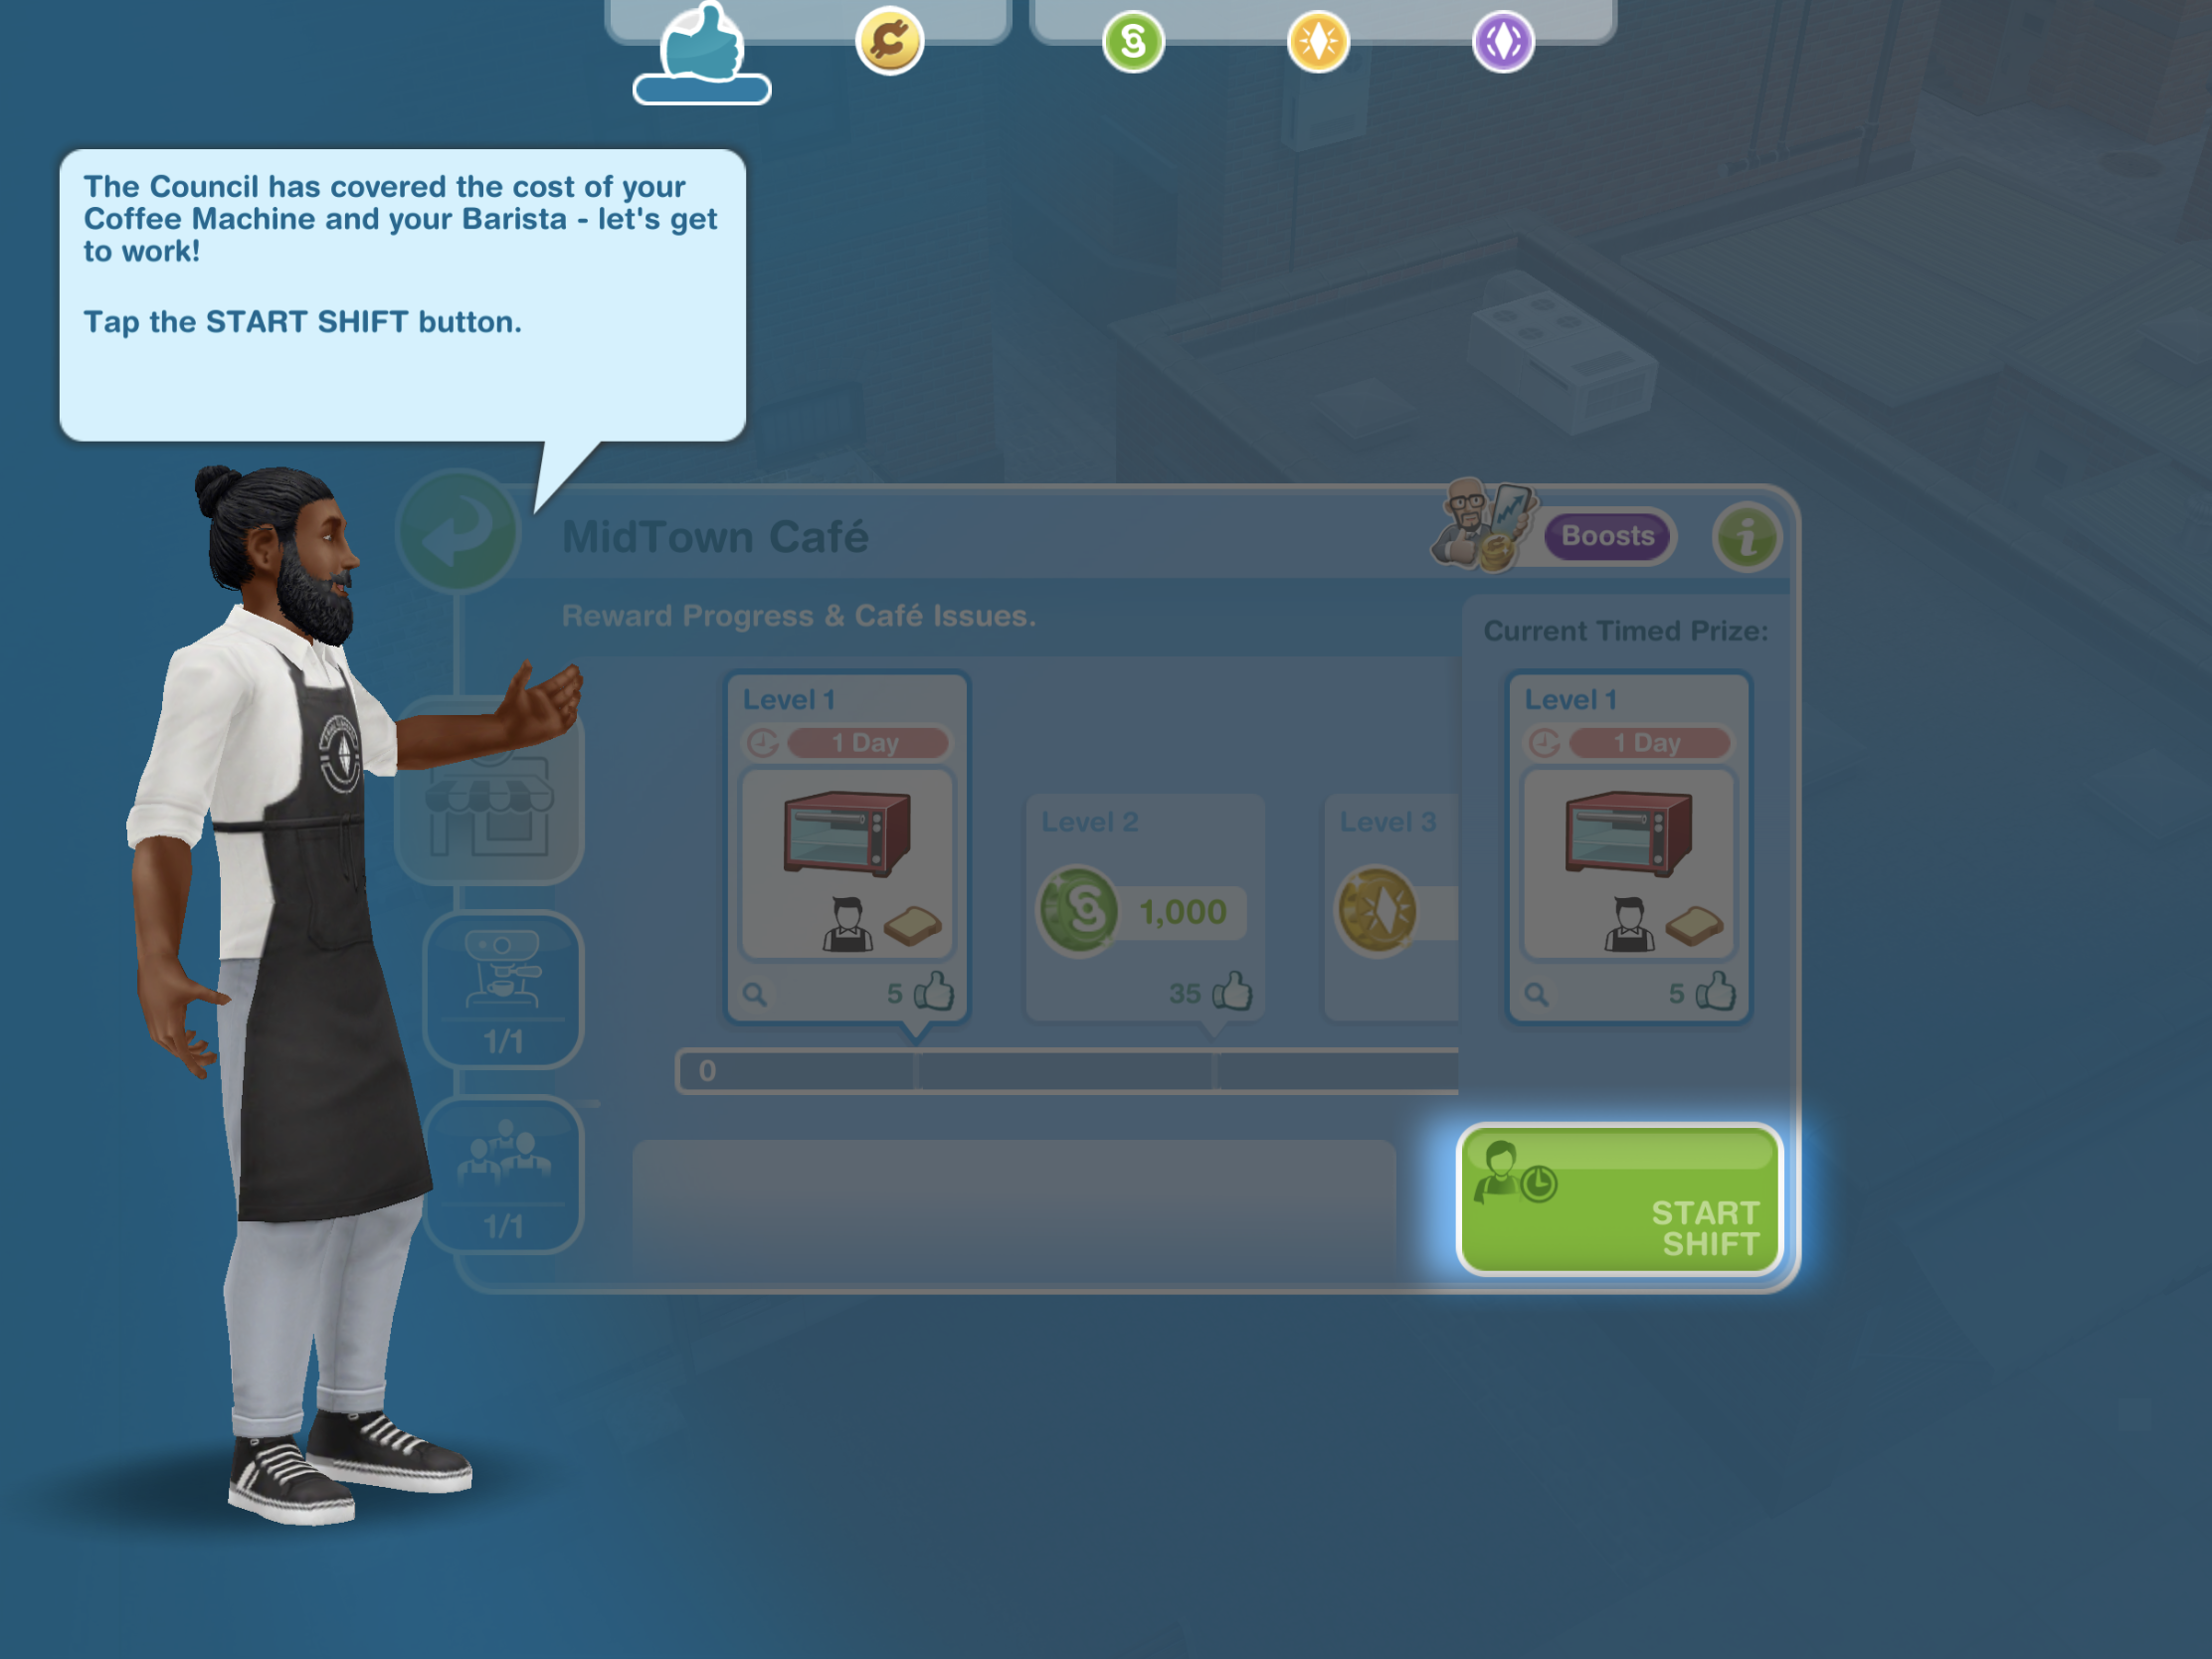
A brand new event is available from the Hot Simmerin’ Summer July 2022 update. MidTown Café is a new business venue where you can hire staff, upgrade equipment, and grow your café to be the most talked about business in the new map location, MidTown!
You must be level 27 or over to begin. This event will be available until you are ready to complete it so there is no rush!
How can I start my café? Build MidTown Terminal, you will find it next to the Children’s Store in Simtown:
Once built you will be able to access the café from the bus terminal and the tutorial with Barry Ista will begin:
THE FIRST TIMER FOR THIS EVENT WILL BEGIN WHEN YOU START THE TUTORIAL
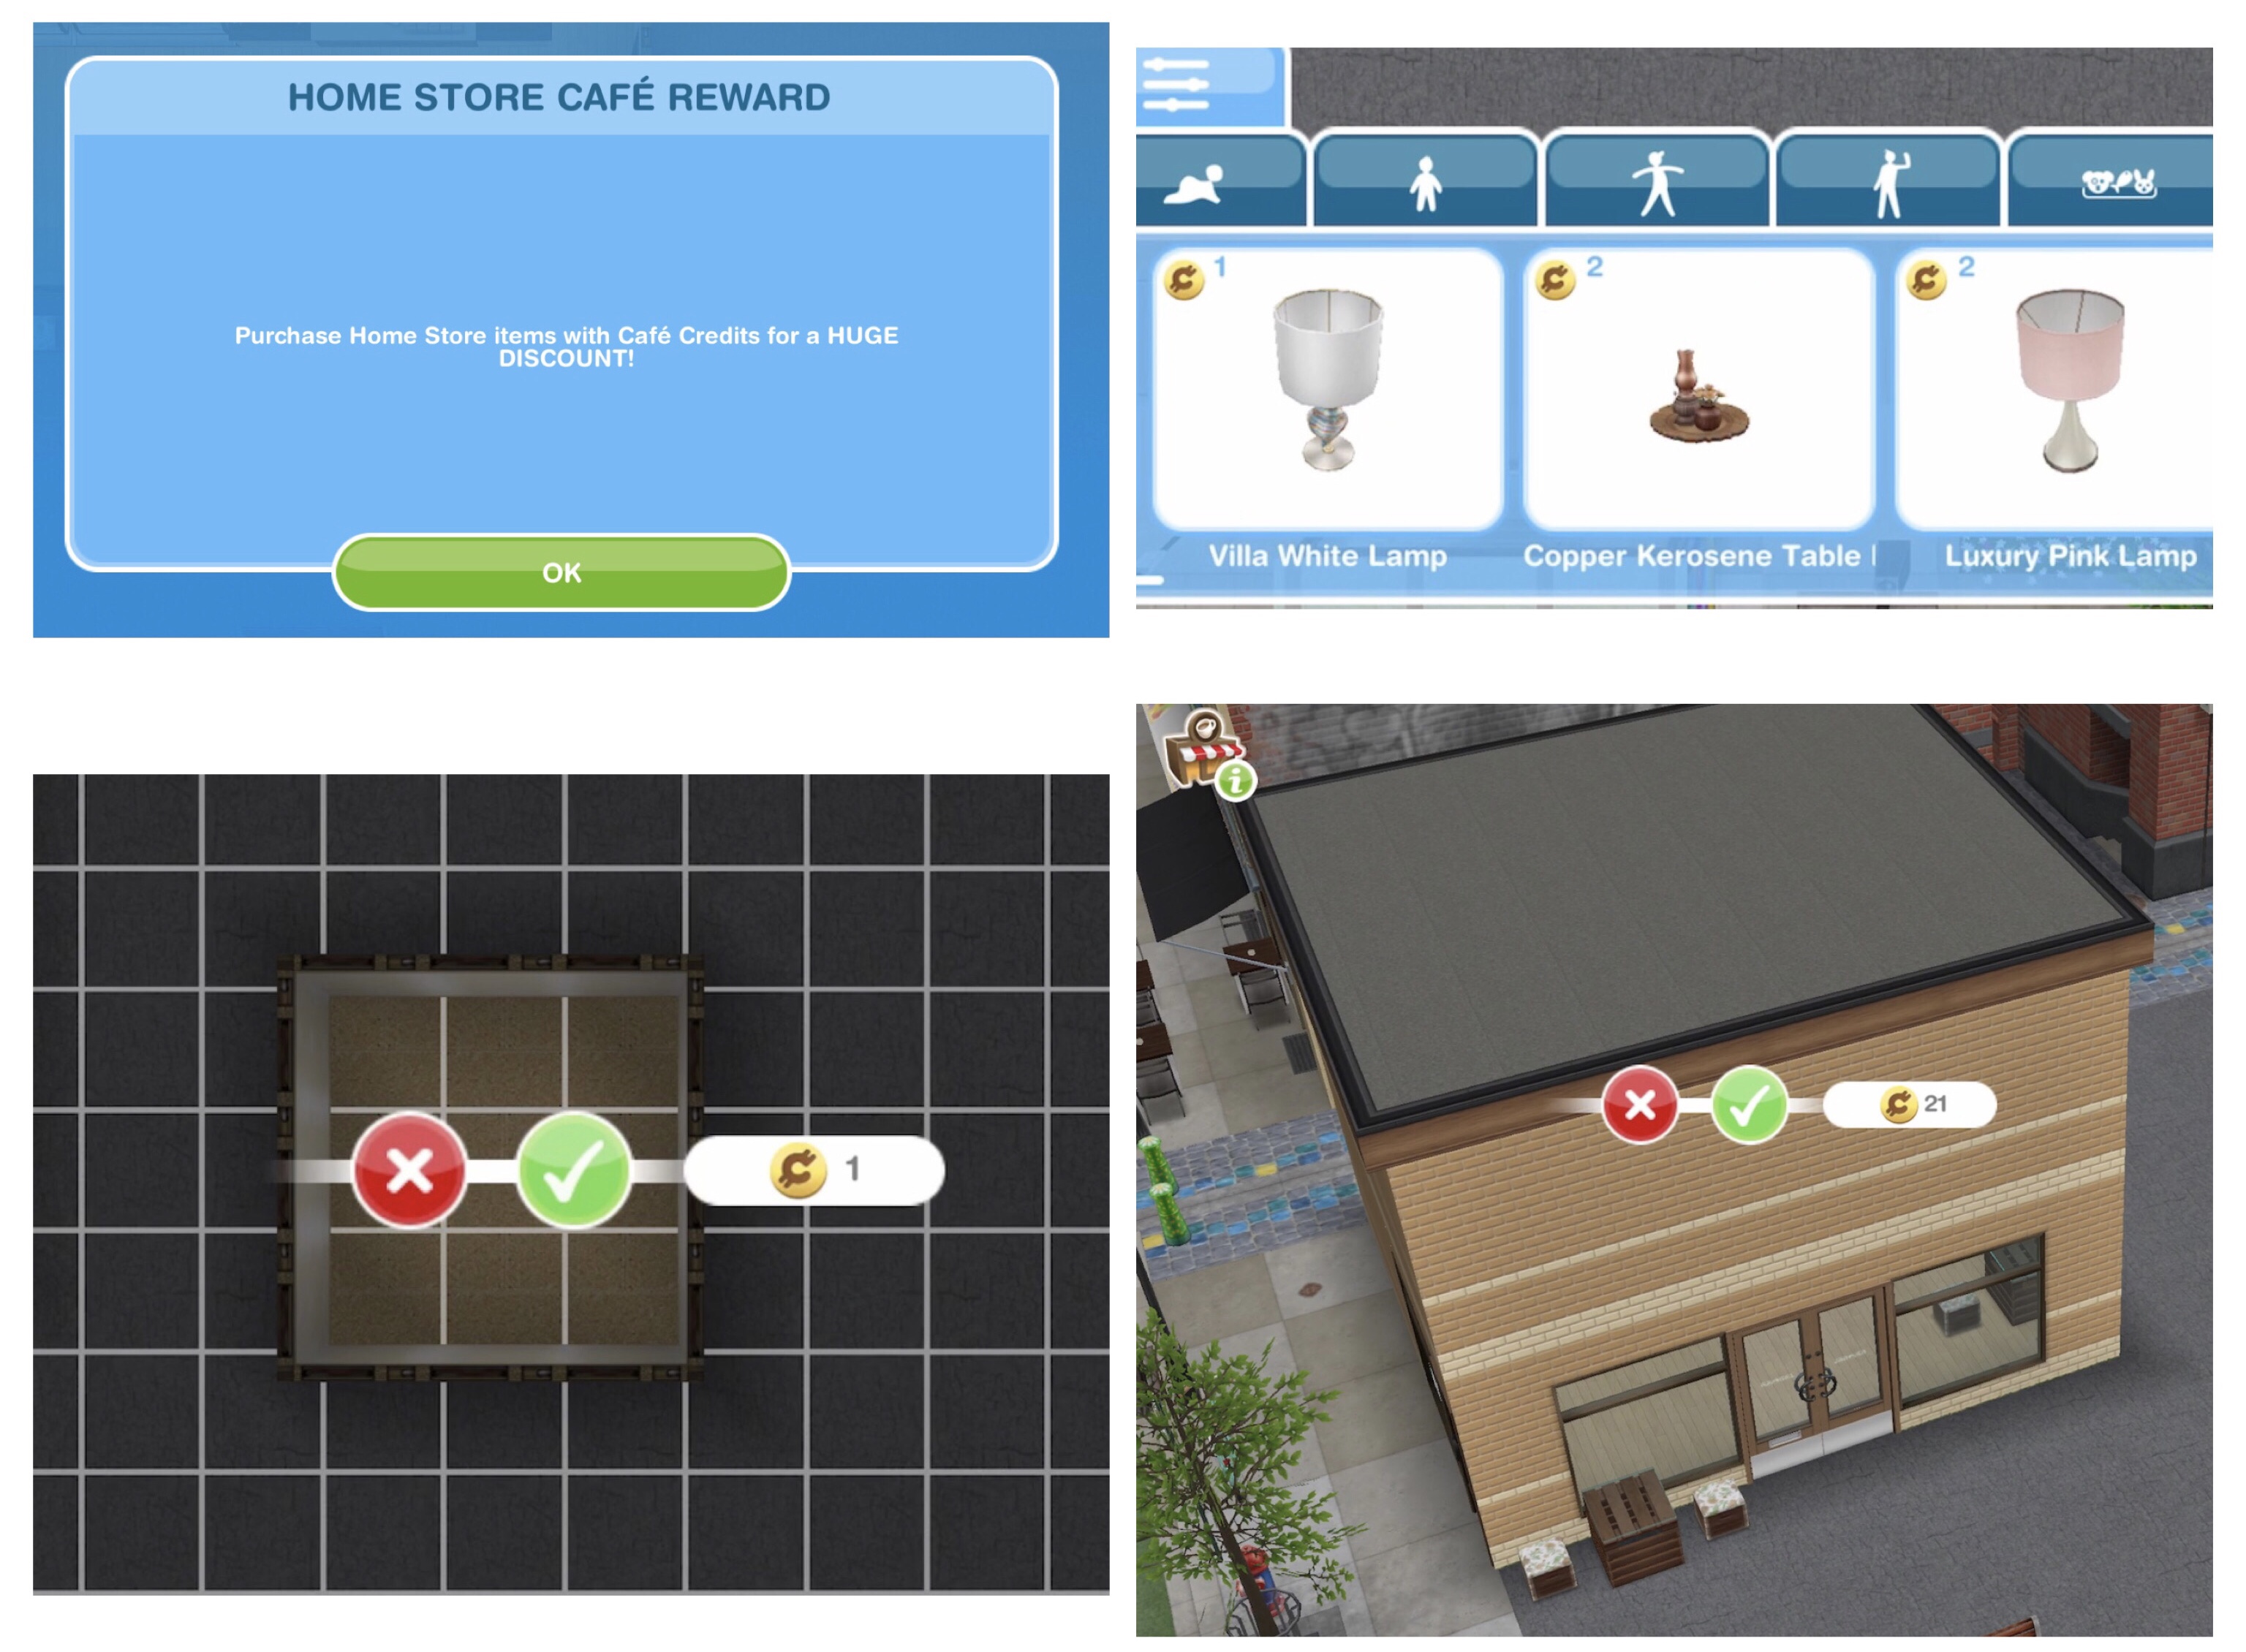
At the café you can click on the menu button in the top left corner to view your progress and everything you need to know about MidTown Café, click here to see this in more detail
You can start shifts from here too, a shift lasts 4 hours and you can complete 2 in a 24 hour period:
What do I have to do?You will manage the Full of Beans Café by serving customers and fulfilling their orders with speedy service. Employ specialist staff and upgrade your café’s equipment to ensure all your customers’ needs are met. Customers will rate your service which then earns you rewards.
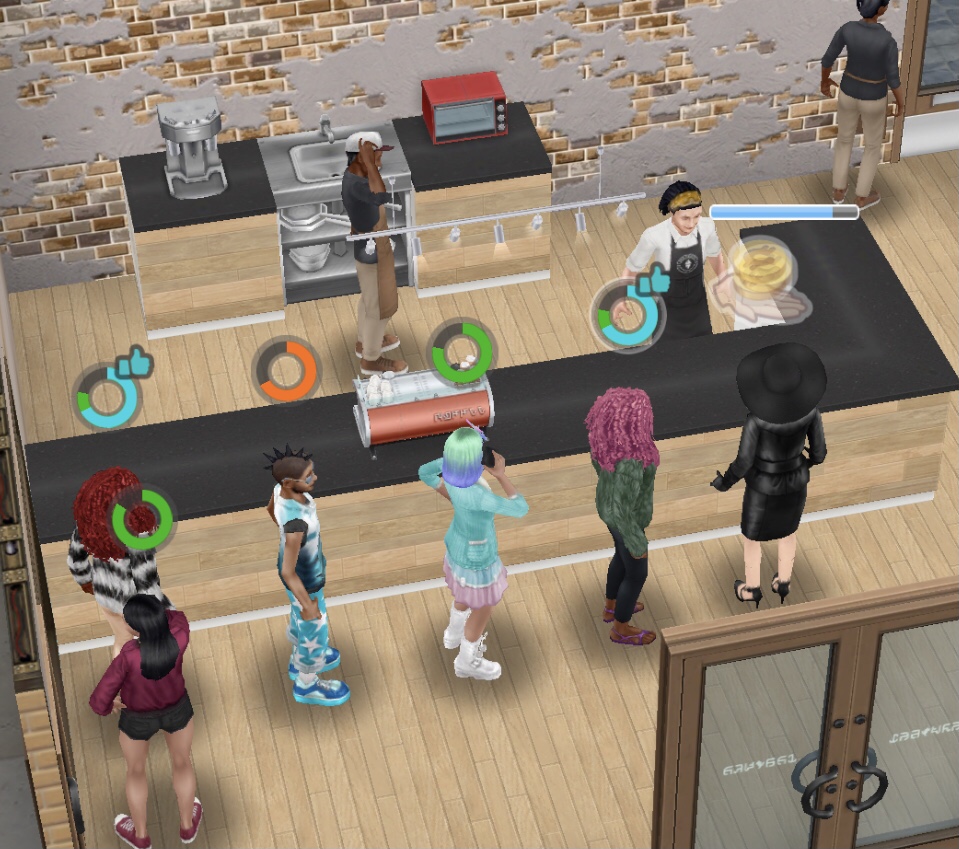
There are 2 types of customers:
Walk ins- these are regular customers who will walk in off the street and pay Café Credits when served
Tourists- these arrive on buses and are part of Tour Groups so many arrive at once. They also pay in Café Credits but you will also earn Likes from these customers. You need to earn Likes to progress and unlock new equipment and prizes on the progress bar.
What are Café Credits used for? Café Credits are used to upgrade equipment, hire staff, send staff on training and pay their wages:
What are Likes used for? Likes unlock rewards on the progress tab in the Café Menu:
There are 3 types of tourists:
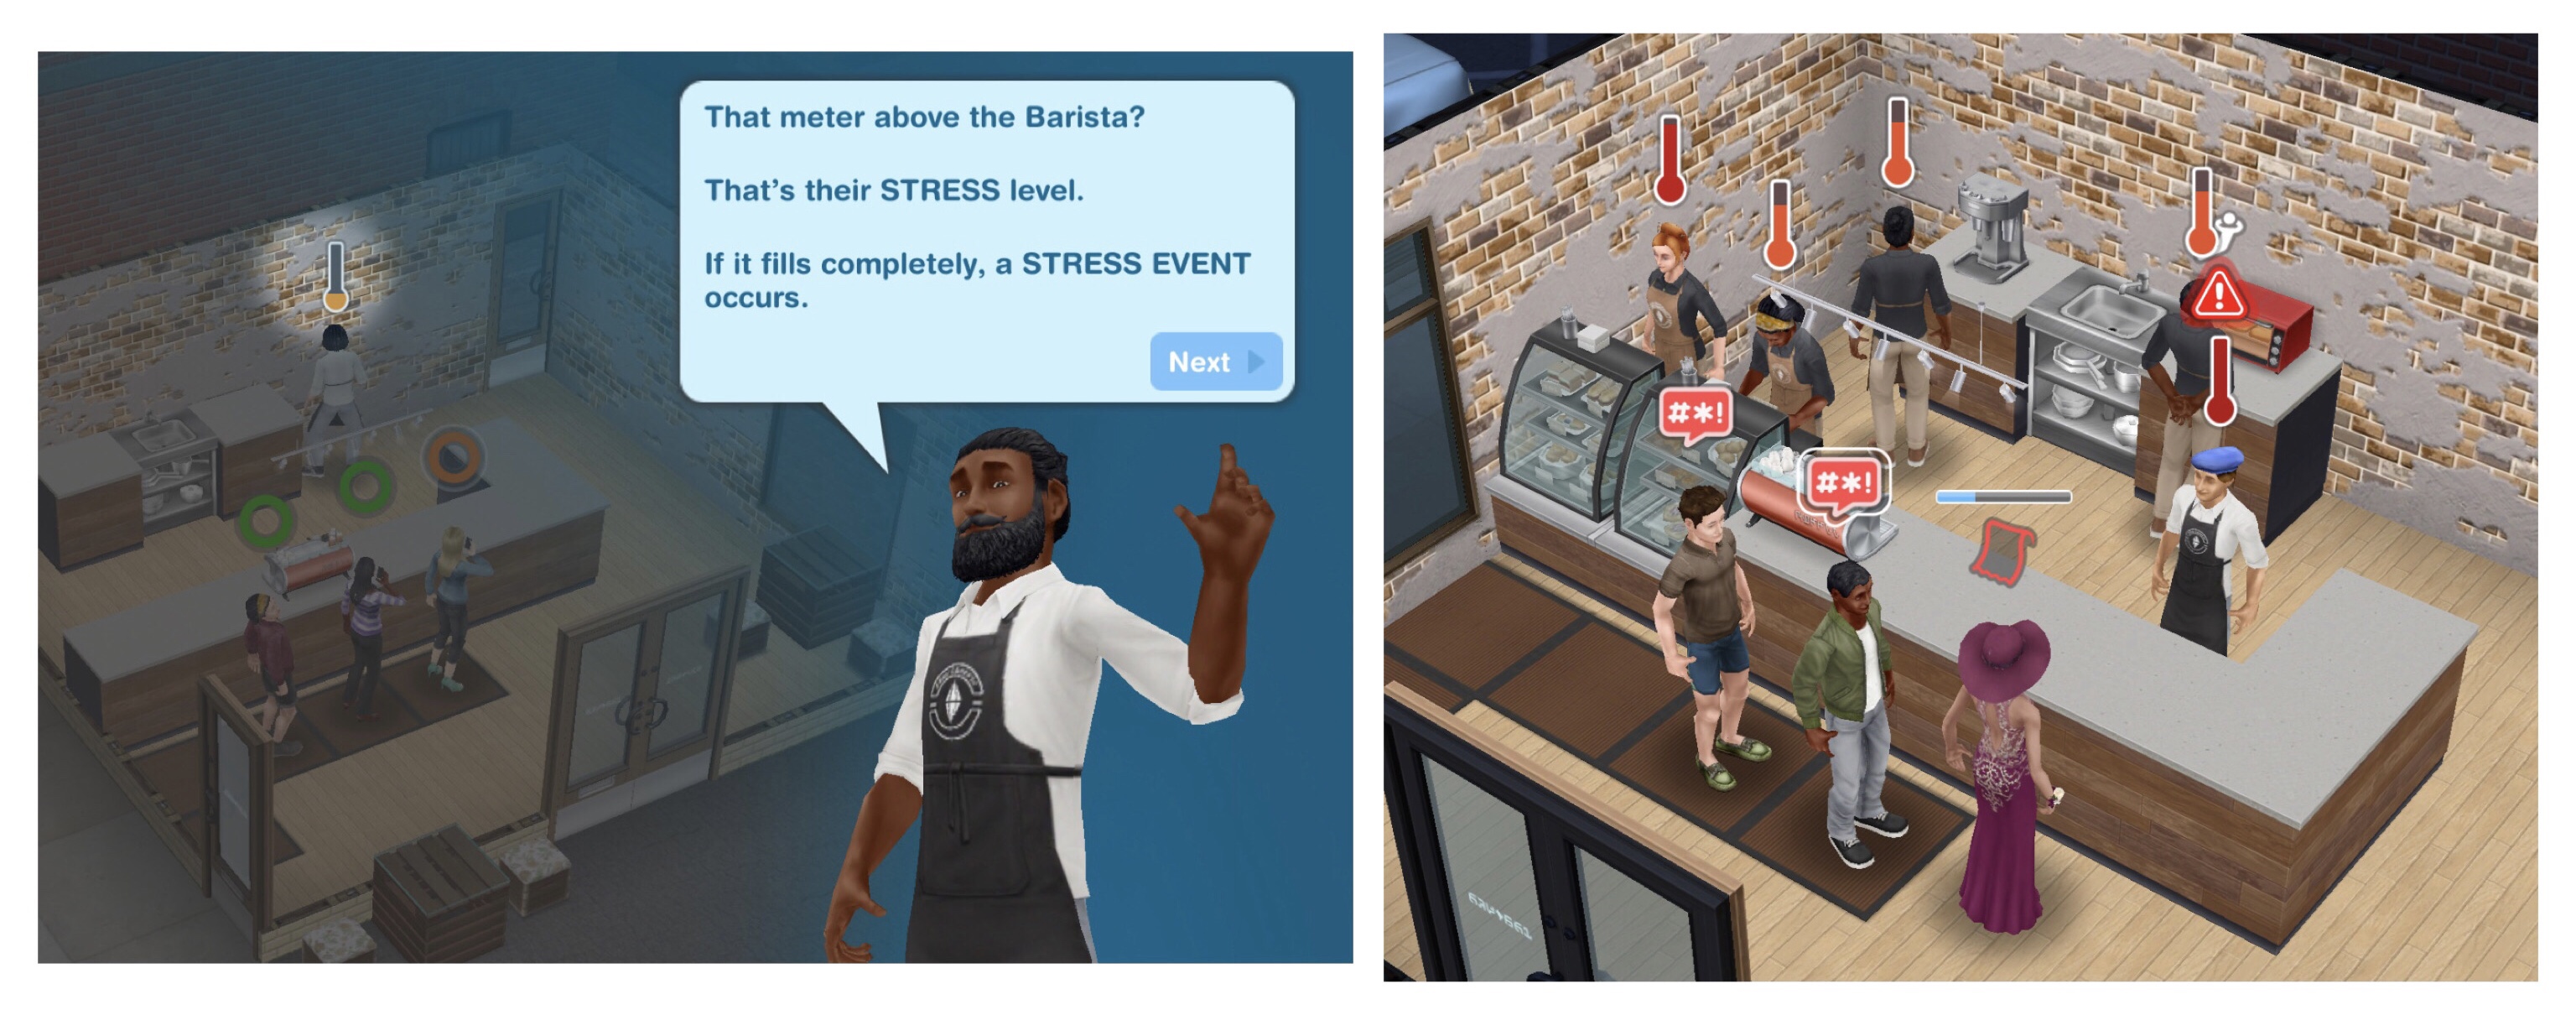
Influencers- they have blue timers above their head and if served before the blue timer turns to green you will earn bonus Likes
Moneybags- they have yellow timers above their head and if served before the yellow timer turns to green you will earn more Café Credit as they will give you a tip
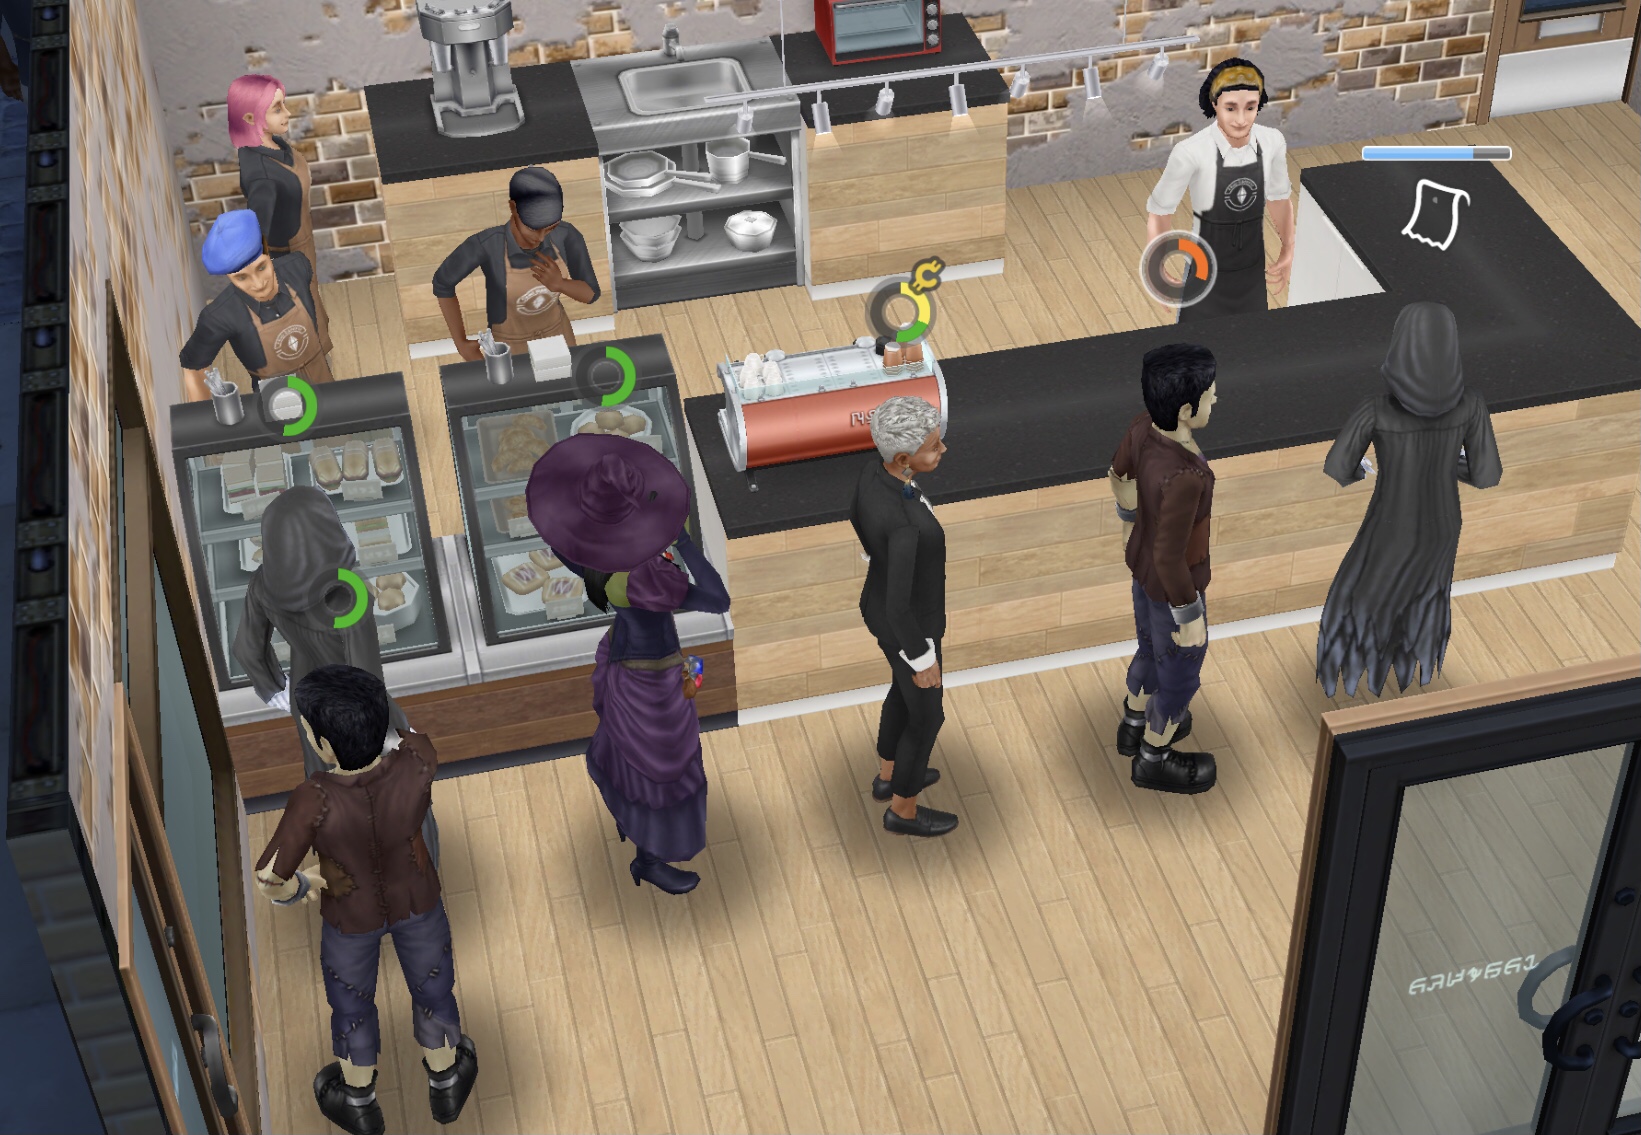
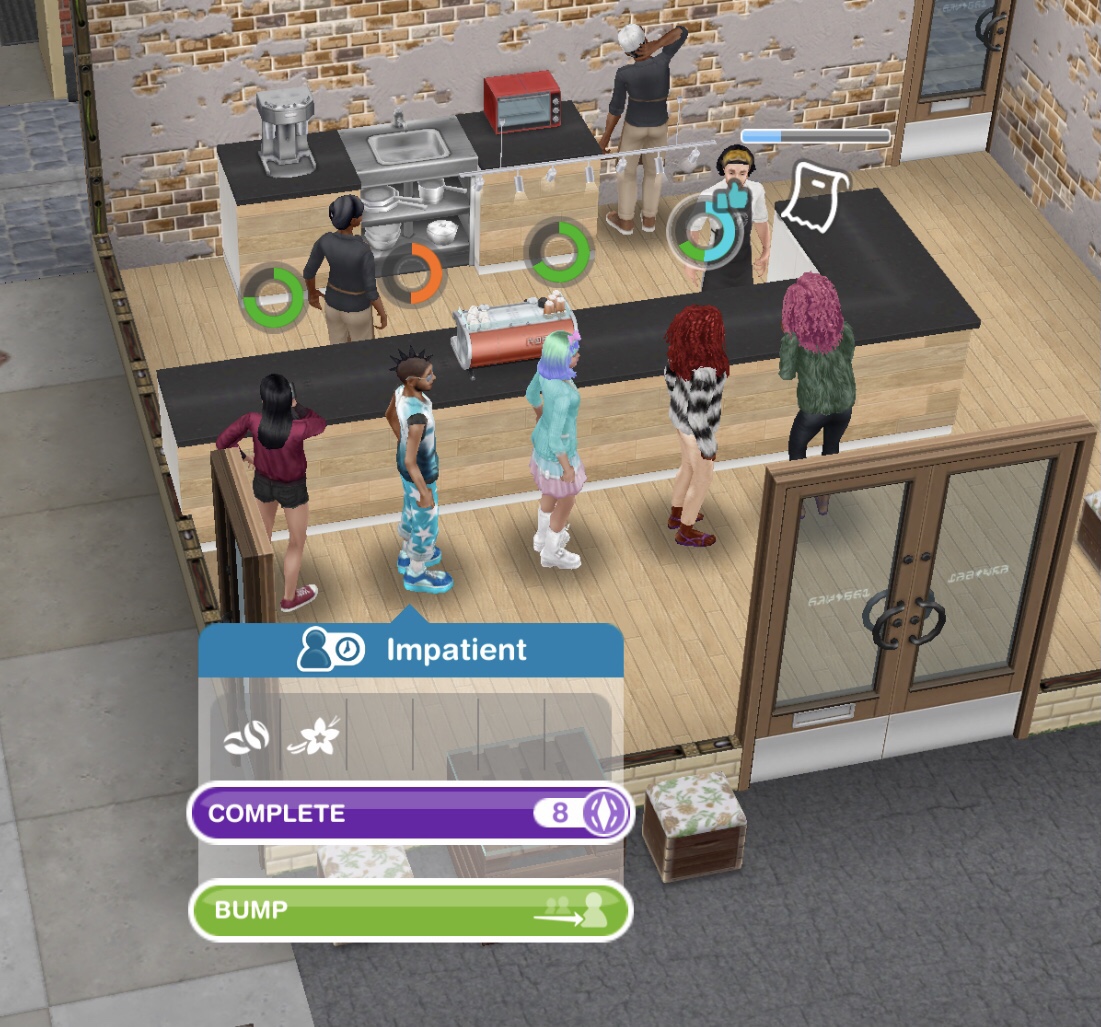
Impatient- they have orange timers above their heads, these are shorter timers than the green one so you need to serve them first to avoid your staff getting stressed
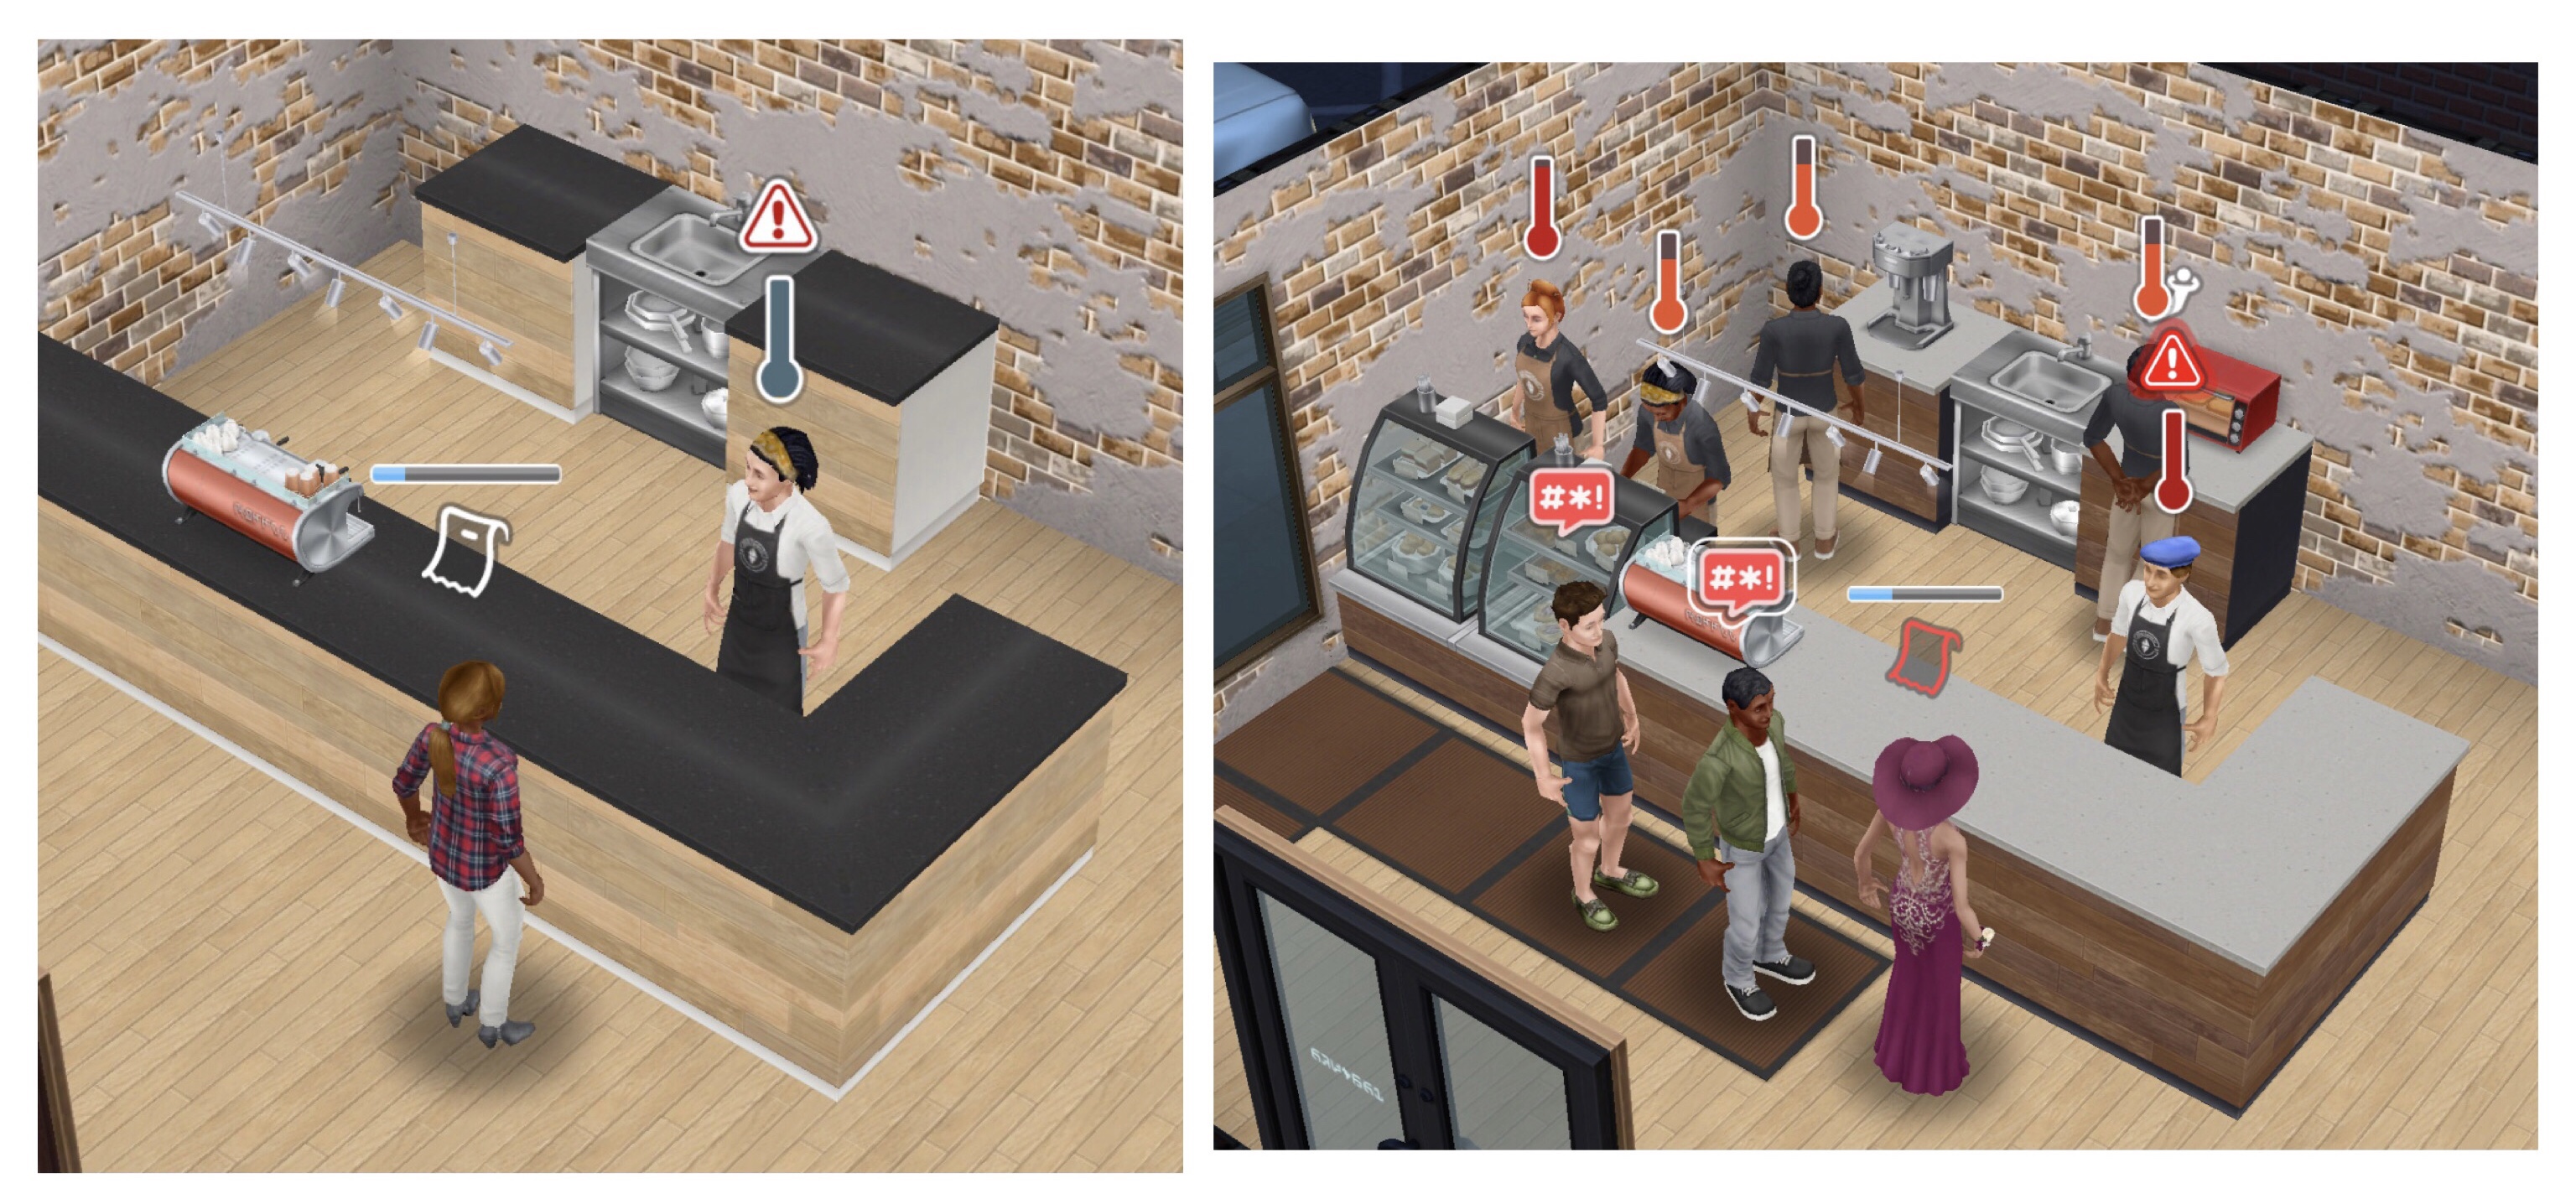
Not all customers have these timers walk ins and some tourists will have the green timer which is the regular timer, if any of the timers run out before they are served they will become angry and cause stress to your staff.
How do I deal with impatient customers? Tap on them and select bump to move them to the front of the queue:
You can do this for any sim you want to serve first so if they have a green timer that will run out before someone else or if they are an influencer or moneybags type of customer you can bump them up to serve them before they lose their extra rewards.
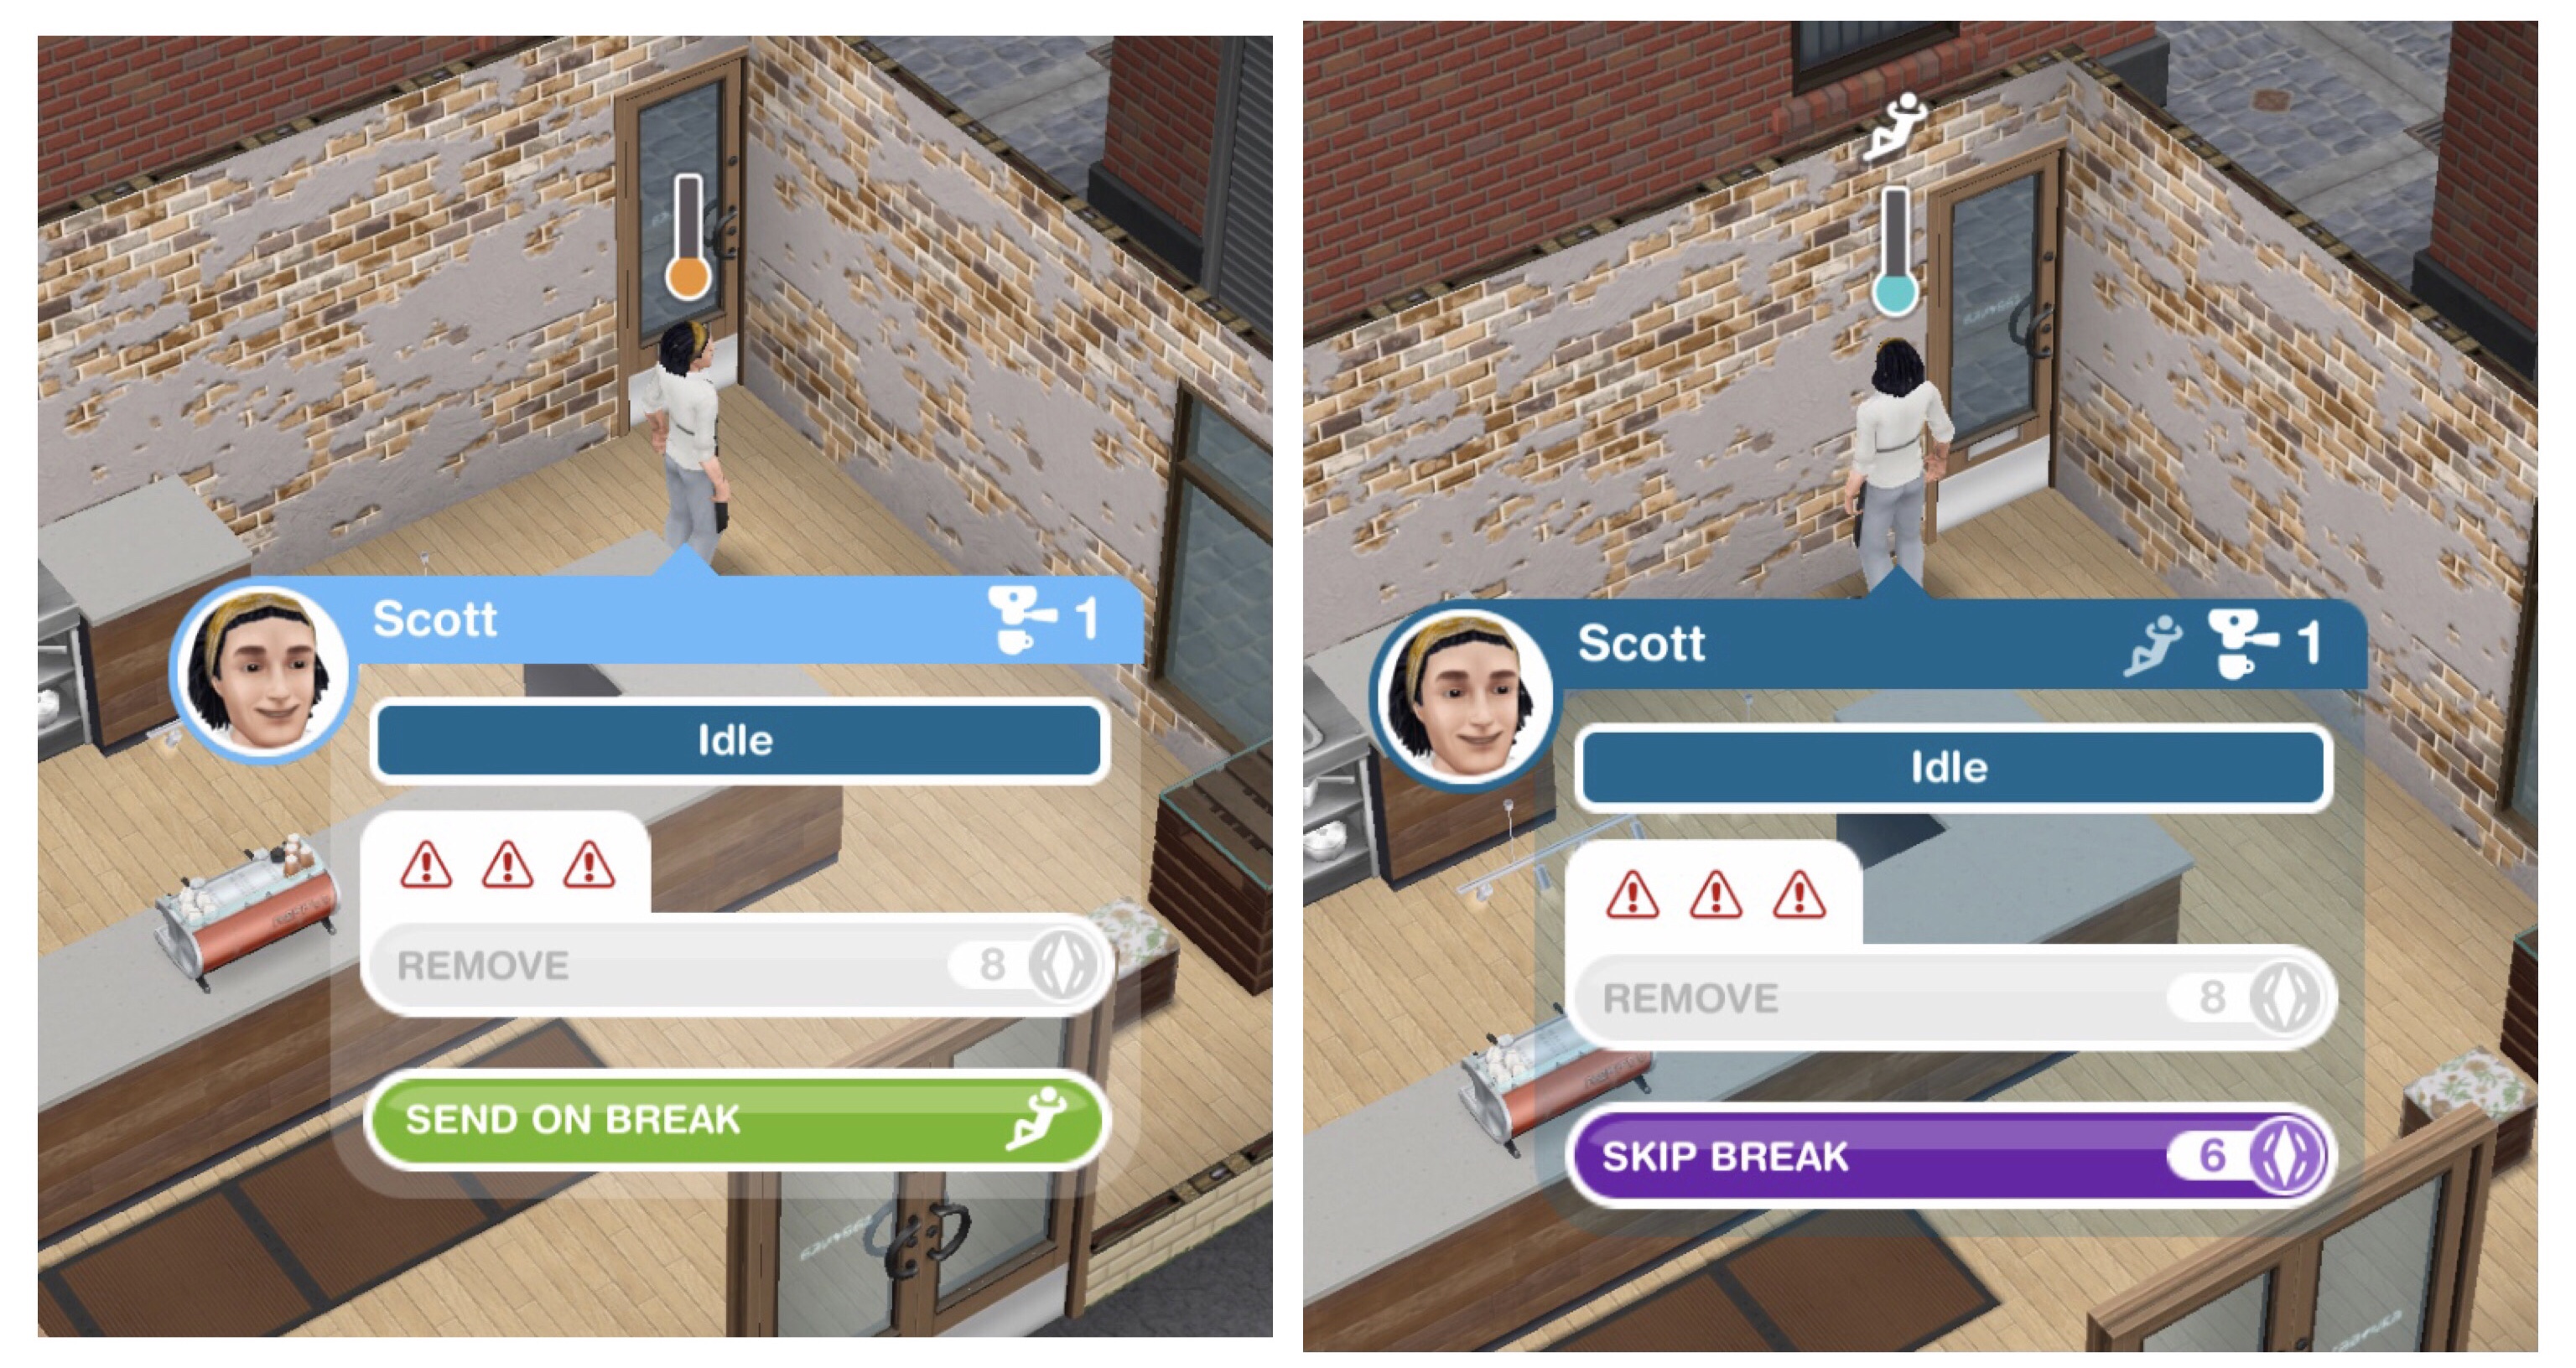
What happens if customers get angry? Angry customers mean your staff will become stressed, a meter will appear above your staff members head when they start to become stressed:
If this meter gets full they will have a stress event:
If they have 2 stress events in 1 shift they may call in sick:
If they have 3 stress events in 1 shift they will quit:
How do I avoid stress events? You can click on a member of staff who is getting stressed and select ‘send on break’ Once they have finished dealing with the current customer they will head outside for some air, this will empty their meter. They will return to work when their meter is empty:
Staff will automatically take a stress break once they have a stress event
What happens if they quit? If a staff member quits you can hire them back at the end of the shift for Café Credits, it is cheaper to rehire than to hire a new member of staff:
How do I get to MidTown Café? You can click on the bus terminal in Simtown or from the active tasks tab:
All staff and customers are non playable sims so you can’t really control them apart from sending staff on breaks or bumping customers up the queue. This means you can bring 10 of your own sims to the café, they won’t be able to work at the café and serve customers however they can enjoy the surroundings but you cannot bring your sims to the café while a tour is going on.
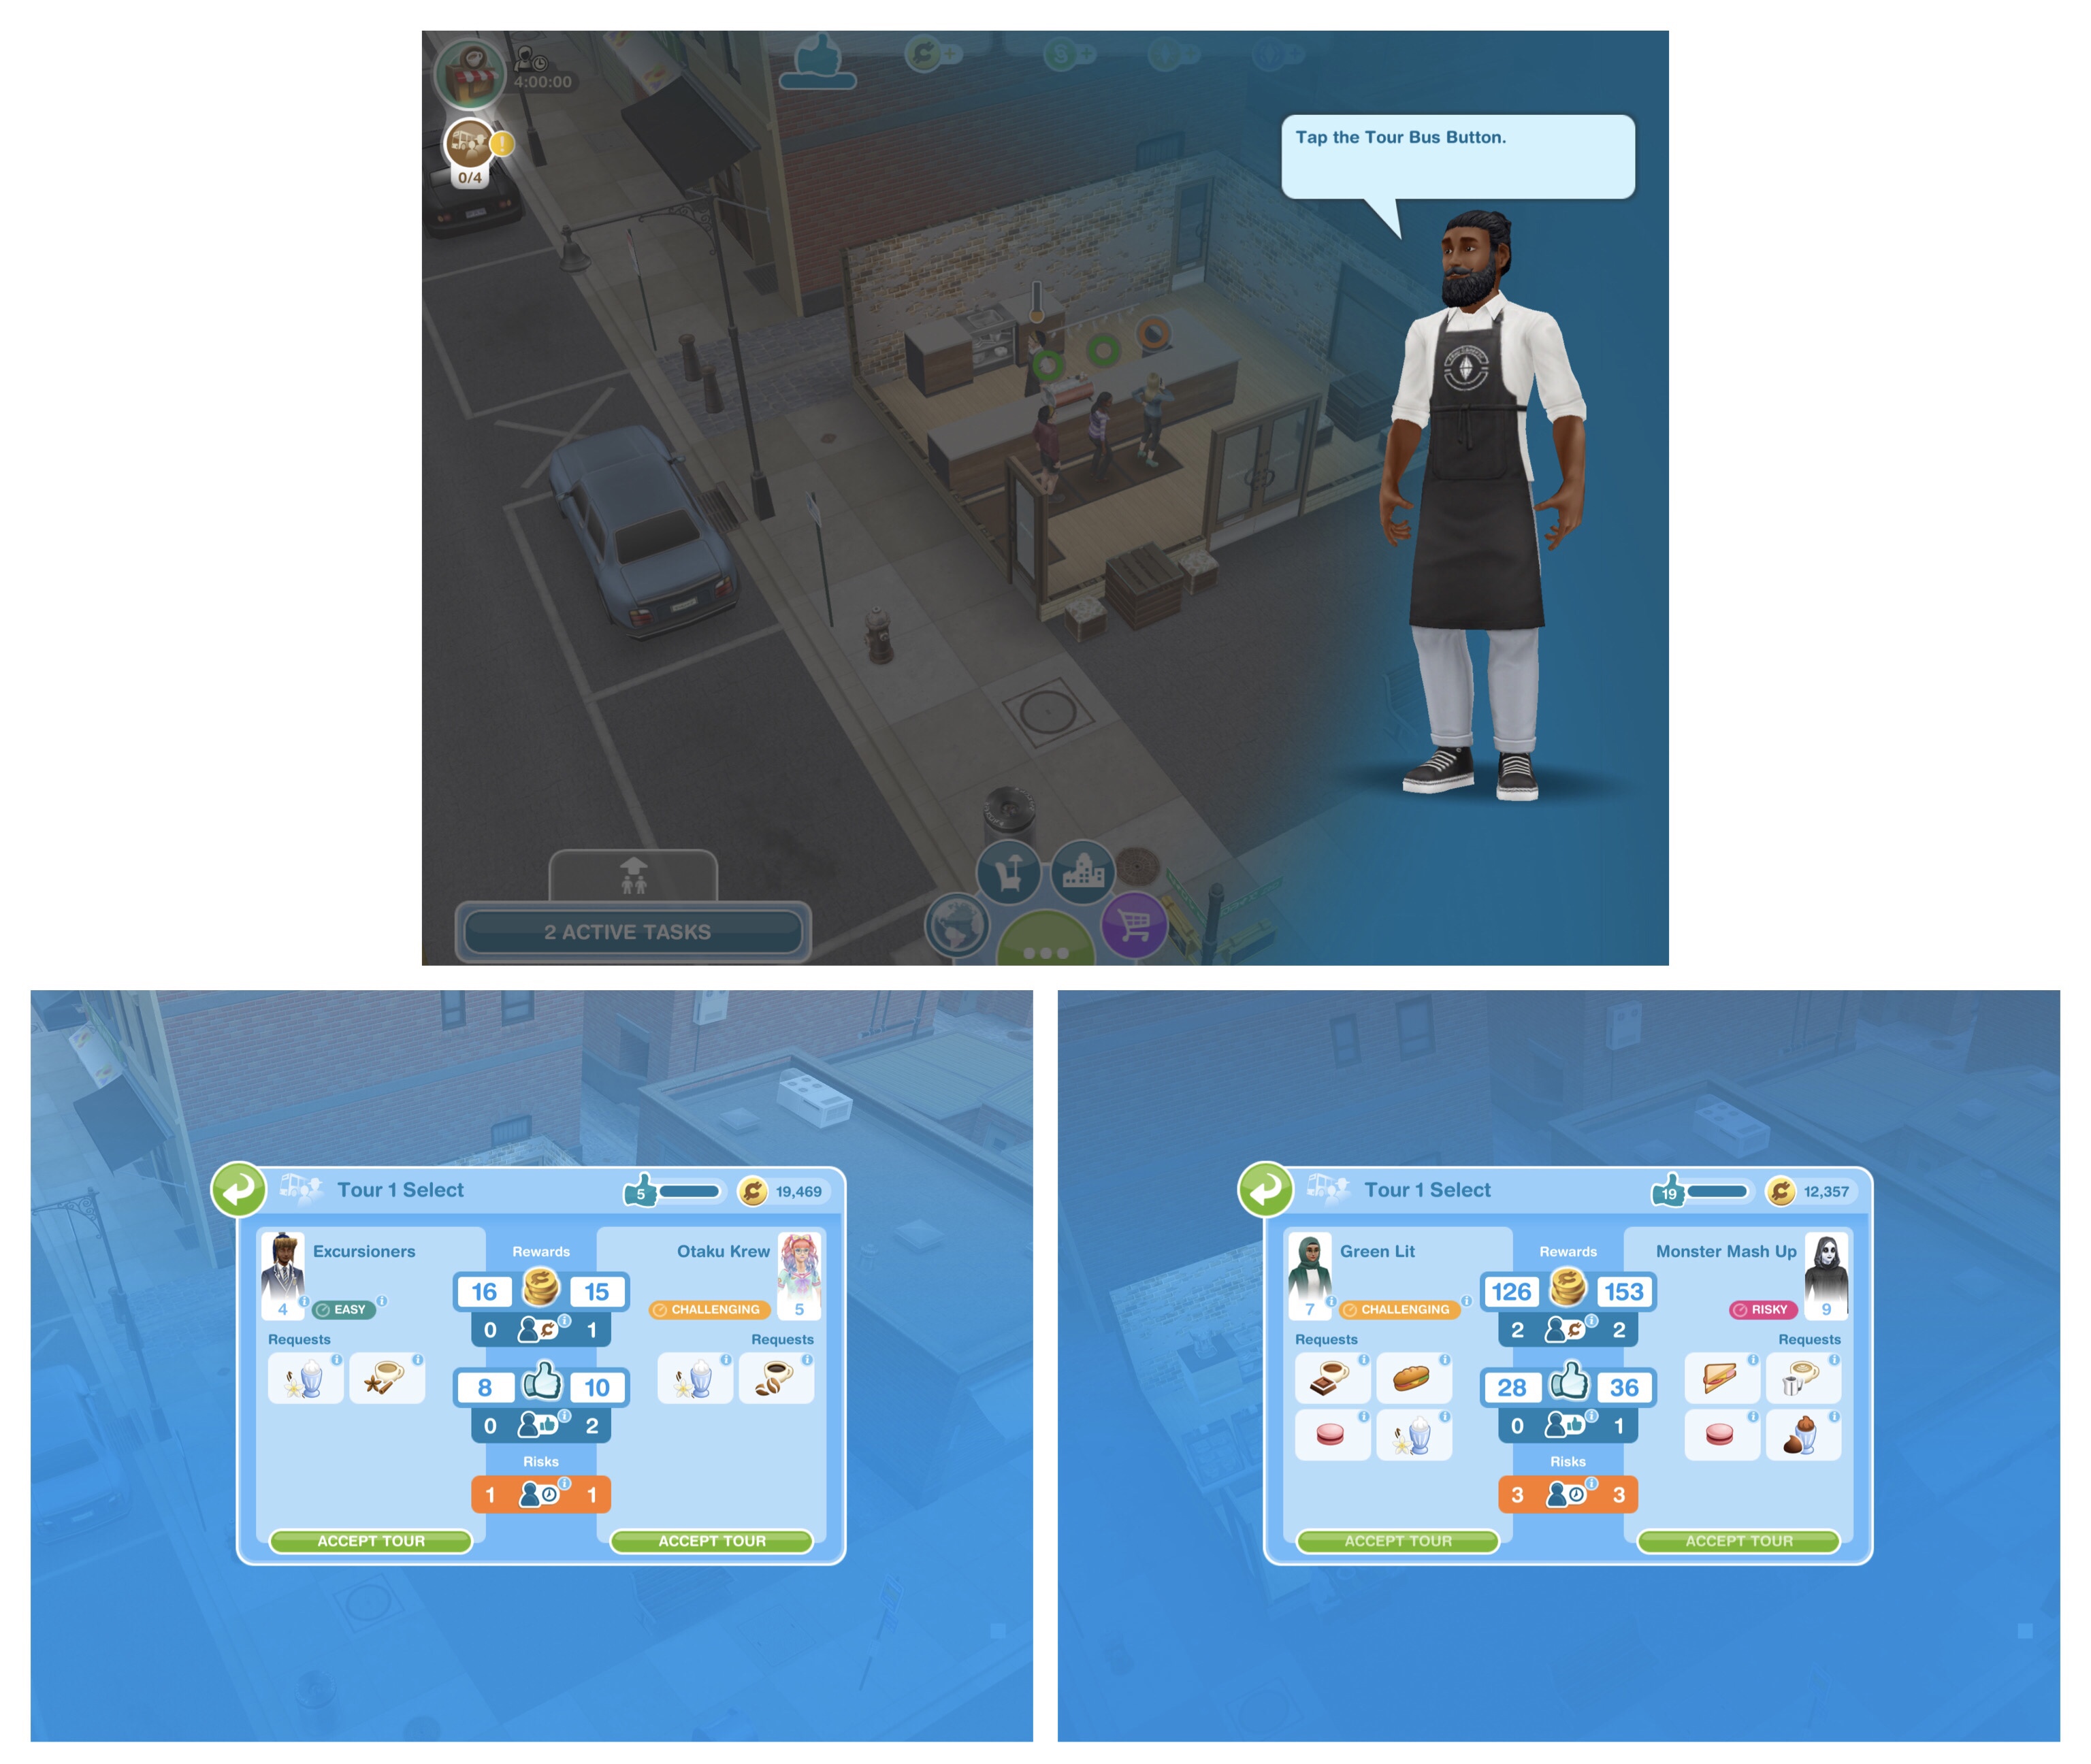
To start a tour you need to click on the Tour Bus Button in the top left corner under the Café Progress Button:
You will then get a pop up to select which tour you want to complete, tours can either be Easy, Challenging or Risky. You will always get the Easy option but then the other will be a harder option so either Challenging or Risky.
Harder Tours have more tourists and more likely to have moneybags, influencers or impatient tourists but shorter queue times so you can earn more rewards but you need to be more efficient when serving them to avoid stress to your staff by bumping certain sims to the top of the queue:
You can complete 4 tours a shift and a shift lasts 4 hours, between each tour there is a cool down period of up to an hour.
Serving Tourists is the only way to earn Likes to progress in this event and unlock rewards
NOTE: Once you have completed the café you will no longer get tours
MidTown Café Menu
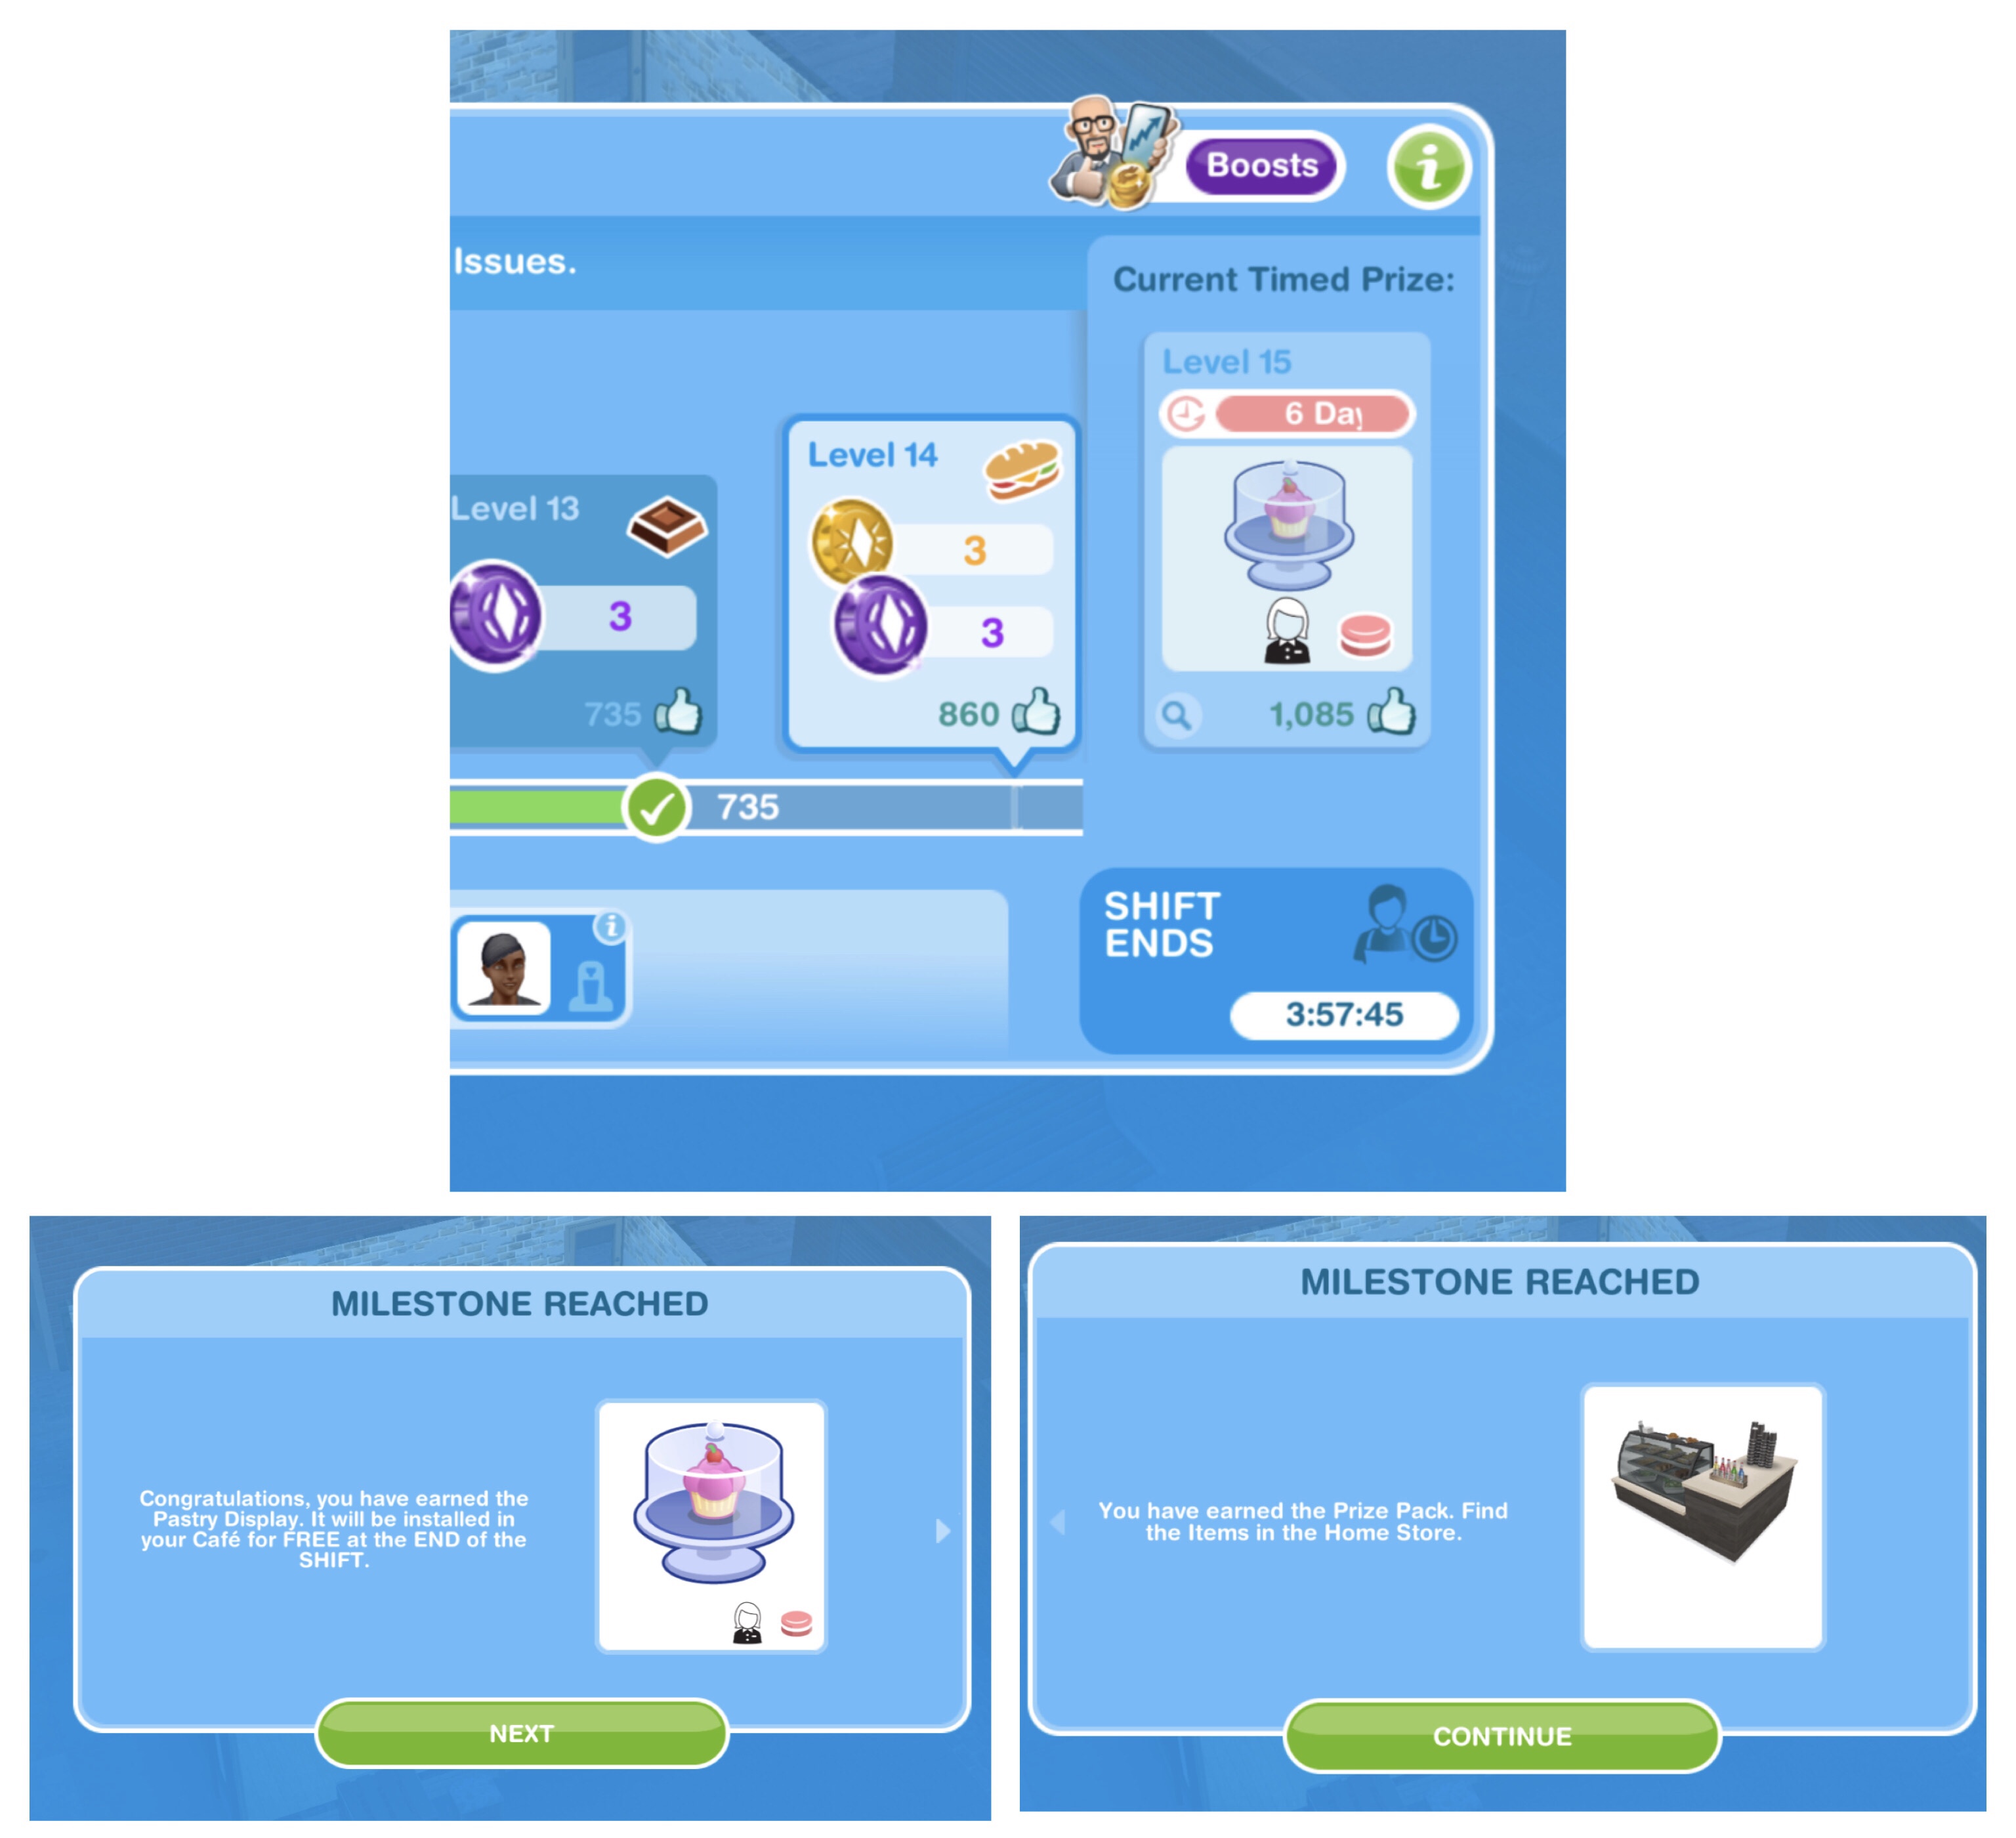
Tab 1: Reward Progress & Café Issues
Reward Progress Bar- there are 45 levels to complete to fully upgrade this café, prizes are unlocked by earning Likes which you earn by completing tours:
Some levels have Milestone Rewards, you need to complete these stages in the time limit to earn those items for free otherwise you will need to purchase them to continue:
It will cost Café Credits to purchase café equipment if you don’t complete in the time limit:
It will cost social points if you fail to reach any of the café upgrade milestones on time, you have to pay before you can even complete another shift. I really don’t like that this costs social points, not everyone has that many to spend on this and the fact you can’t even continue completing shifts until you pay it doesn’t seem fair:
It will also cost SP if you want to unlock prize packs you missed out on, the SP price will appear on the progress bar:
THE FIRST TIMER FOR THIS EVENT WILL BEGIN WHEN YOU START THE TUTORIAL
The table below shows all the levels you need to complete, the rewards you earn for each level and how many likes are needed to unlock these rewards. You can also see the time limit to reach certain milestones as well as the cost if you fail to complete in time:
I’ve unlocked a piece of equipment but it isn’t in my café, why? This will be added at the end of the shift:
Café Upgrades are also completed after the shift
Café Issues– underneath the progress bar you can see any issues that have occurred, this is usually due to a piece of equipment not being upgraded enough to fulfil customer requests or if a member of staff is unavailable or one hasn’t been hired to use a certain type of equipment:
You can also start shifts from this screen
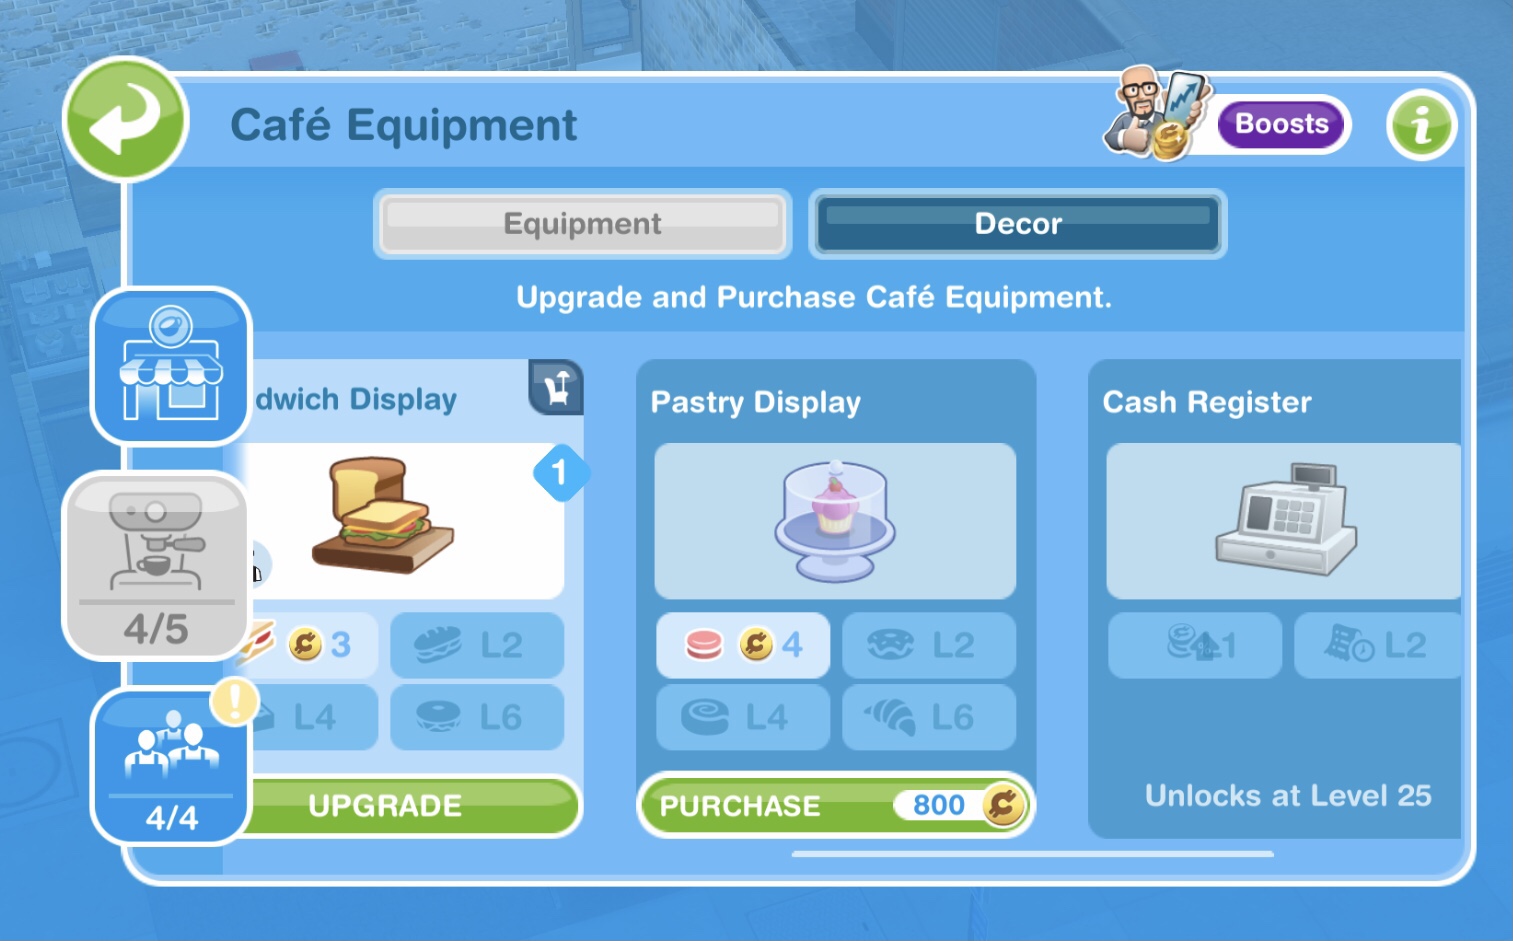
Tab 2: Upgrading Equipment
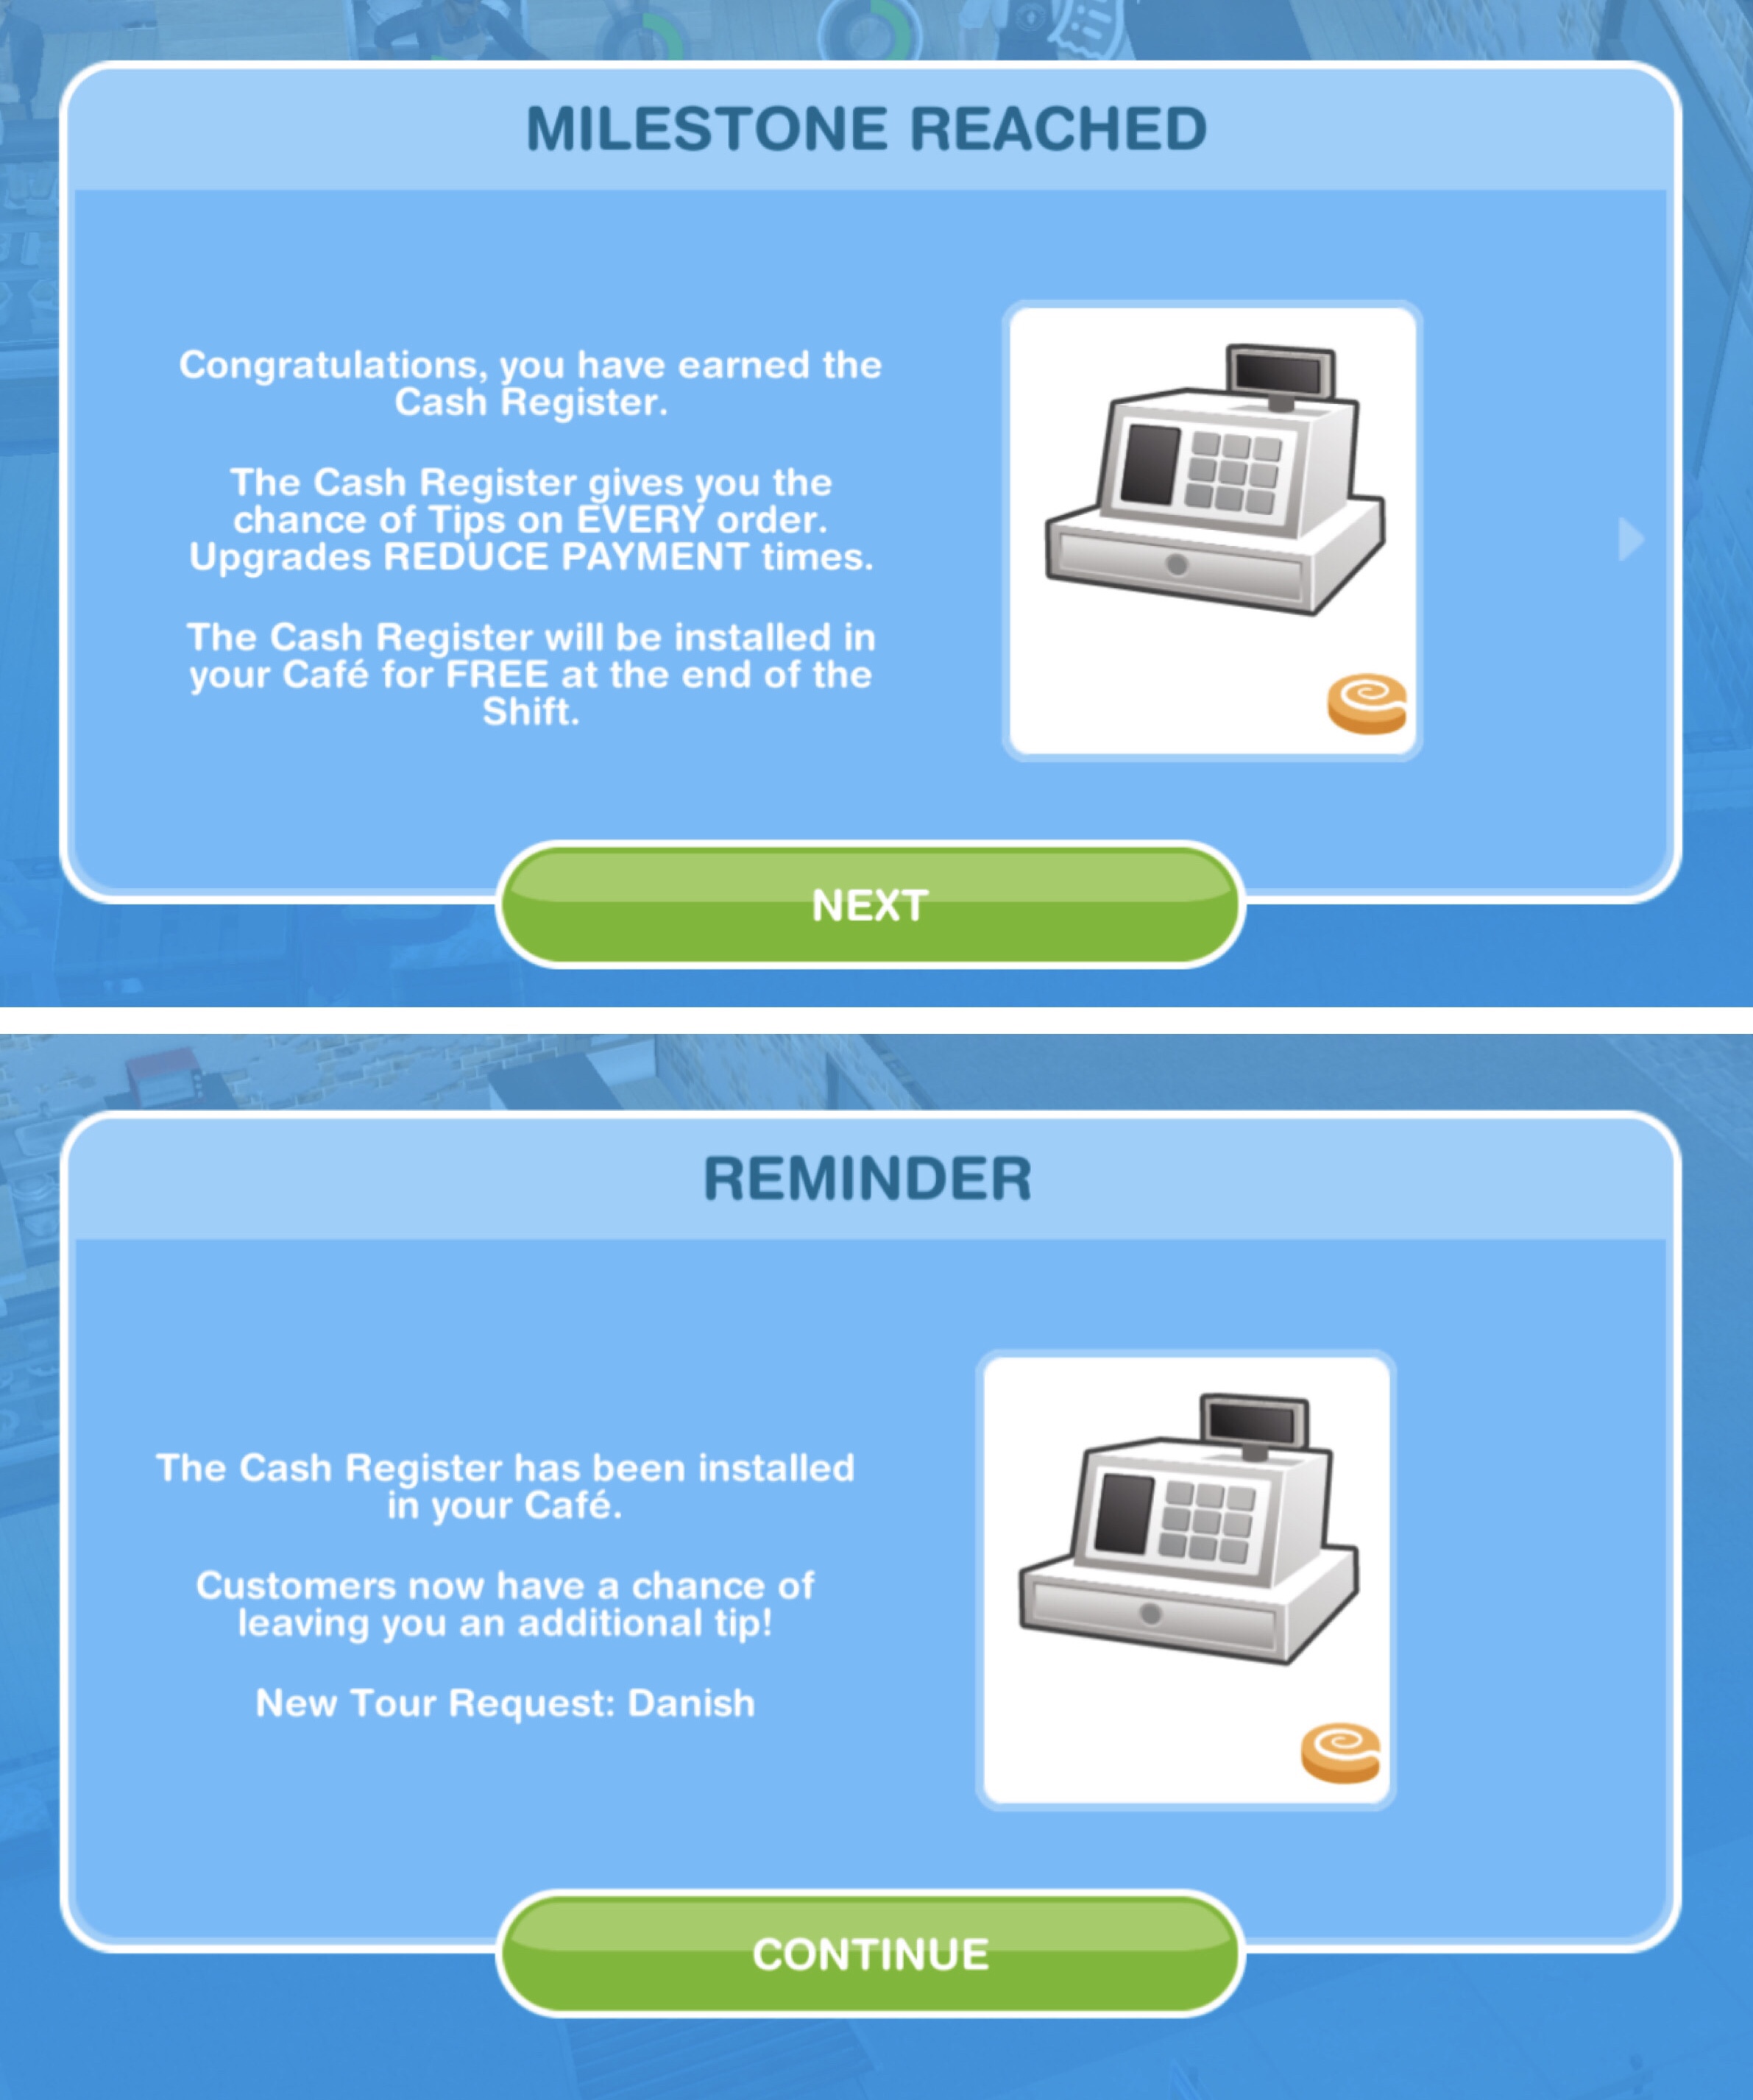
Some progress rewards are Tour Requests, this mean a piece of equipment needs to be upgraded so you can make different items that customers want to buy, if you don’t upgrade your equipment you won’t earn as many Café Credits by completing tours:
In the table below you can find the upgrade costs for all the café equipment (they all cost Café Credits):
LEVEL 2
LEVEL 3
LEVEL 4
LEVEL 5
LEVEL 6
LEVEL 7
COFFEE MACHINE
319
372
425
452
510
578
TOASTER
383
446
459
510
612
694
SHAKE MAKER
1,020
1,047
1,156
1,360
1,632
2,394
SANDWICH DISPLAY
1,020
1,190
1,360
1,700
2,550
2,720
PASTRY DISPLAY
2,400
2,520
2,720
4,400
4,800
5,120
CASH REGISTER
6,750
8,663
9,000
11,250
SALAD DISPLAY
6,300
7,350
8,400
10,500
12,600
13,440
This table explains how many Café Credits (CC) you will earn from the customers with each upgrade, I haven’t included items in this table if they make the same amount of Café Credits as the previous level, for example, at level 2 with the coffee machine you still sell Coffee for 1CC, but it is included in level 3 as you earn 2CC.
LEVEL 1
LEVEL 2
LEVEL 3
LEVEL 4
LEVEL 5
LEVEL 6
LEVEL 7
COFFEE MACHINE
Coffee- 1CC
Chai Latte- 2CC
Coffee- 2CC
Latte- 4CC
Coffee- 3CC
Chai Latte- 4CC
Mocha- 6CC
Coffee- 4CC
Chai Latte- 5CC
Chai Latte- 3CC
Latte- 5CC
Latte- 6CC
Mocha- 7CC
TOASTER
Toast- 2CC
Cheese Toast- 3CC
Toast- 3CC
Ham and Cheese Toast- 4CC
Toast-4CC
Cheese Toast- 5CC
Avocado Toast- 6CC
Toast- 5CC
Cheese Toast- 6CC
Cheese Toast- 4CC
Ham and Cheese Toast- 5CC
Ham and Cheese Toast- 6CC
Avocado Toast- 7CC
SHAKE MAKER
Vanilla Shake- 2CC
Chocolate Shake- 3C
Vanilla Shake- 3CC
Banana Shake- 5CC
Vanilla Shake- 4CC
Chocolate Shake- 5CC
Strawberry Shake- 7CC
Vanilla Shake- 5CC
Chocolate Shake- 6CC
Chocolate Shake- 4CC
Banana Shake- 6CC
Banana Shake- 7CC
Strawberry Shake- 8CC
SANDWICH DISPLAY
Sandwich- 3CC
Roll- 4CC
Sandwich- 4CC
Focaccia- 6CC
Sandwich- 5CC
Roll- 6CC
Bagel- 8CC
Sandwich-6CC
Roll- 7CC
Roll- 5CC
Focaccia- 7CC
Focaccia- 8CC
Bagel- 9CC
PASTRY DISPLAY
Macaron- 4CC
Donut- 5CC
Macaron- 5CC
Danish- 7CC
Macaron- 6CC
Donut- 7CC
Croissant- 9CC
Macaron- 7CC
Donut- 8CC
Donut- 6CC
Danish- 8CC
Danish- 9CC
Croissant- 10CC
CASH REGISTER
3 seconds
faster payment
2 seconds
faster payment
2 seconds
faster payment
3 seconds
faster payment
SALAD DISPLAY
Green Salad- 5 CC
Kale Salad- 6CC
Green Salad- 6CC
Pasta Salad- 8CC
Green Salad- 7CC
Kale Salad- 8CC
Potato Salad- 10CC
Green Salad- 8CC
Kale Salad- 9CC
Kale Salad- 7CC
Pasta Salad- 9CC
Pasta Salad- 10CC
Potato Salad- 11CC
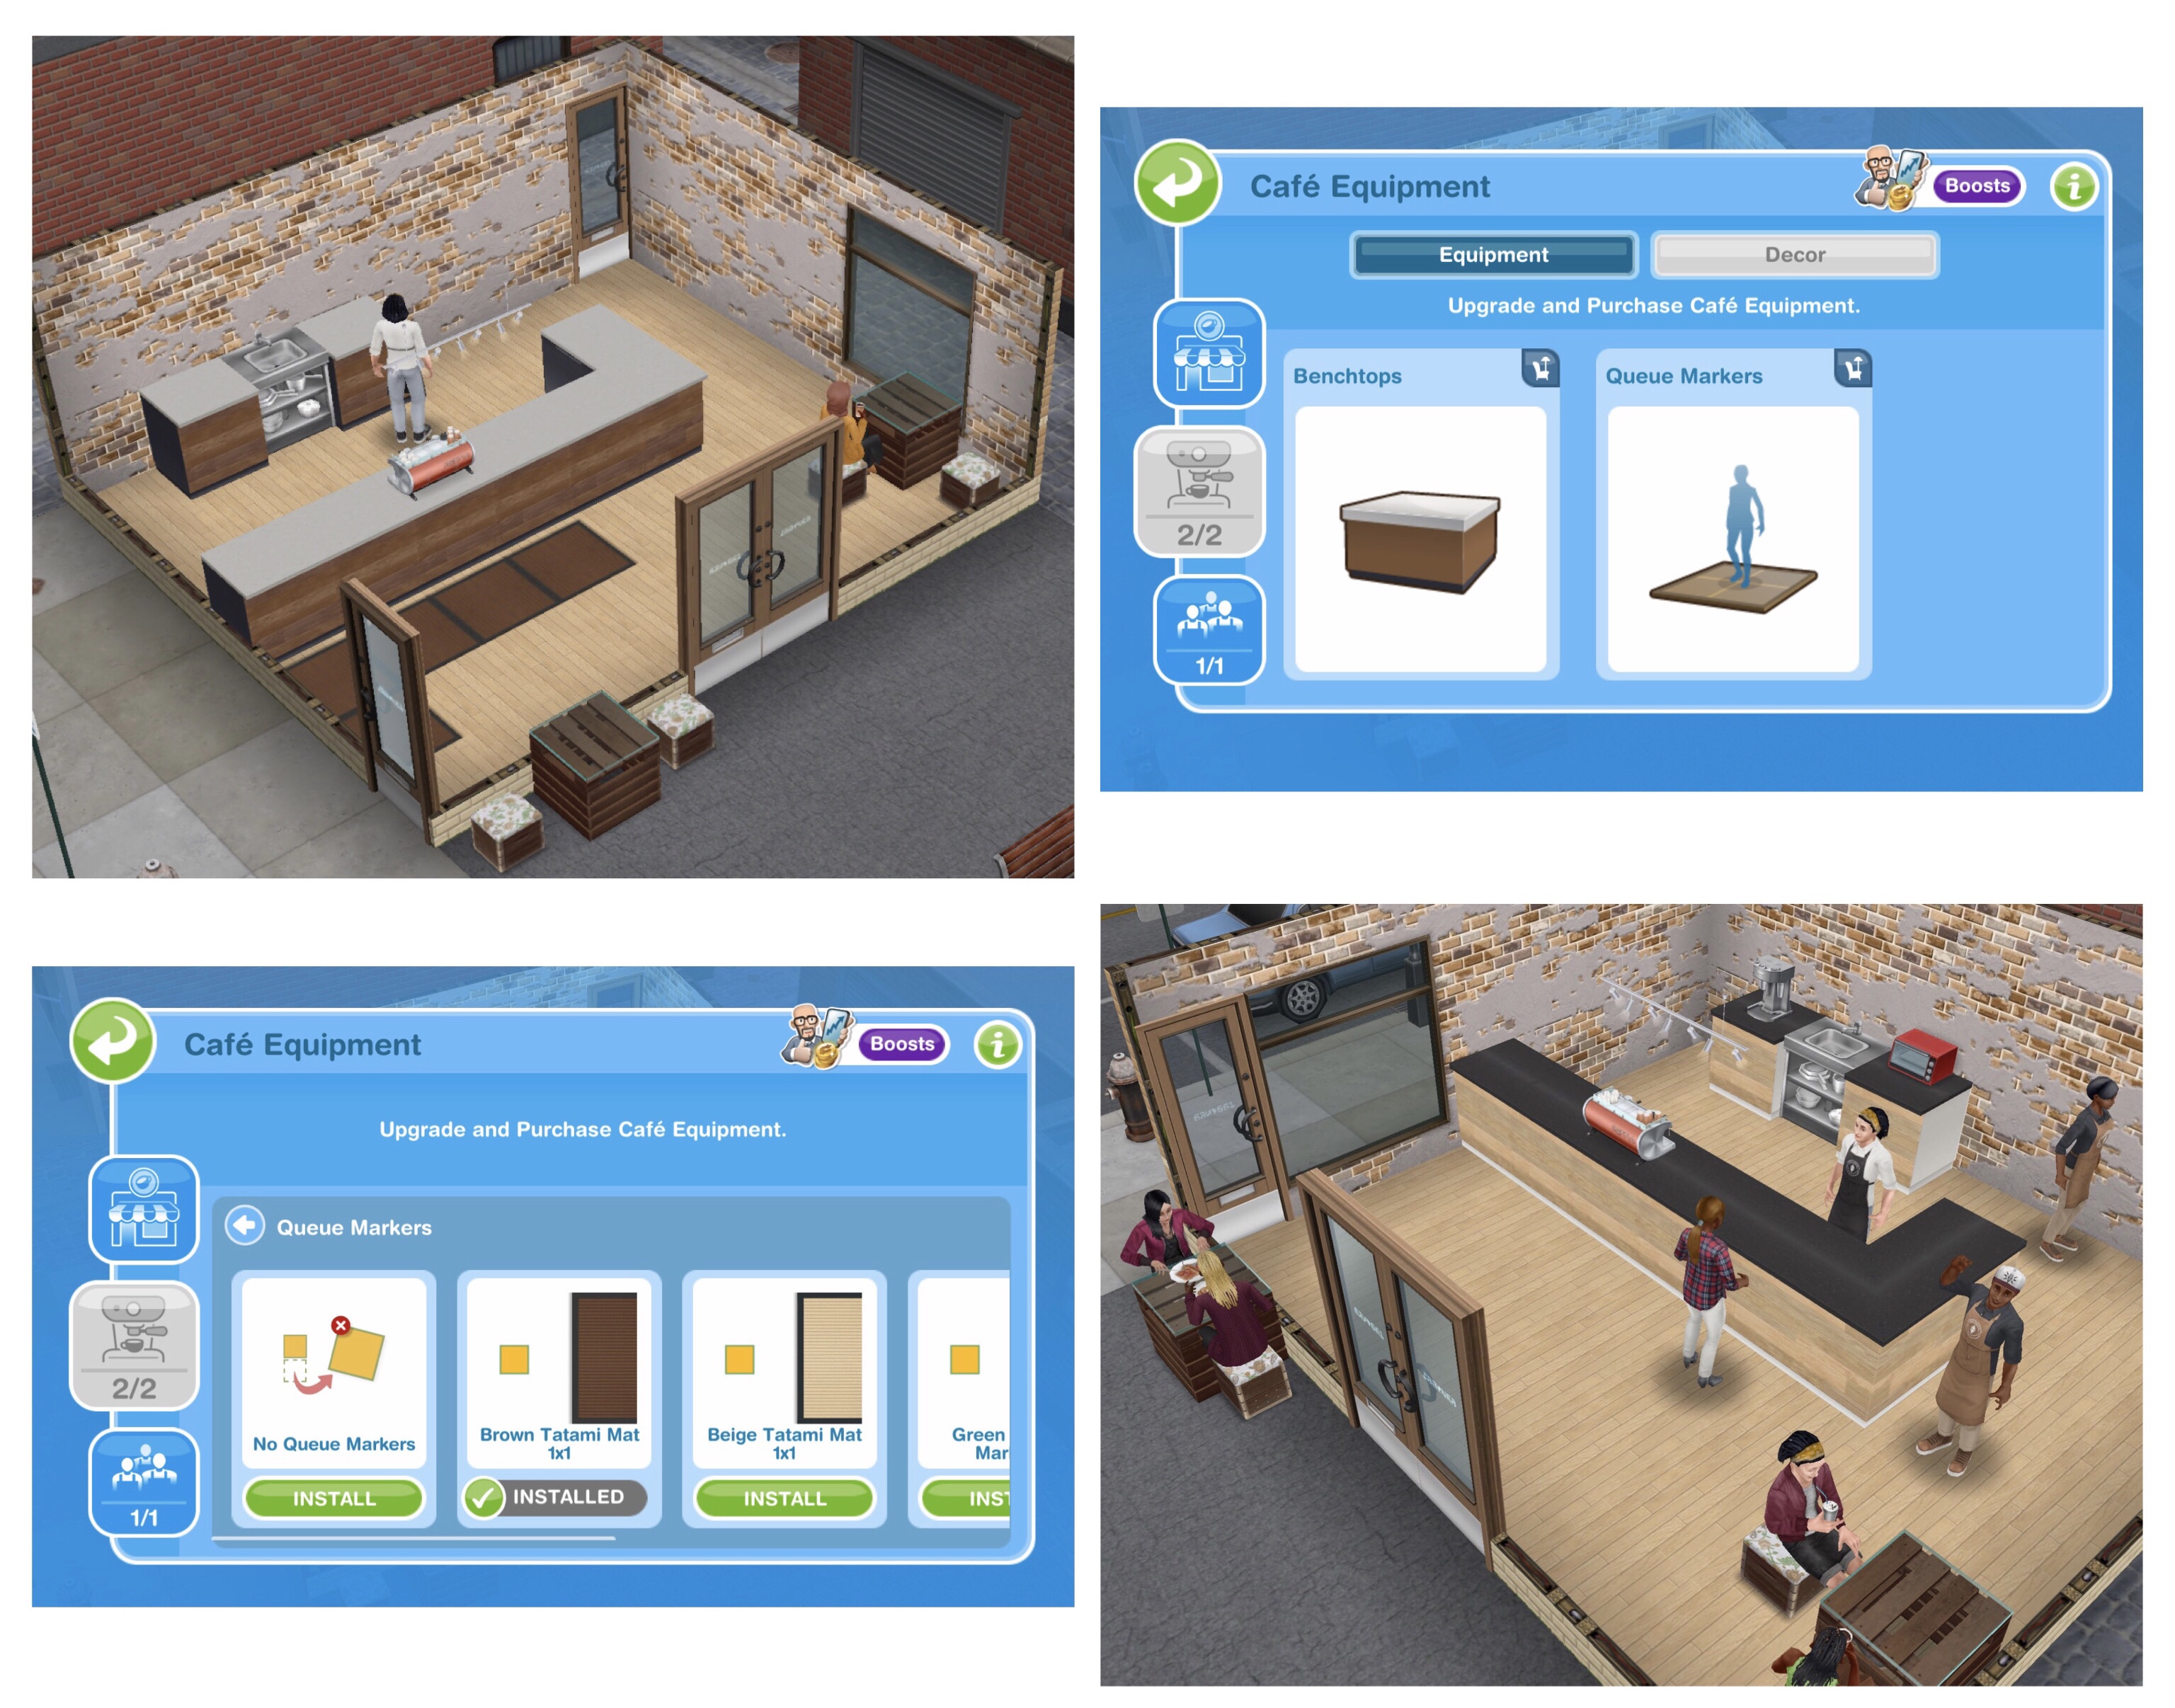
Your equipment and benchtops can both be customised to fit the theme of your café. Under the upgrading equipment tab you can click on the build/buy button on each item to change the colour of the equipment and under decor on the same tab you can change the benchtops from walnut to pine (or any of the other designs once you have unlocked them in this event):
Also under decor you can edit the queue markers, if you don’t want queue markers you can also remove them:
I love that you can edit all the café items, you can also edit the whole cafe building and make it look exactly as you want it, you can really make this place into your café rather than it being a standard business.
Tab 3: Staff Management
From this tab you can manage and hire staff.
Manage: Every shift they work they will gain XP but lose happiness. Once they earn enough XP they will be able to complete training to level up and earn perks:
Faster ordering processing
Slower stress gain
Recover faster when on a break
Greater stress tolerance
Clicking on the up arrow on a member of staff on the manage tab shows you all the staff levels and the perks they can unlock
Once their happiness gets too low they will call in sick and will be unavailable for 3 hours. To avoid this you can select ‘time off’ on that member of staff in the Manage tab and they will take time off for 45 minutes, during this time they will be unable to work but once they return their happiness will be full again. If they call in sick due to low happiness they will also have full happiness when they return.
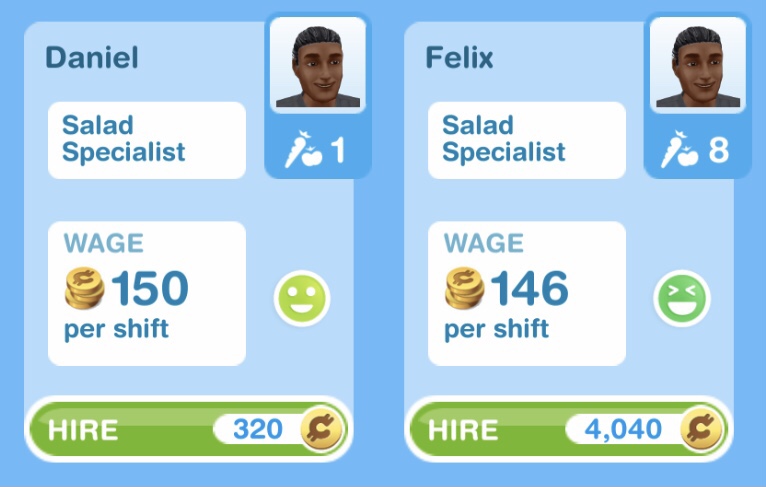
Hire: Under the hire tab you can see all applicants, the list will refresh every 24 hours so if you don’t see anyone suitable you can wait for a new set of applicants.
You can see under their image what level they are on, higher level sims will cost more to hire.
Staff are paid with Café Credits so you can see in the wages section how much they will cost per shift.
Next to this you can see their happiness level, happier sims can go longer before needing time off so they will cost more to hire:
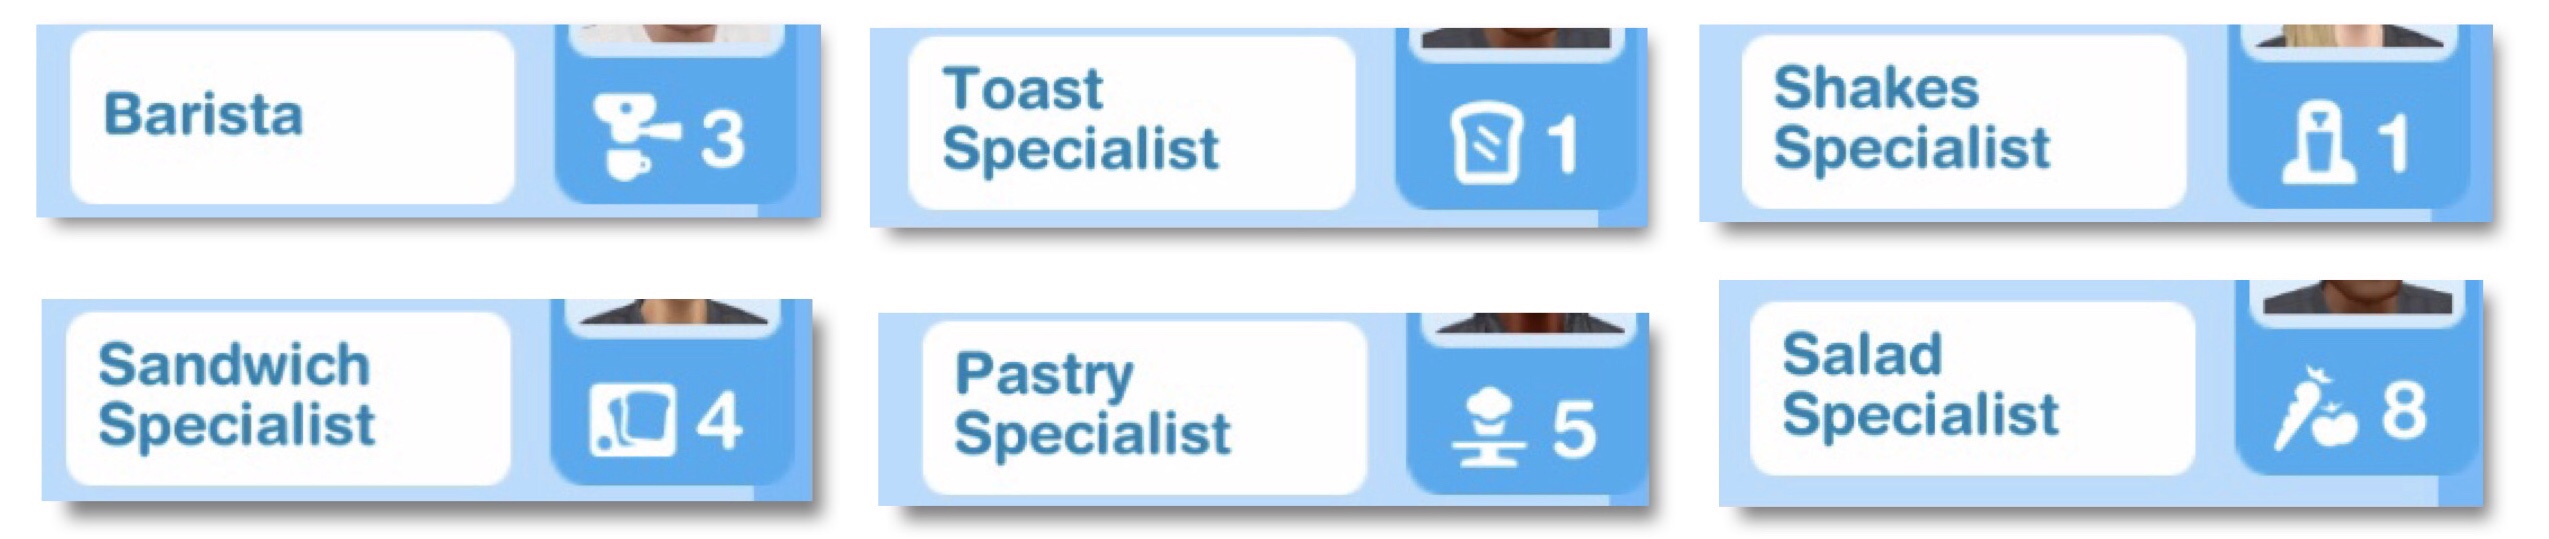
Every piece of equipment in your café will have a specialist. For the coffee machine it is your barista, for the sandwich display it is your sandwich specialist etc. Only specialists can use their perks on their assigned equipment so a barista can use the sandwich display, they just won’t earn any perks. You can see on the image below all the symbols for the different specialists:
You can hire a Temp with social points, they are a special staff type that has all the perks for all equipment. They also don’t get stressed but they only work one shift:
Managers: Managers can be purchased with real money to help you complete the café, they will earn you more Café Credits per tour and shift but they won’t help to earn Likes:
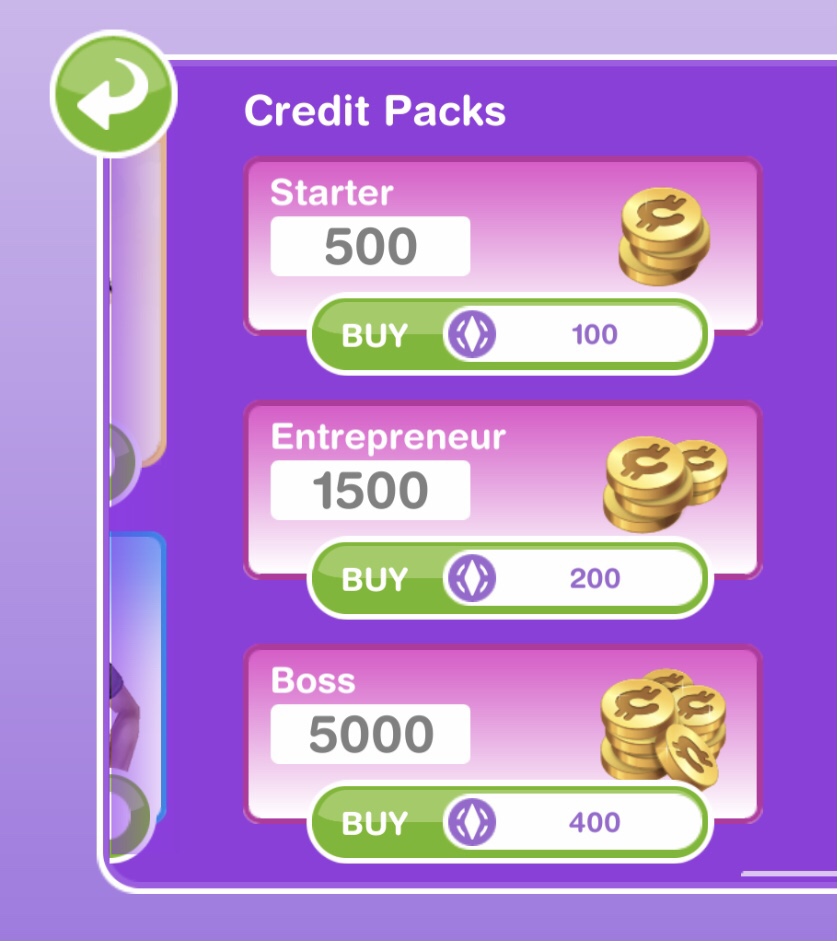
You can also purchase credit packs with social points:
You might notice them appear occasionally to check how you are running their café!
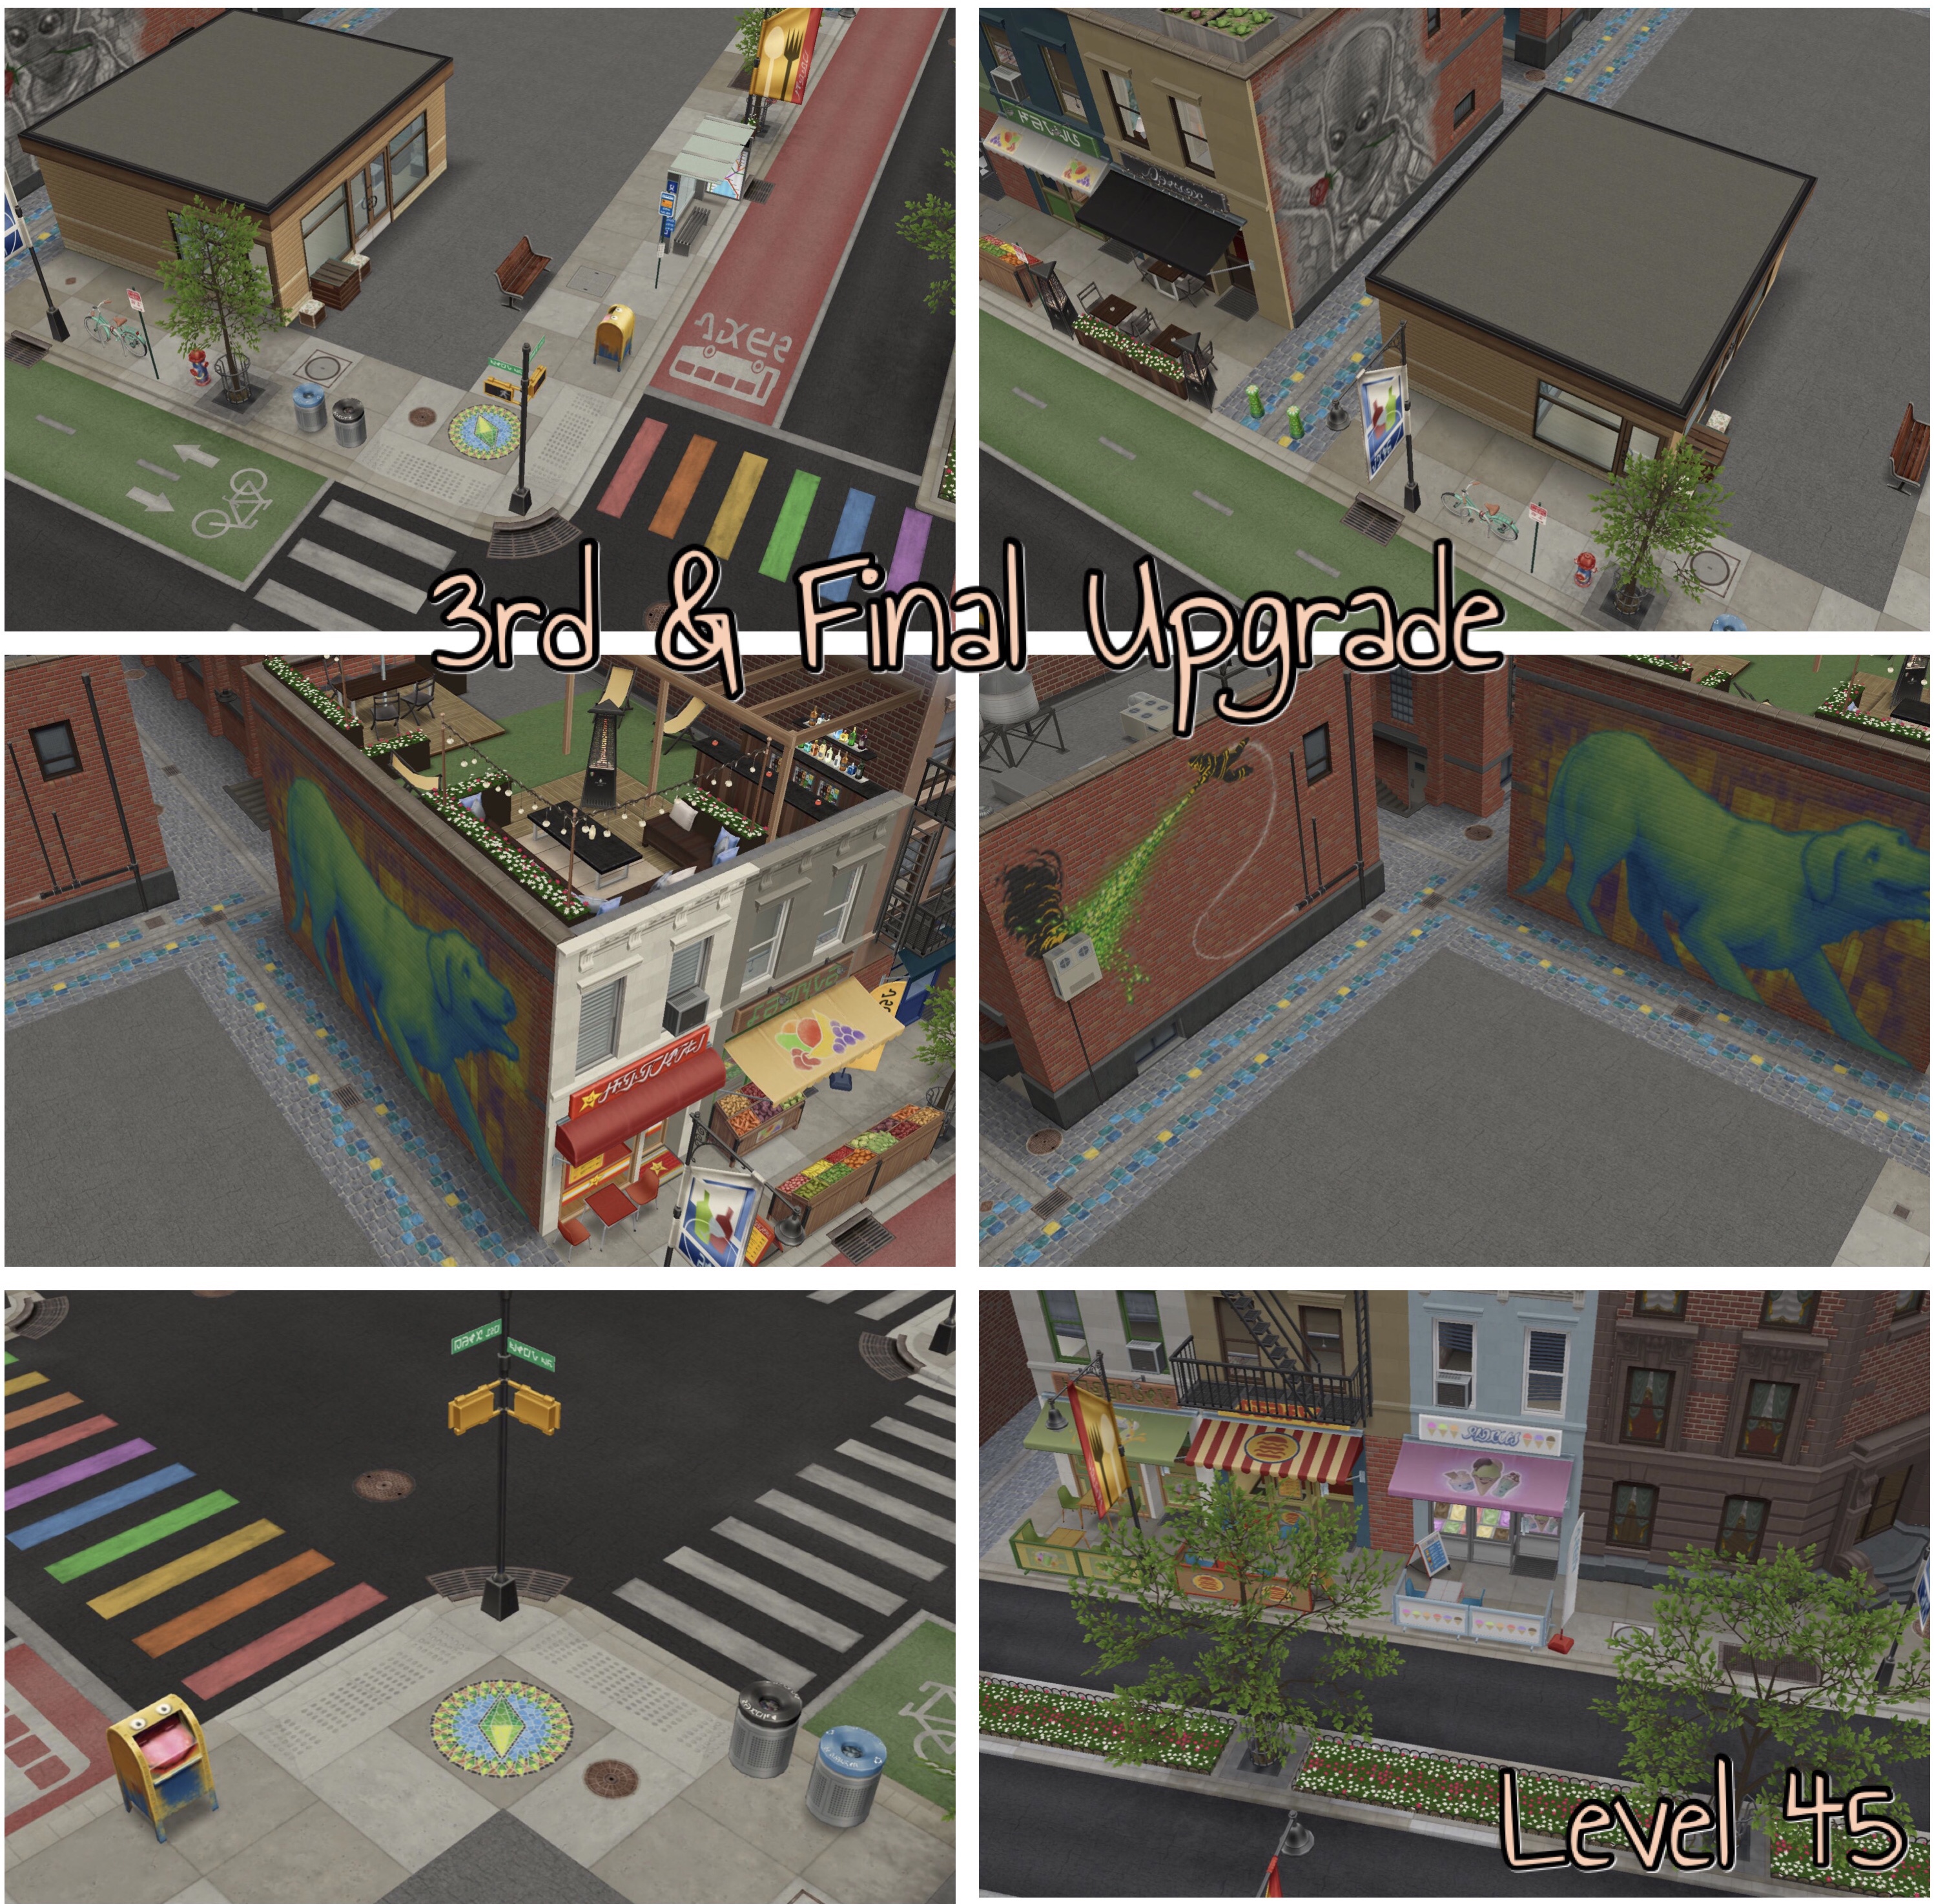
Upgrading MidTown Café
At Levels 20, 35 and 45 you will unlock visual changes to the area of MidTown where the café is located. You will start with an area that looks rundown with not a lot going on and as you improve the café with each upgrade the landscape changes and more people hear about the area until you reach level 45 and you have a bright busy MidTown due to the café’s success!
Level 20: As well as the visual changes of art on the walls and shops opening up, the building next to the café has been demolished so you can increase the size of the café:
Level 35: The second building next to the café has also been demolished giving you a 12×24 grid to build on! You can completely customise your café and make it look exactly how you want:
Level 45: The café is complete and MidTown looks incredible!
If you don’t manage to reach one of these upgrade milestones in the time limit you will have to pay social points to progress in this event, see more information here
Customising your Café
My favourite thing about this event is that you can make the café your own by completing customising it, once you reach level 35 you will have the whole 12×24 grid to build on using all your buy mode items and build features! There are a few things you can’t move which are the benchtops, café equipment and 2 single doors as if you messed with these your café wouldn’t be able to function but everything else can be moved and designed to suit your style!
Once you complete the café you can still complete shifts to earn Café Credits, these can then be used to build and buy items for your café as all home store items at the café will now cost Café Credits rather than other currency:
Any items you buy with Café Credits cannot be stored and placed in a house, they can only be used in the café
Watch My Café Tour here:
Prizes
When you reach milestone levels you also earn buy mode prizes to use in your café and your sims houses.
Level 5
Kitchen Section: Steel (S172,000) and White (18SP) Milkshake Makers
Silver (S265,000) Black (S320,000) Blue (30LP) and Red (25SP) Café Coffee Machines
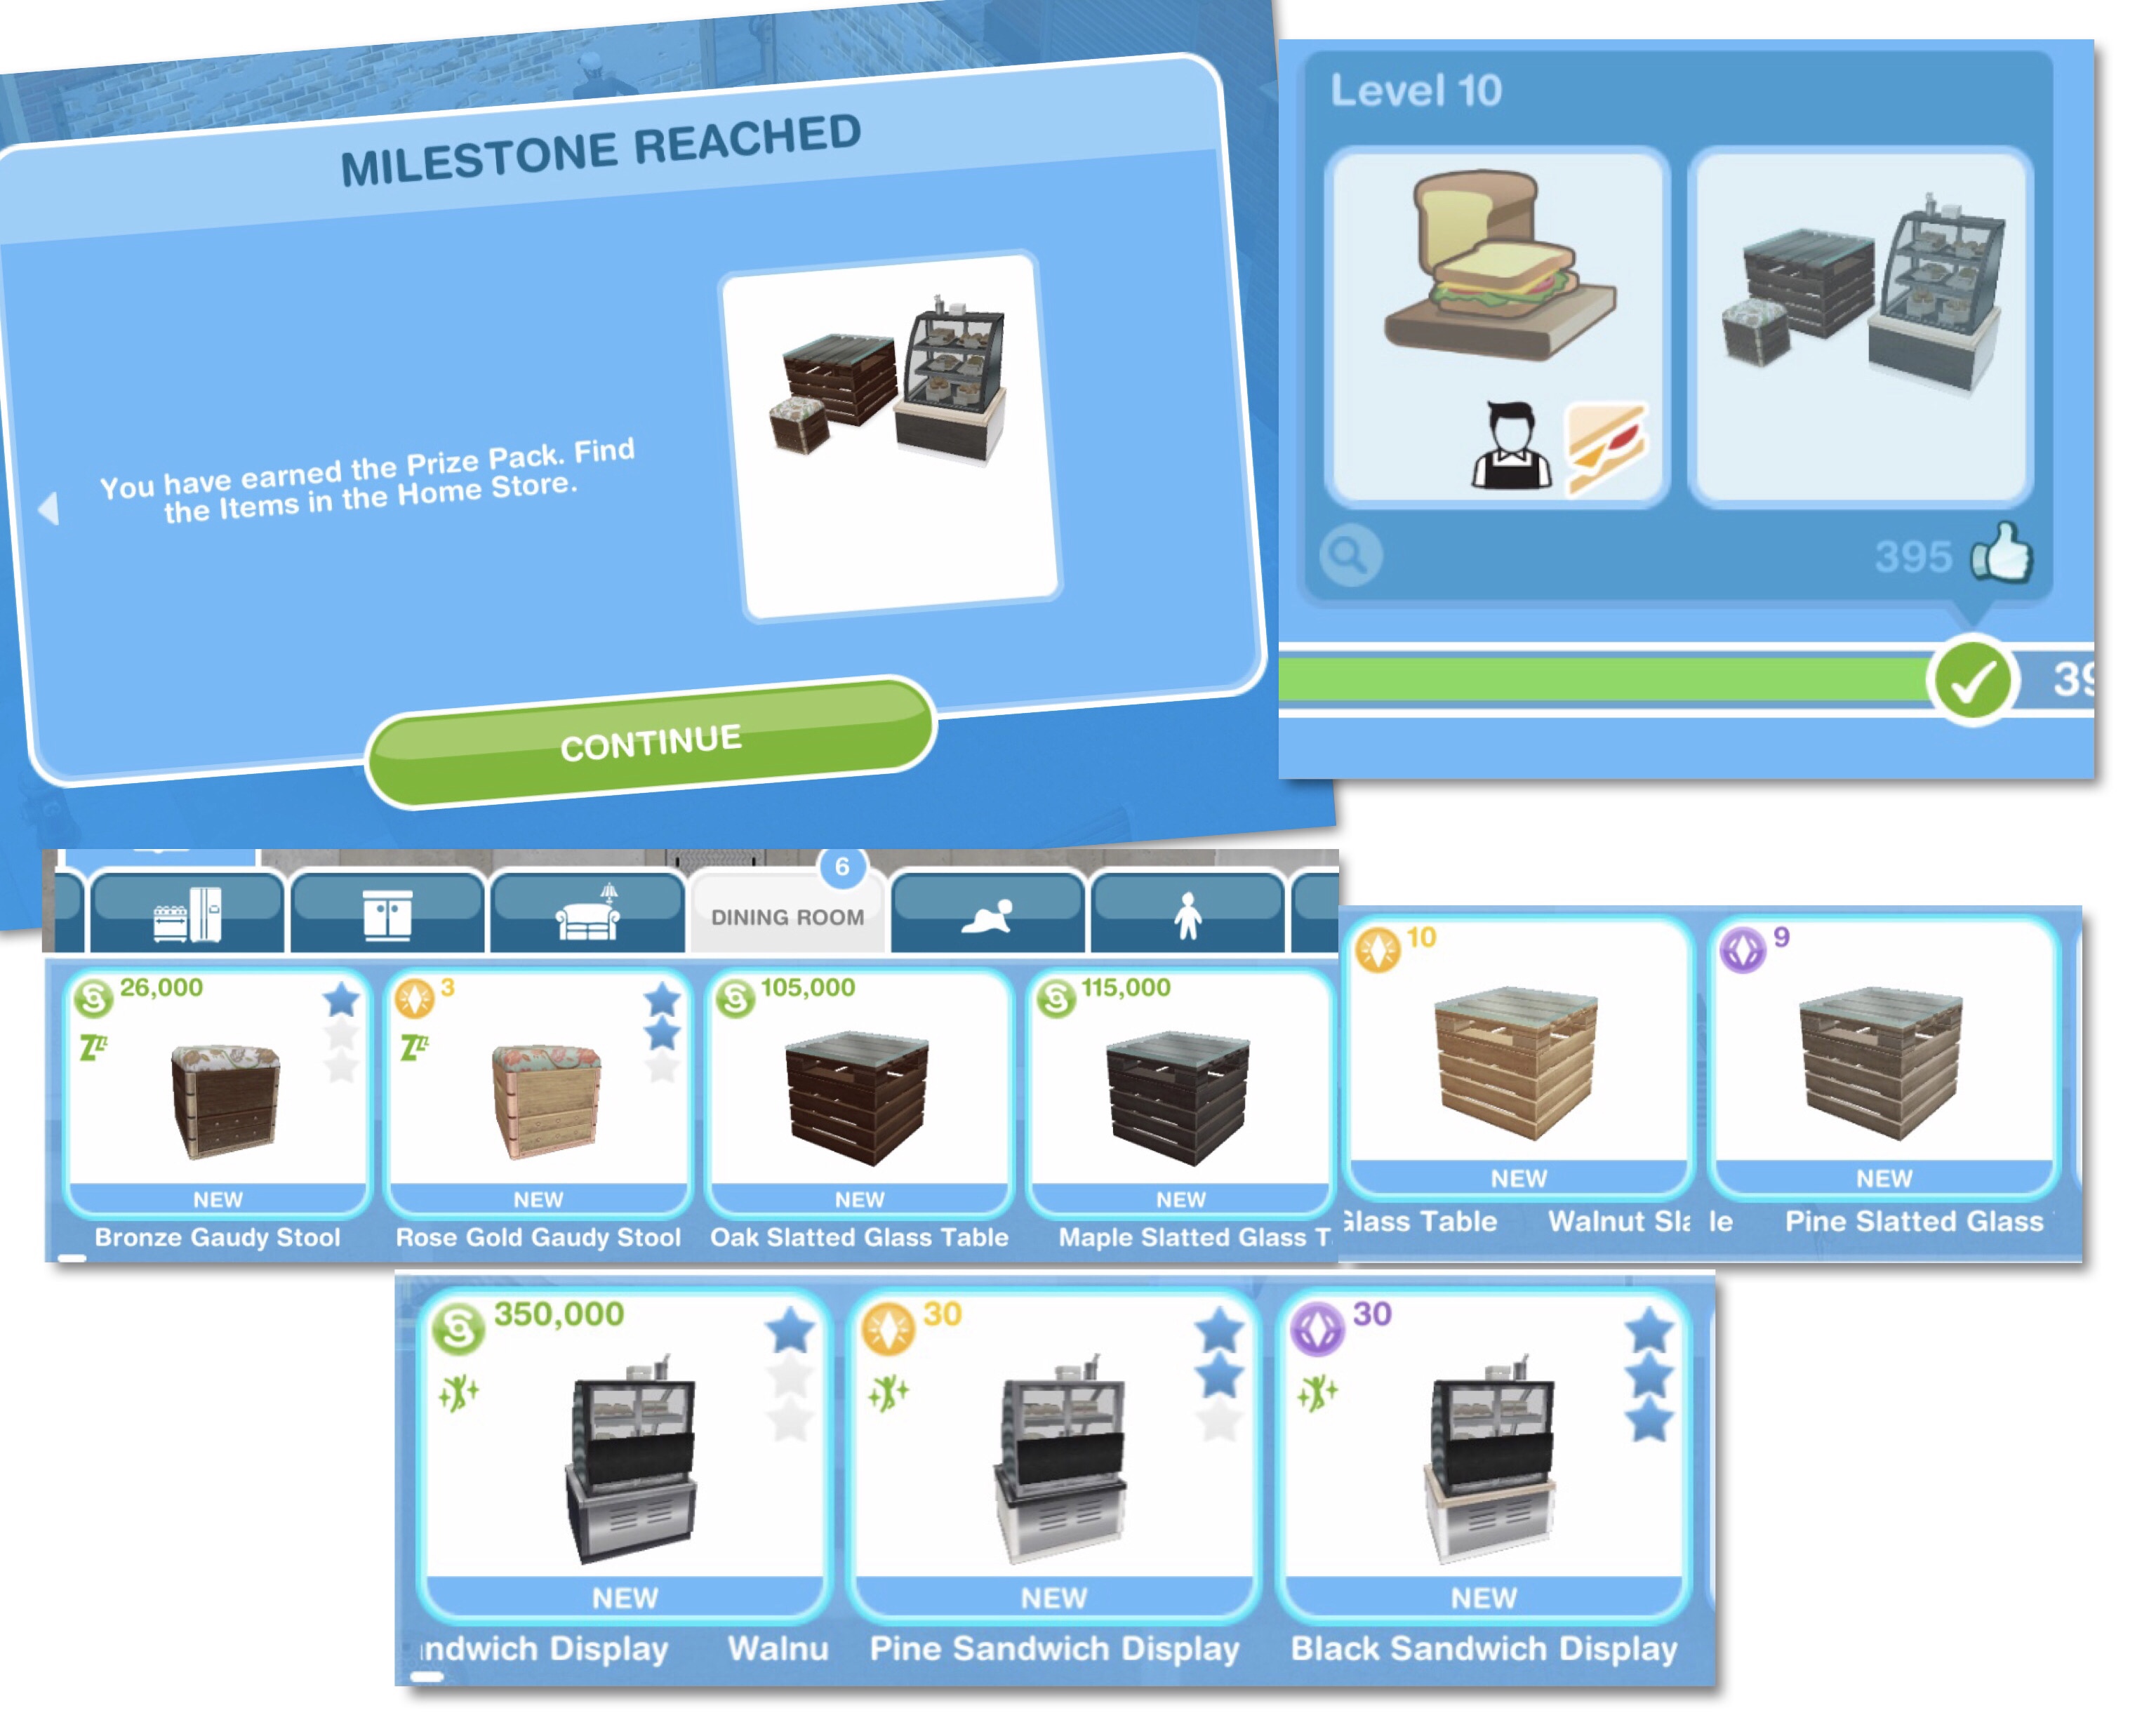
Level 10
Countertops Section: Walnut (S350,000) Pine (30LP) and Black (30SP) Sandwich Displays
Dining Room Section: Bronze (S26,000) and Rose Gold (3LP) Gaudy Stools
Oak (S105,000) Maple (S115,000) Walnut (10LP) and Pine (9SP) Slatted Glass Tables
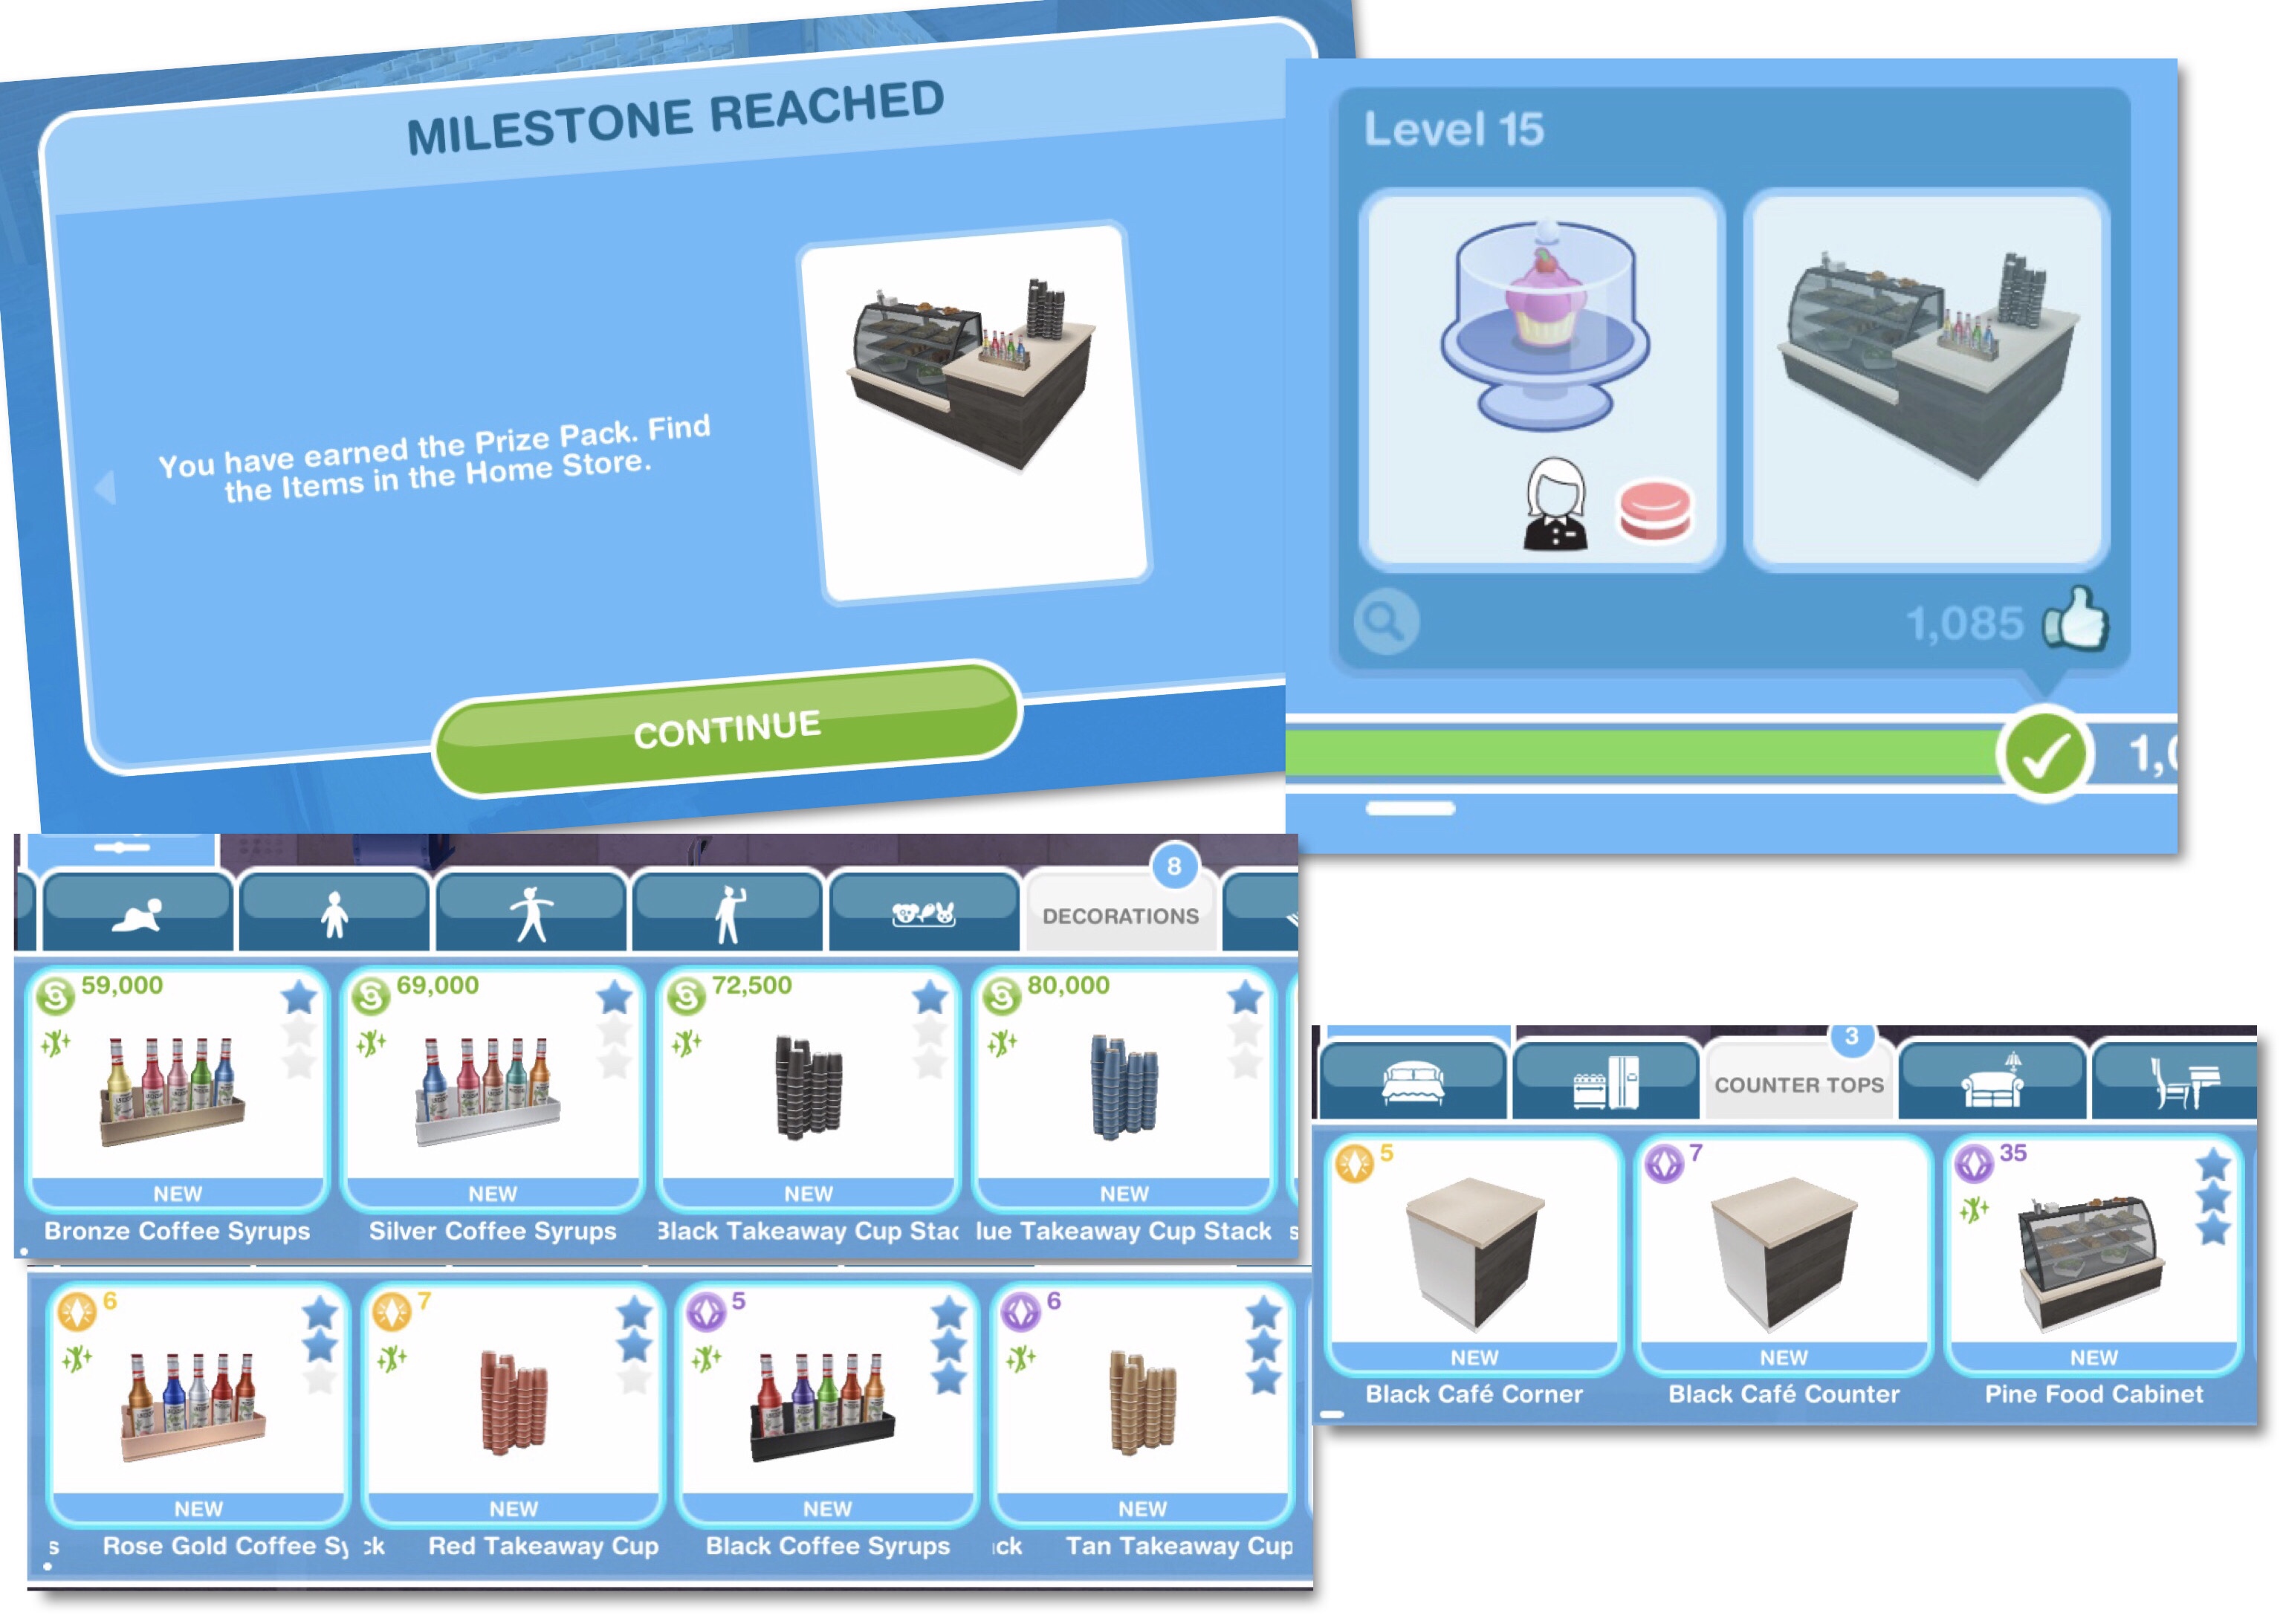
Level 15
Countertops Section: Black Café Corner (5LP) Black Café Counter (7SP) and Pine Food Cabinet (35SP)
Decorations Section: Bronze (S59,000) Silver (S69,000) Rose Gold (6LP) and Black (5SP) Coffee Syrups
Black (S72,500) Blue (S80,000) Red (7LP) and Tan (6SP) Takeaway Cups
Level 20
Kitchen Section: Black (S31,000) Blue (S35,500) Pink (3LP) and Yellow (2SP) Macaron Jars
Walnut (S47,000) Black (S57,000) Oak (5LP) and Ash (4SP) Sliced Fruit Trays
Dining Room Section: Blue (S28,000) and Black (2SP) Gaudy Stools
Walnut (S78,800) Black (S86,500) Oak (8LP) and Ash (7SP) Pallet Dining Tables
Level 25
Kitchen Section: Bronze (S50,000) Silver (S60,000) Pink (5LP) and Black (4SP) Coffee Knock Boxes
Bronze (S68,000) Silver (S78,500) Rose Gold (6LP) and Black (5SP) Siphon Coffee Makers
Countertops Section: Pine Register (15LP)
Decorations Section: Oak (S45,000) Black (S55,000) Pine (4LP) and Ash (3SP) Coffee Bean Pictures
Level 30
Kitchen Section: Bronze (S115,000) Silver (S125,000) Rose Gold (14LP) and Black (10SP) Coffee Grinders
Lighting Section: Backlit Black (S23,000) Beige (S33,000) Green (2LP) and Brown (1SP) Wall Signs
Lit Bronze (S62,000) Silver (S72,000) Rose Gold (6LP) and Black (5SP) Menu Boards
Outdoor Furniture Section: Bronze (S56,500) Silver (S61,000) Rose Gold (5LP) and Black (4SP) Public Bins
Level 35
Countertops Section: White (S160,000) Black (S185,000) Grey (20LP) and Pine (14SP) Panel Registers
Black (S50,000) White (S55,000) Grey (5LP) Pine (5SP) Panel Counter
Black (S50,000) White (S55,000) Grey (5LP) Pine (5SP) Panel Corner
Bronze (S150,000) Steel (S160,000) Rose Gold (15LP) Black (14SP) Service Counters
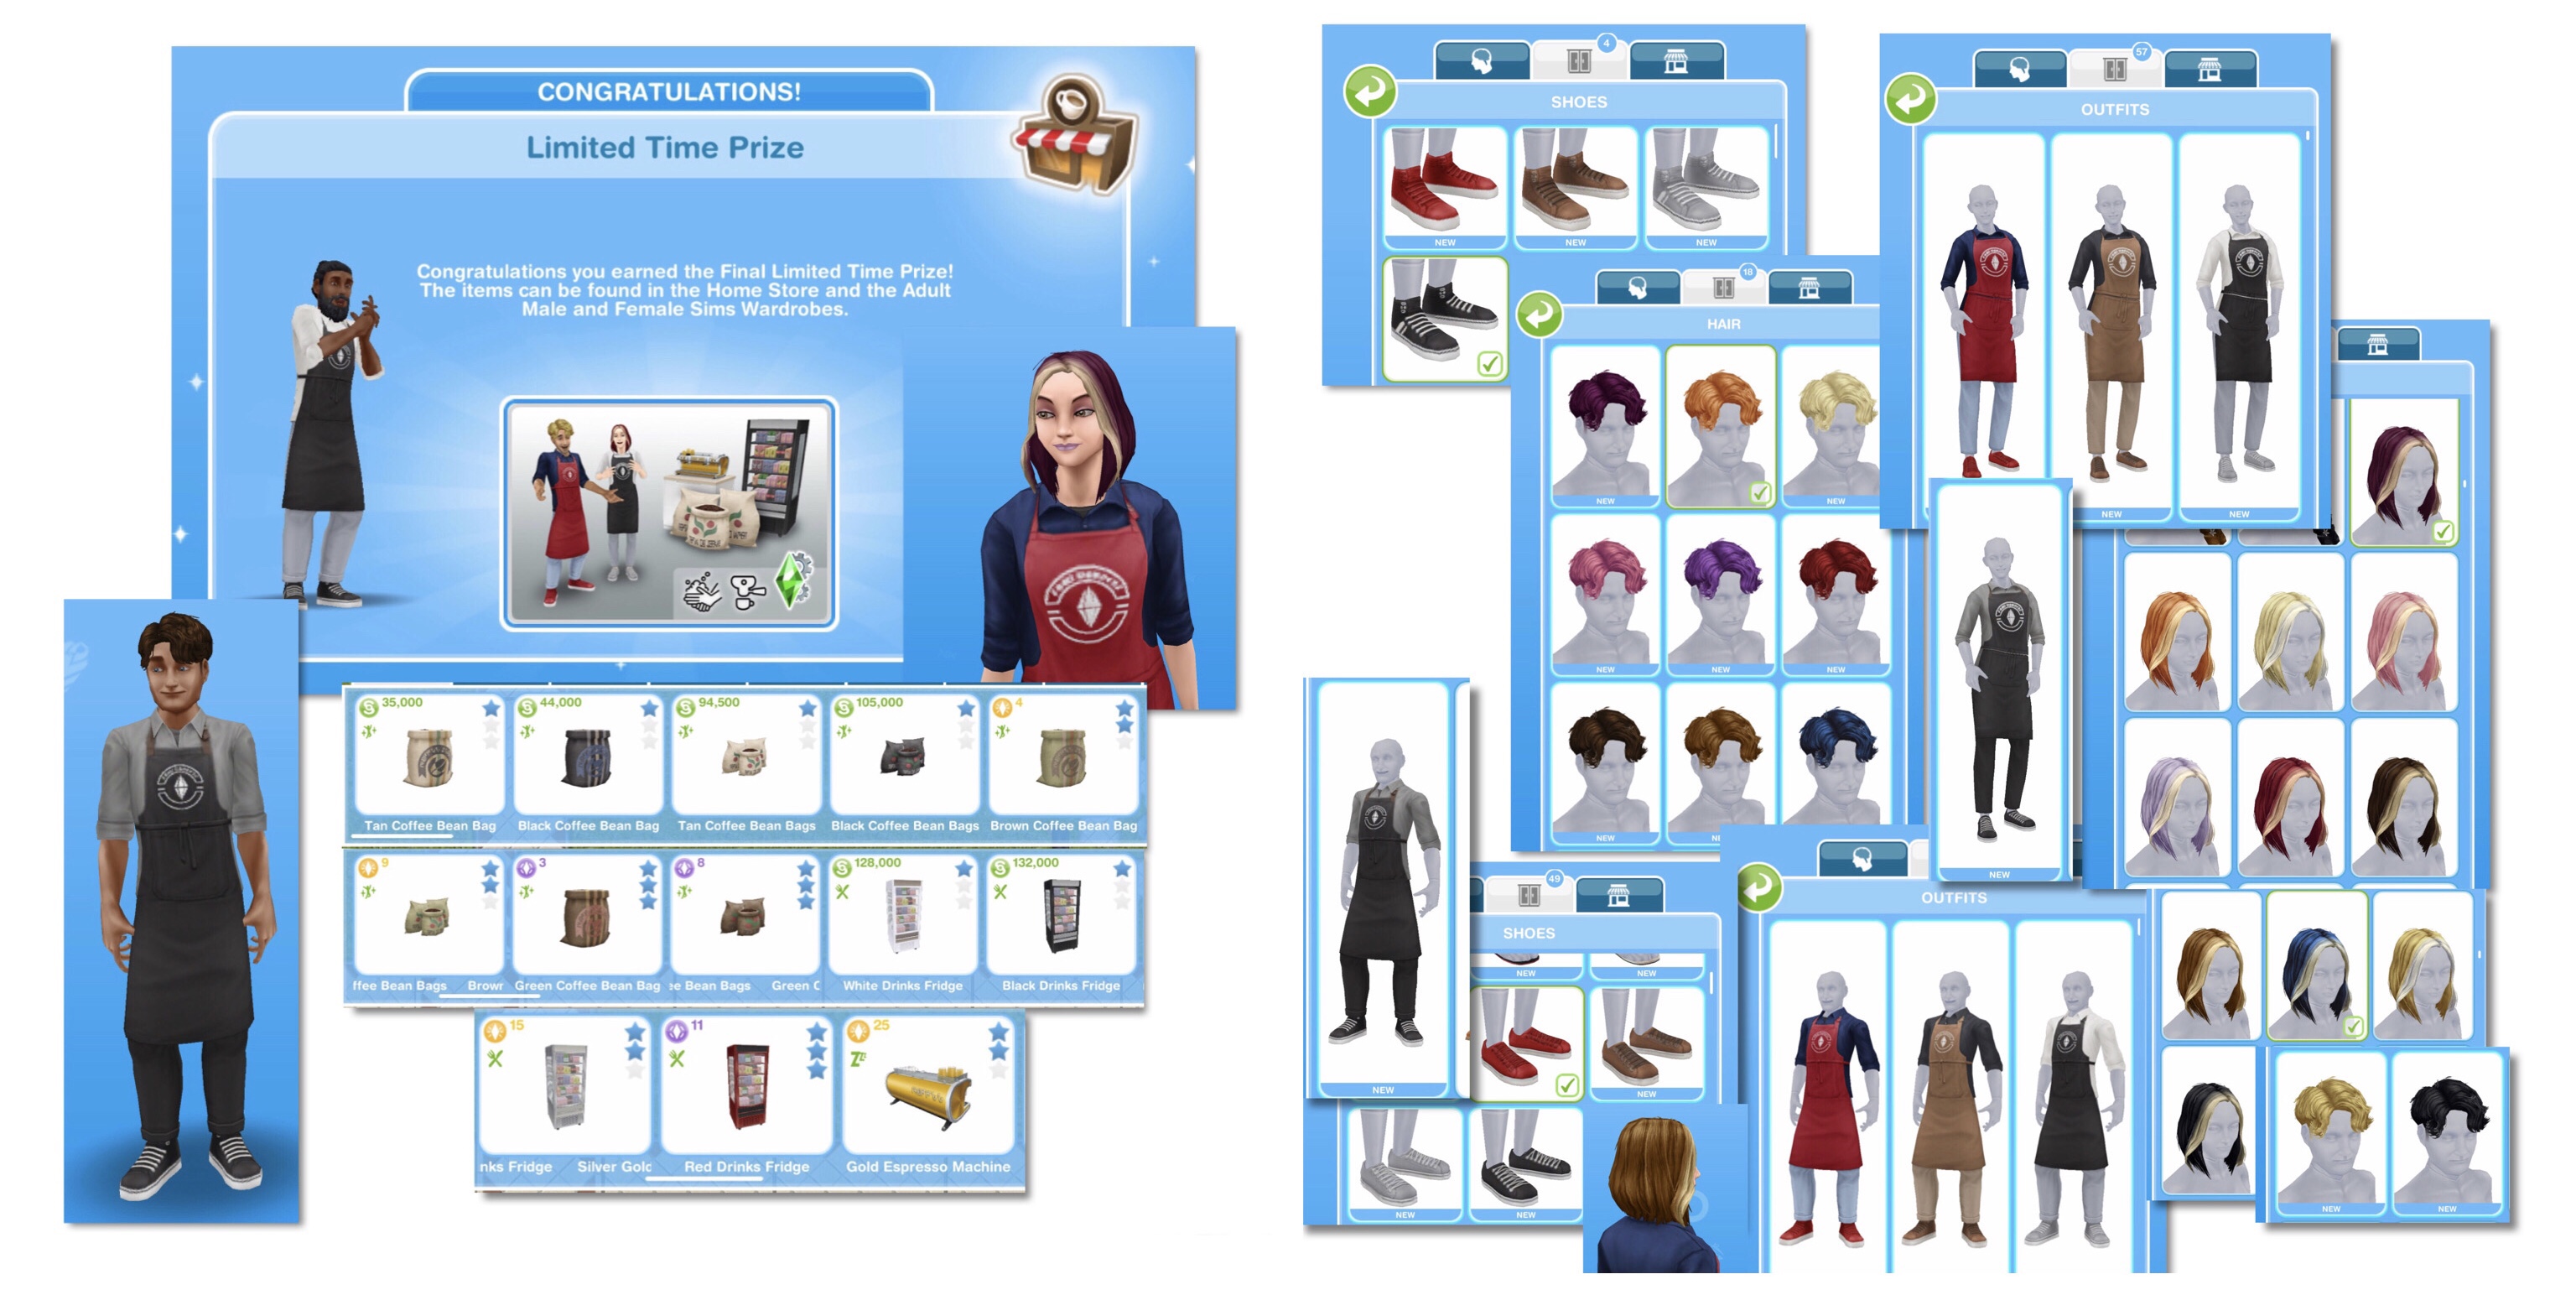
Level 45
Kitchen Section: White (S128,000) Black (S132,000) Silver (15LP) and Red (11SP) Drinks Fridges
Gold Espresso Machine (25LP)
Decorations Section: Tan (S35,000) Black (S44,000) Brown (4LP) and Green (3SP) Coffee Bean Bag
Tan (S94,500) Black (S105,000) Brown (9LP) and Green (8SP) Coffee Bean Bags
Café outfits, shoes and hairstyles for female and male adult sims
If you don’t complete the milestones on time to unlock these prize packs you can purchase them from the café progress menu with social points
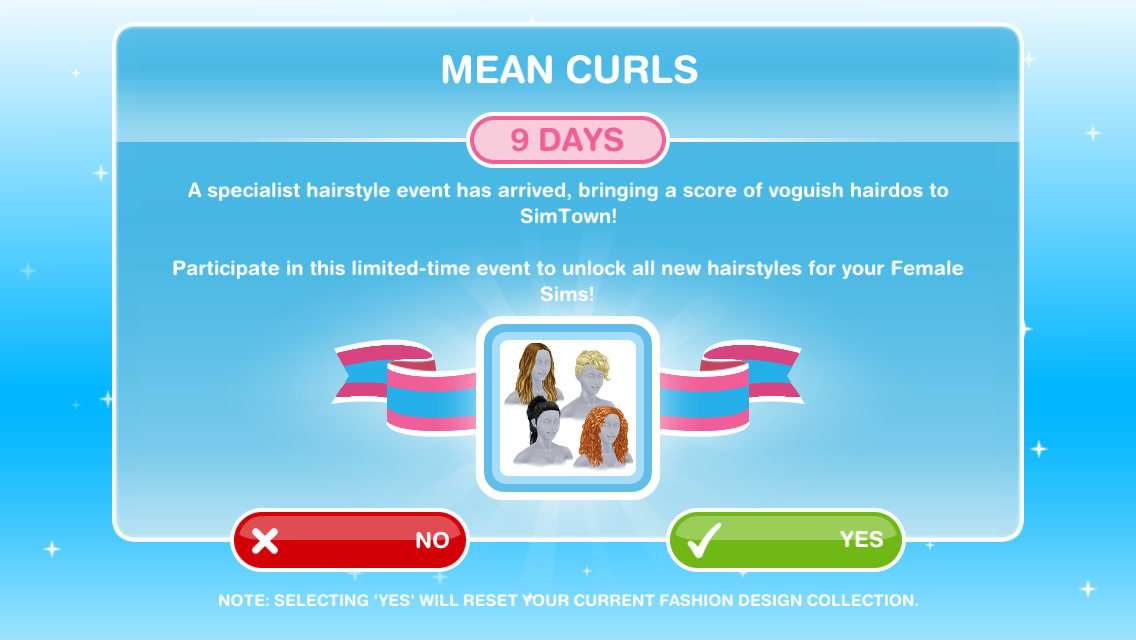
The Mean Curls Hobby Event is back again for 7 days from 17th July. To get all 9 hairstyles you need to complete the fashion designer hobby collection 9 times in the 7 day time limit. You get a new hairstyle each time you complete the collection (find all 12 fashion pieces), once you unlock a hairstyle you get to keep it even if you don’t find them all. If you have never done the fashion designer hobby click here for details.
If you completed this event last time it will not appear for you again. If you got some hairstyles last time you will start from the point you reached so if you got 5 last time you only need to complete the collection 4 times this time.
You need to buy a fashion studio from the promotions r us store to complete this hobby
You need to firstly accept this event, it will remove the fashion designs you have already created from the collection so you don’t get a head start.
If you say no you can start it from the active tasks tab, you will not get any extra time if you start this late.
If you already have a sim as a level 6 fashion designer (or previous have) then you will complete this a lot quicker as you aren’t waiting for all the designs to become unlocked.
It is really helpful to have loads of sims doing the hobby, and have them doing the 10 minute option over and over if possible!
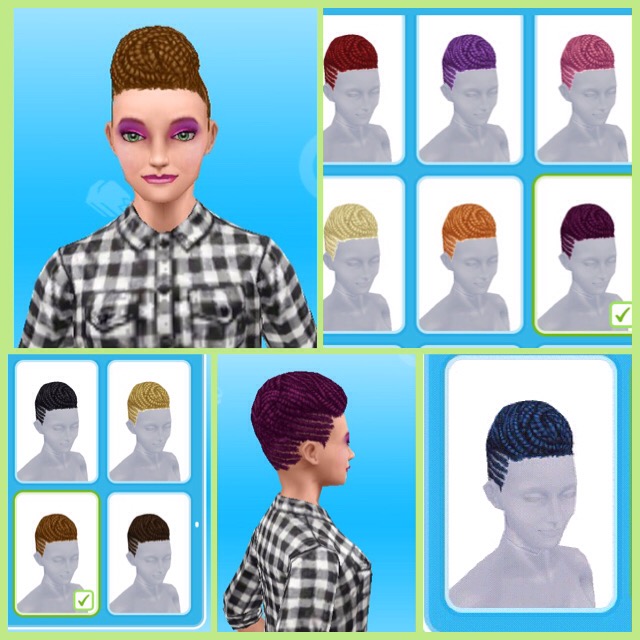
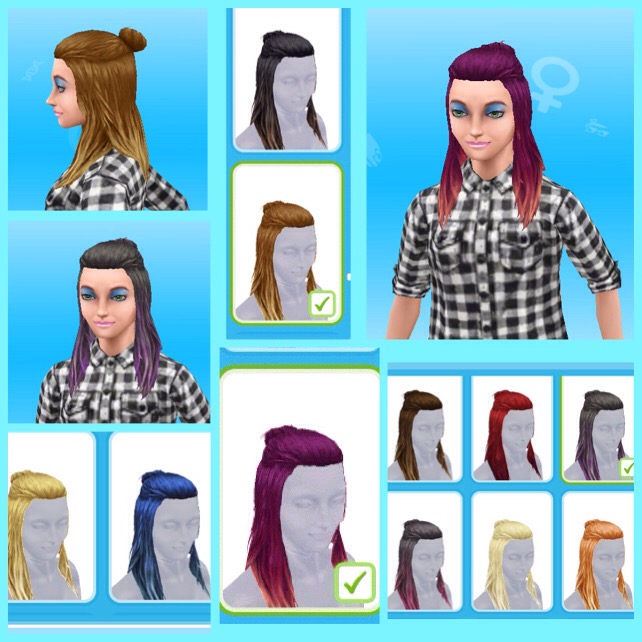
YOU NEED TO COMPLETE ALL FOUR ROWS TO GET ONE HAIRSTYLE!!
12 FASHION ITEMS= 1 HAIRSTYLE
TIPS FOR FINDING THEM ALL IN THE TIME LIMIT:
-have more than one sim working on it, you can have as many sims as you want completing this hobby at once but you will need a fashion studio for each of them
-it is easier if you have all the sims in one house, maybe build a room for them so they are all together but you don’t have to!
-if you can, do the 10 minute option over and over, you will find the most designs this way (once you have a sim at level 6)
-have at least one sim at level 6 or working on getting to level 6 (maybe do the 12 hour option) so all designs are unlocked (don’t know if you already got a sim to level 6? If you have previously completed the collection you reached level 6 or you can see when you look at the hobby collection, if boxes are greyed out you haven’t completed it yet)
-remember to click start new collection on the fashion hobby collection once you have got all the pieces
-most importantly: just keep going! I know it’s annoying when you get the same one constantly (those heels are a nightmare!) but you will eventually get the ones you need.
Hairstyles– there are 11 of each style available once you unlock them, each time you complete the collection you will unlock one hairstyle:
The Country Homestead Event to unlock furniture is back for 10 days from the 28th June. To unlock all the country homestead furniture packs you need to complete the woodworking hobby collection 10 times in the 10 day time limit! Once you unlock a furniture pack you get to keep it even if you don’t find them all. If you have never done the woodworking hobby click here for details.
If you completed it last time you will not get this event again. If you won some of the packs last time then you will only have to unlock the ones you have left, for example, if you unlocked 5 packs last time you will only have 5 packs left to unlock this time.
You need to buy a woodworking bench from the promotions r us store to complete this (or use the ones at the community center)
You need to firstly accept this event, it will remove the woodwork pieces you have already created from the collection so you don’t get a head start.
If you say no you can start it from the active tasks goal tab:
You won’t get extra time if you start this late
YOU NEED TO COMPLETE ALL FOUR ROWS (FIND ALL 12 ITEMS) TO GET ONE FURNITURE PACK!!
TIPS FOR FINDING THEM ALL IN THE TIME LIMIT:
-have more than one sim working on it (the shortest option is 5 hours)
-have at least one sim at level 6 or working on getting to level 6 if you haven’t done the hobby before so all pieces are unlocked then you can just keeping doing the 5 hour option over and over (if you have completed this hobby before you don’t need a sim to reach level 6 in this hobby again!) -remember to click start new collection on the woodworking hobby collection once you have got all the pieces so you can find them again -don’t panic! They will bring it back again if you don’t manage to complete it this time, these events usually reappear a lot! -most importantly: just keep going! I know it’s annoying when you get the same one constantly but you will eventually get the ones you need.
Prizes
First one of each prize is free
Walls
Walls Section: Homestead (S100) Southern Dawn (S125) and Charcoal Rise (S175)
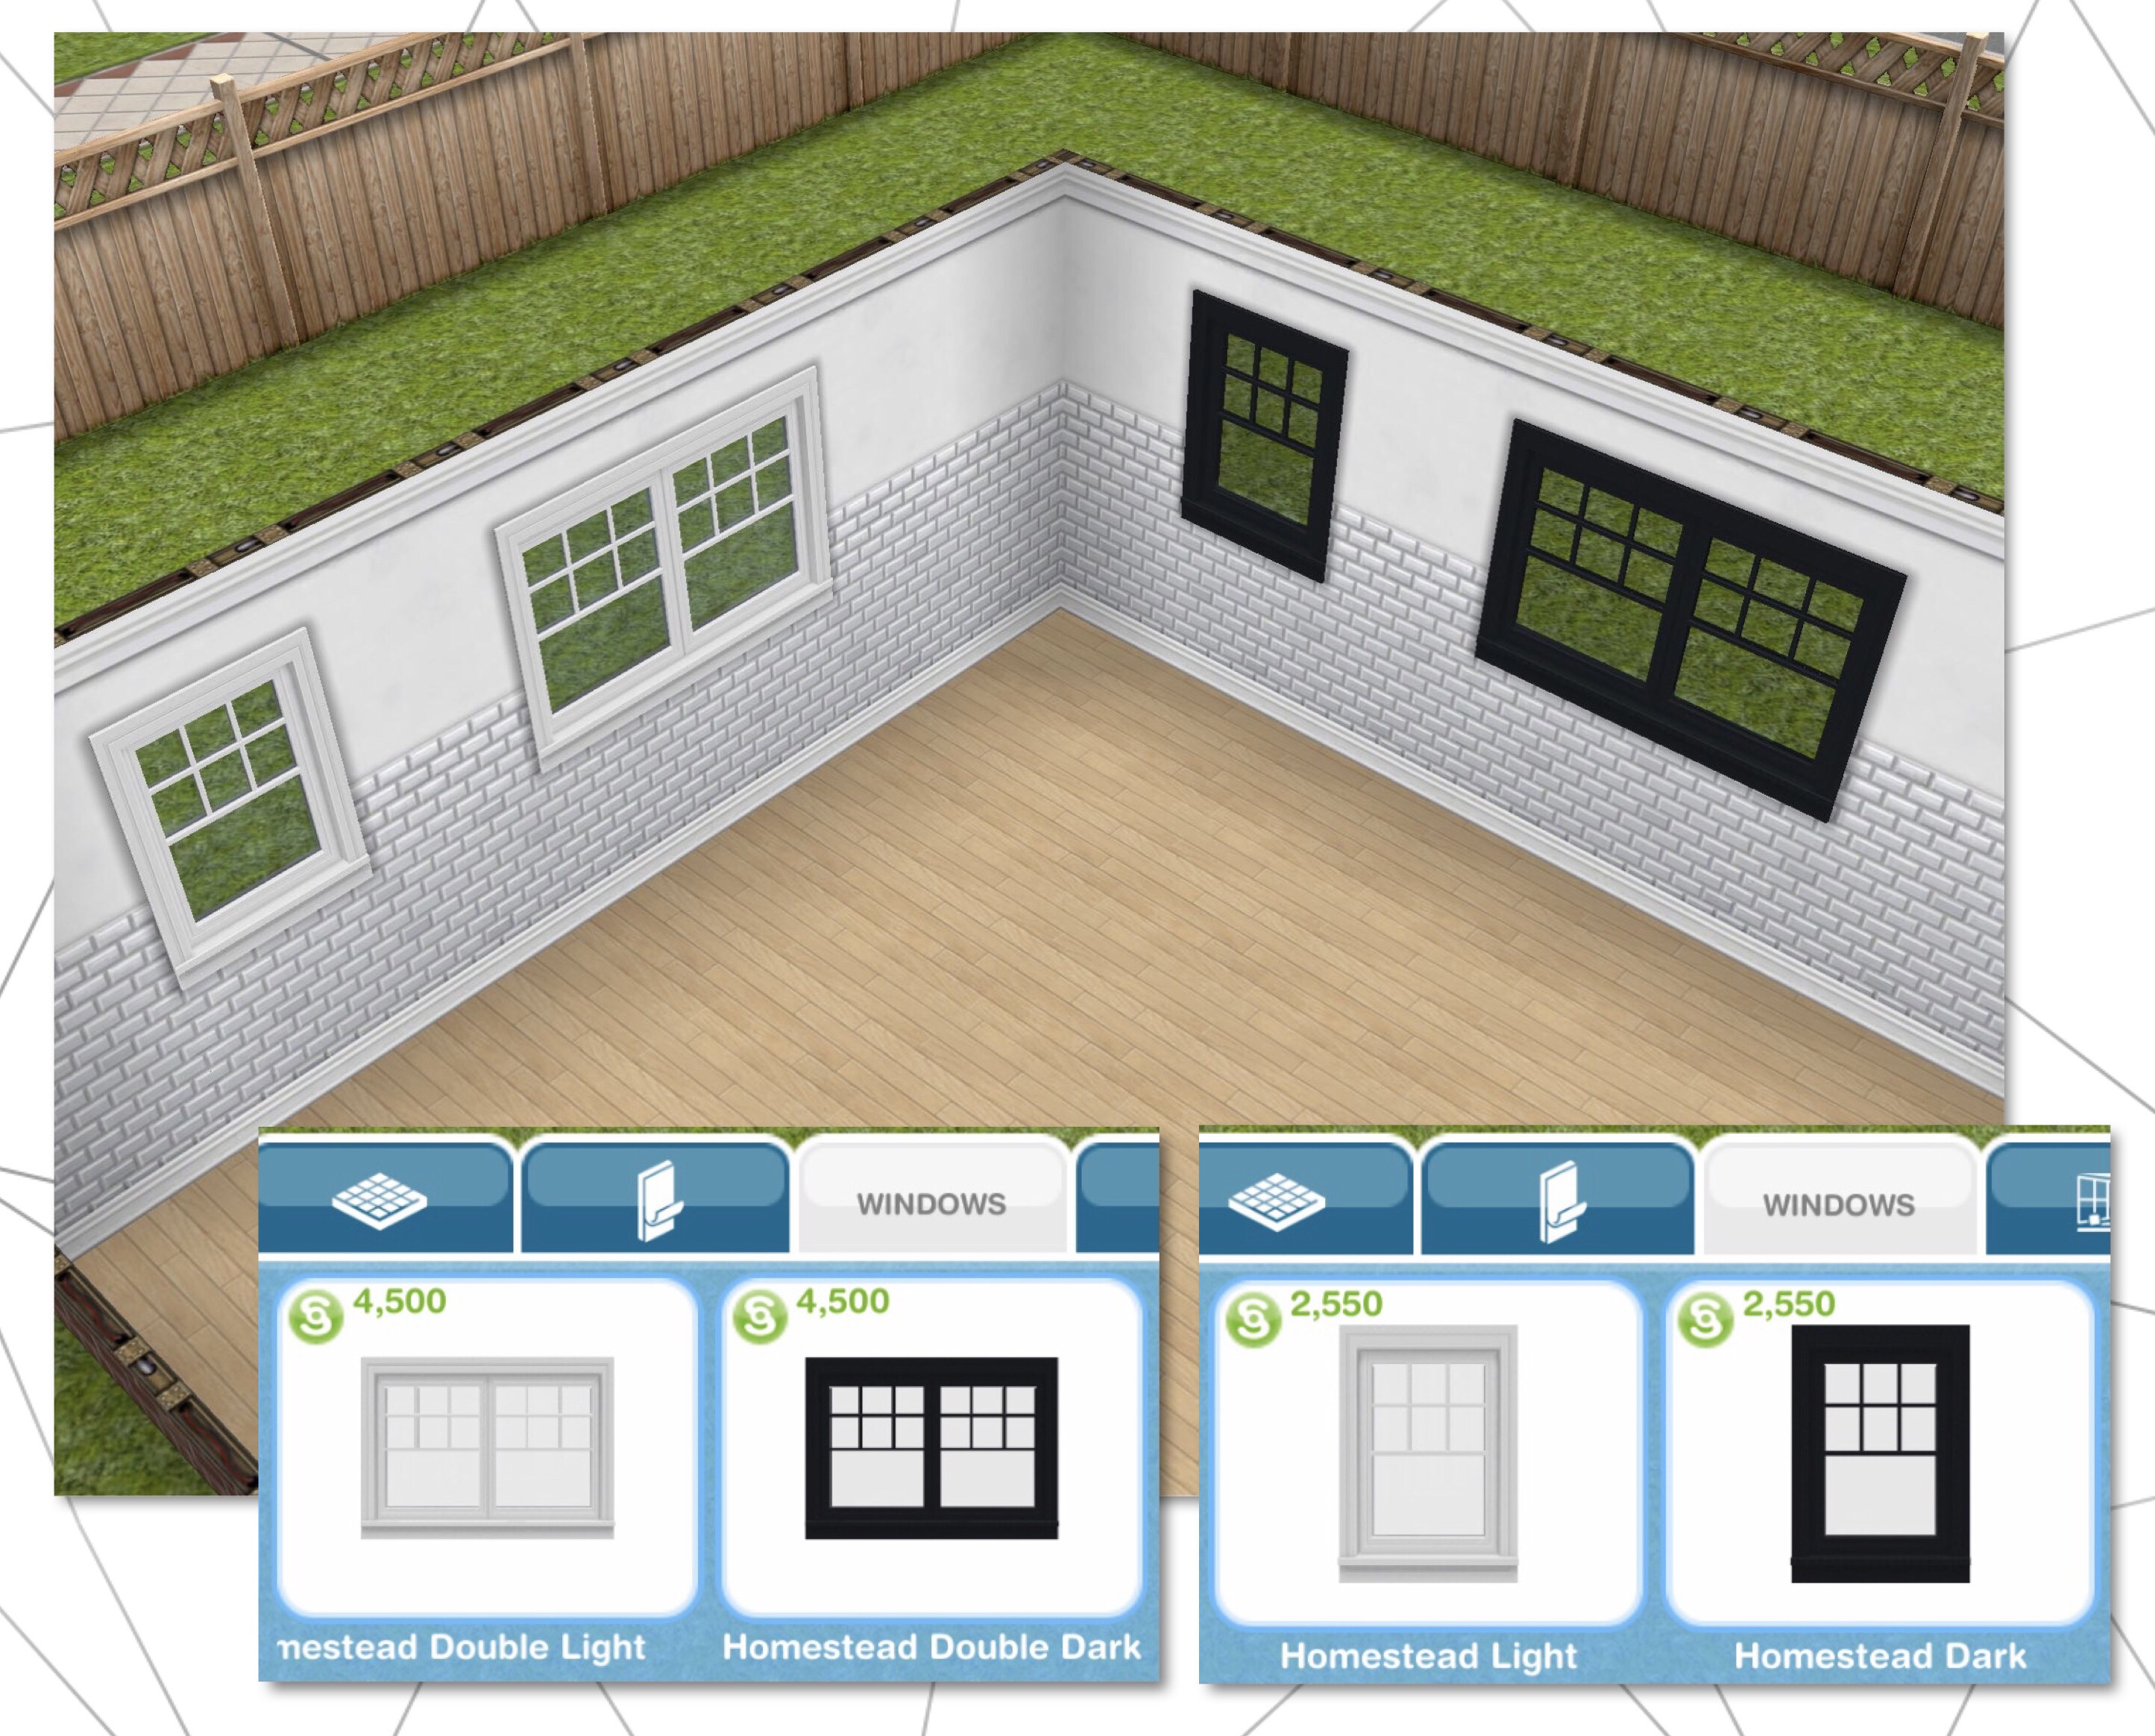
Windows
Windows Section: Homestead Light (S2,550) and Dark (S2,550)
Homestead Double Light (S4,500) and Dark (S4,500)
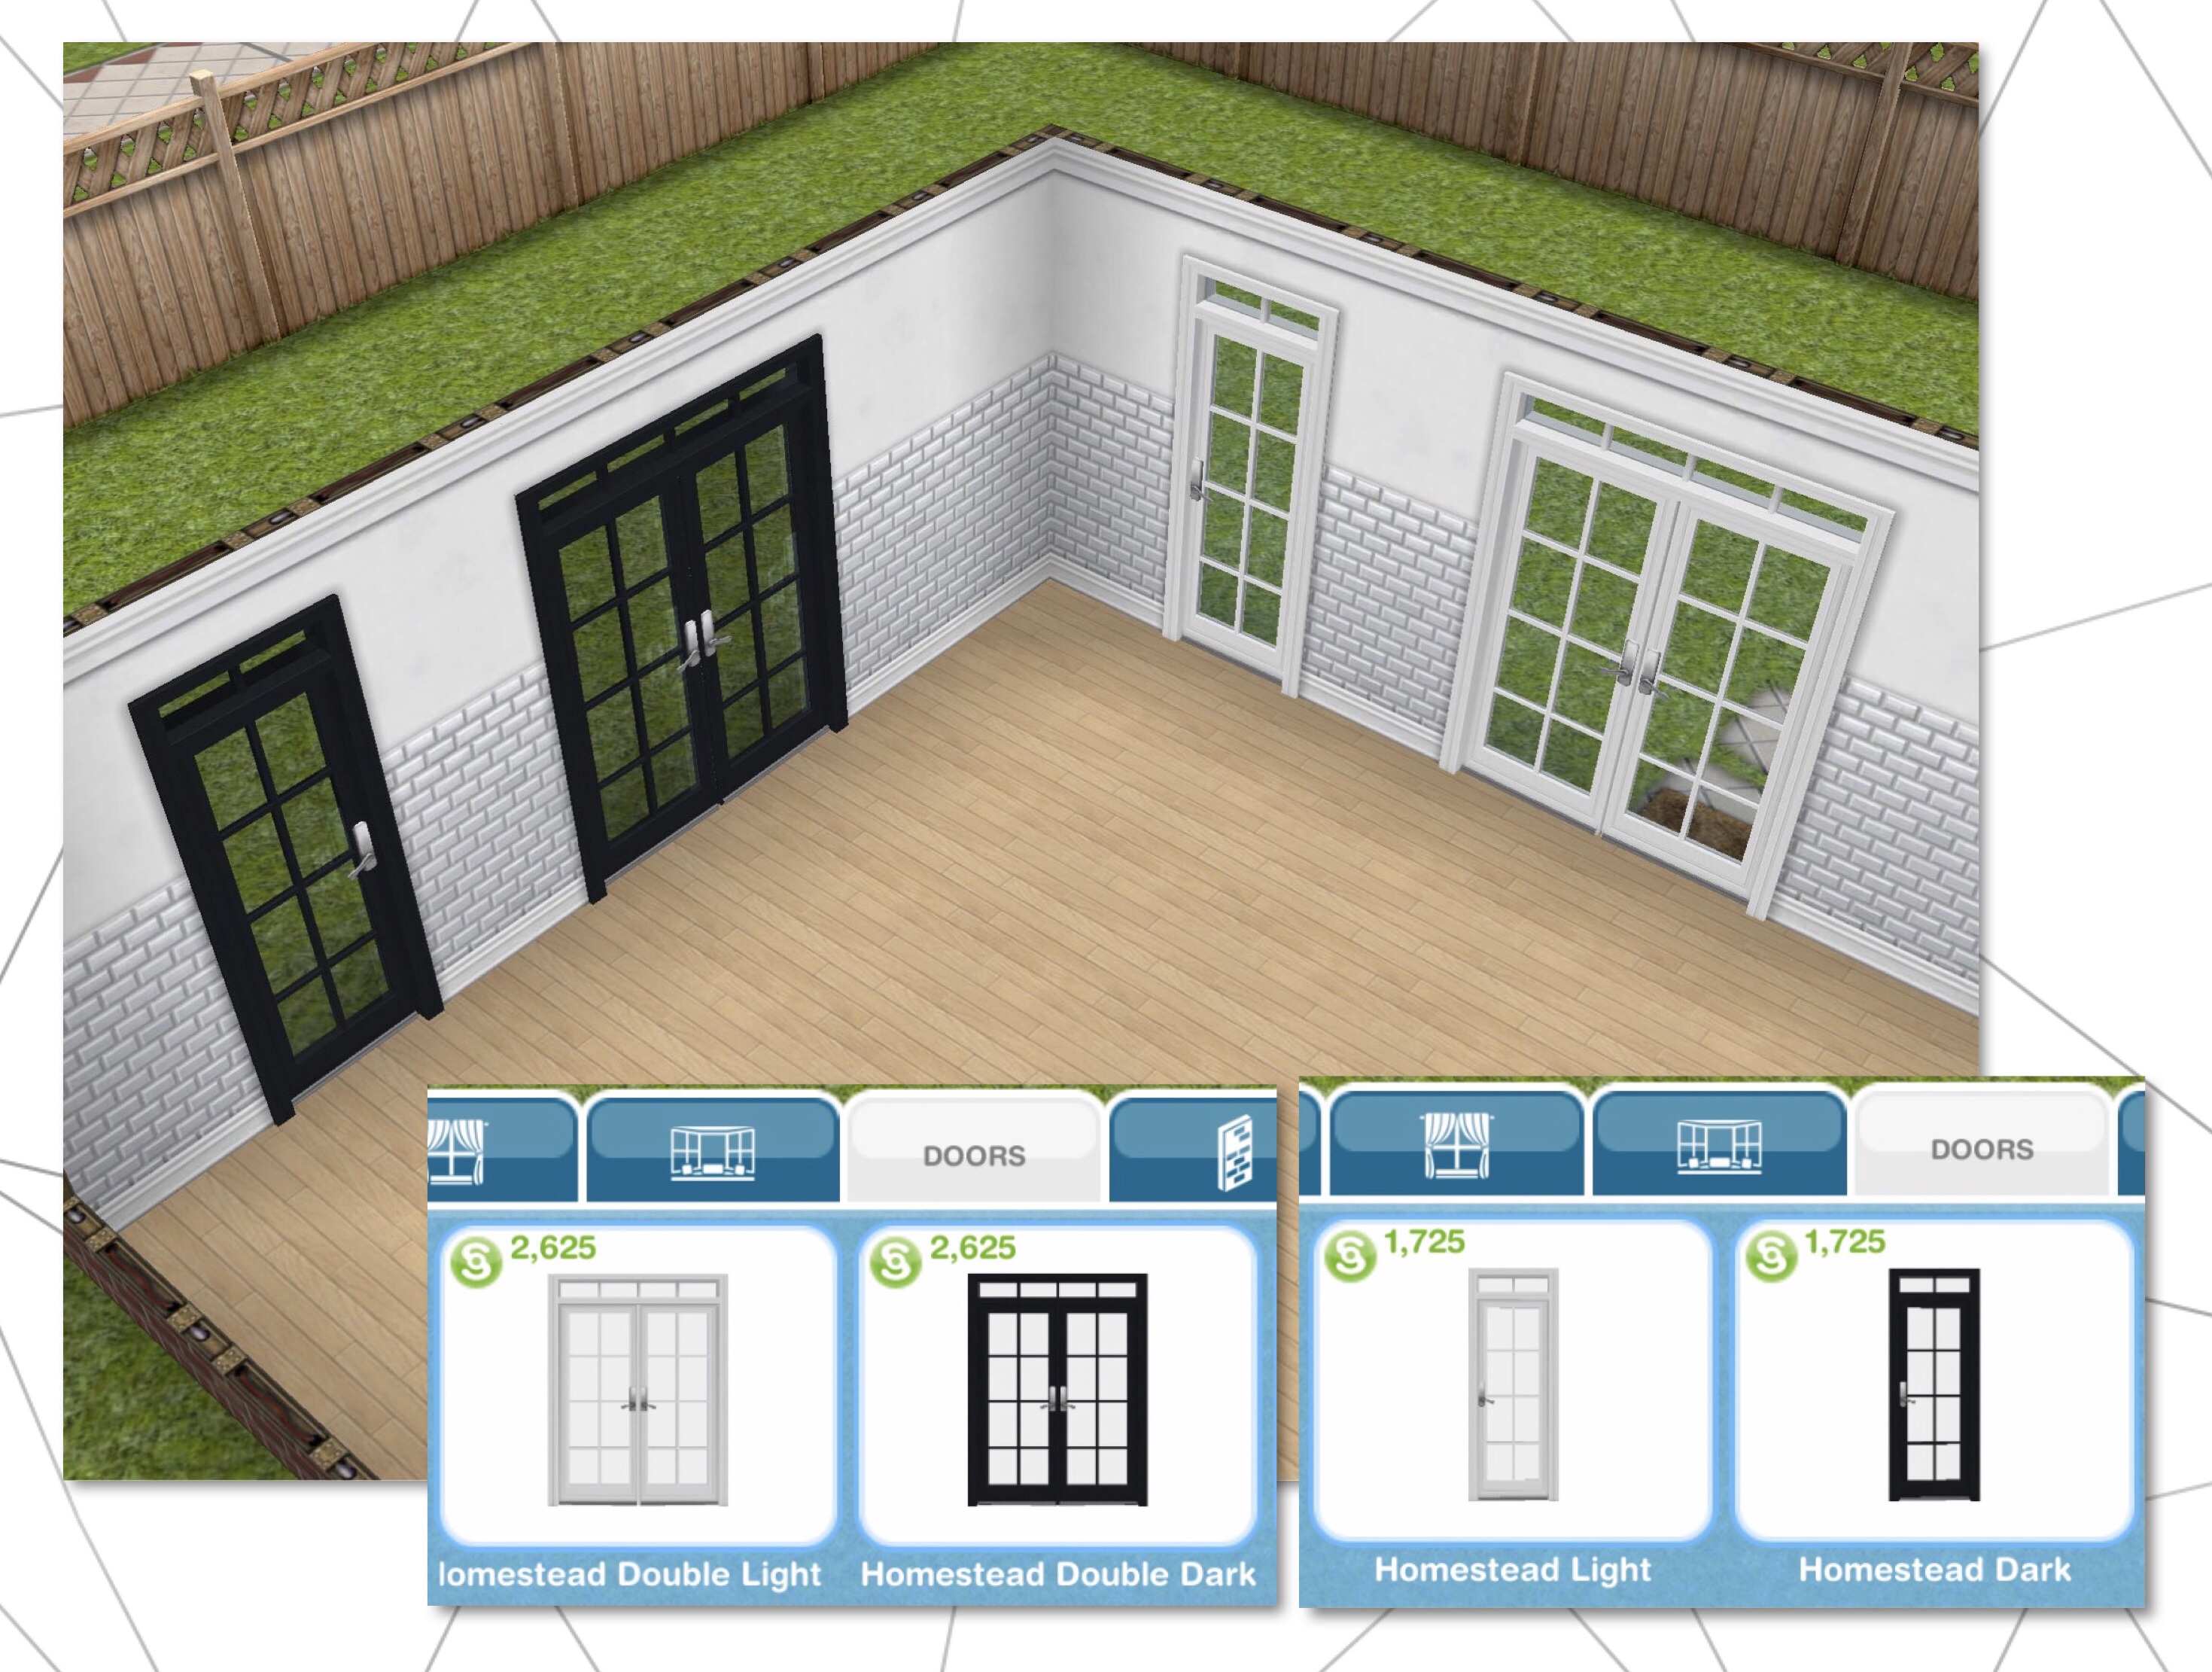
Doors
Doors Section: Homestead Light (S1,725) and Dark (S1,725)
Homestead Double Light (S2,625) and Dark (S2,625)
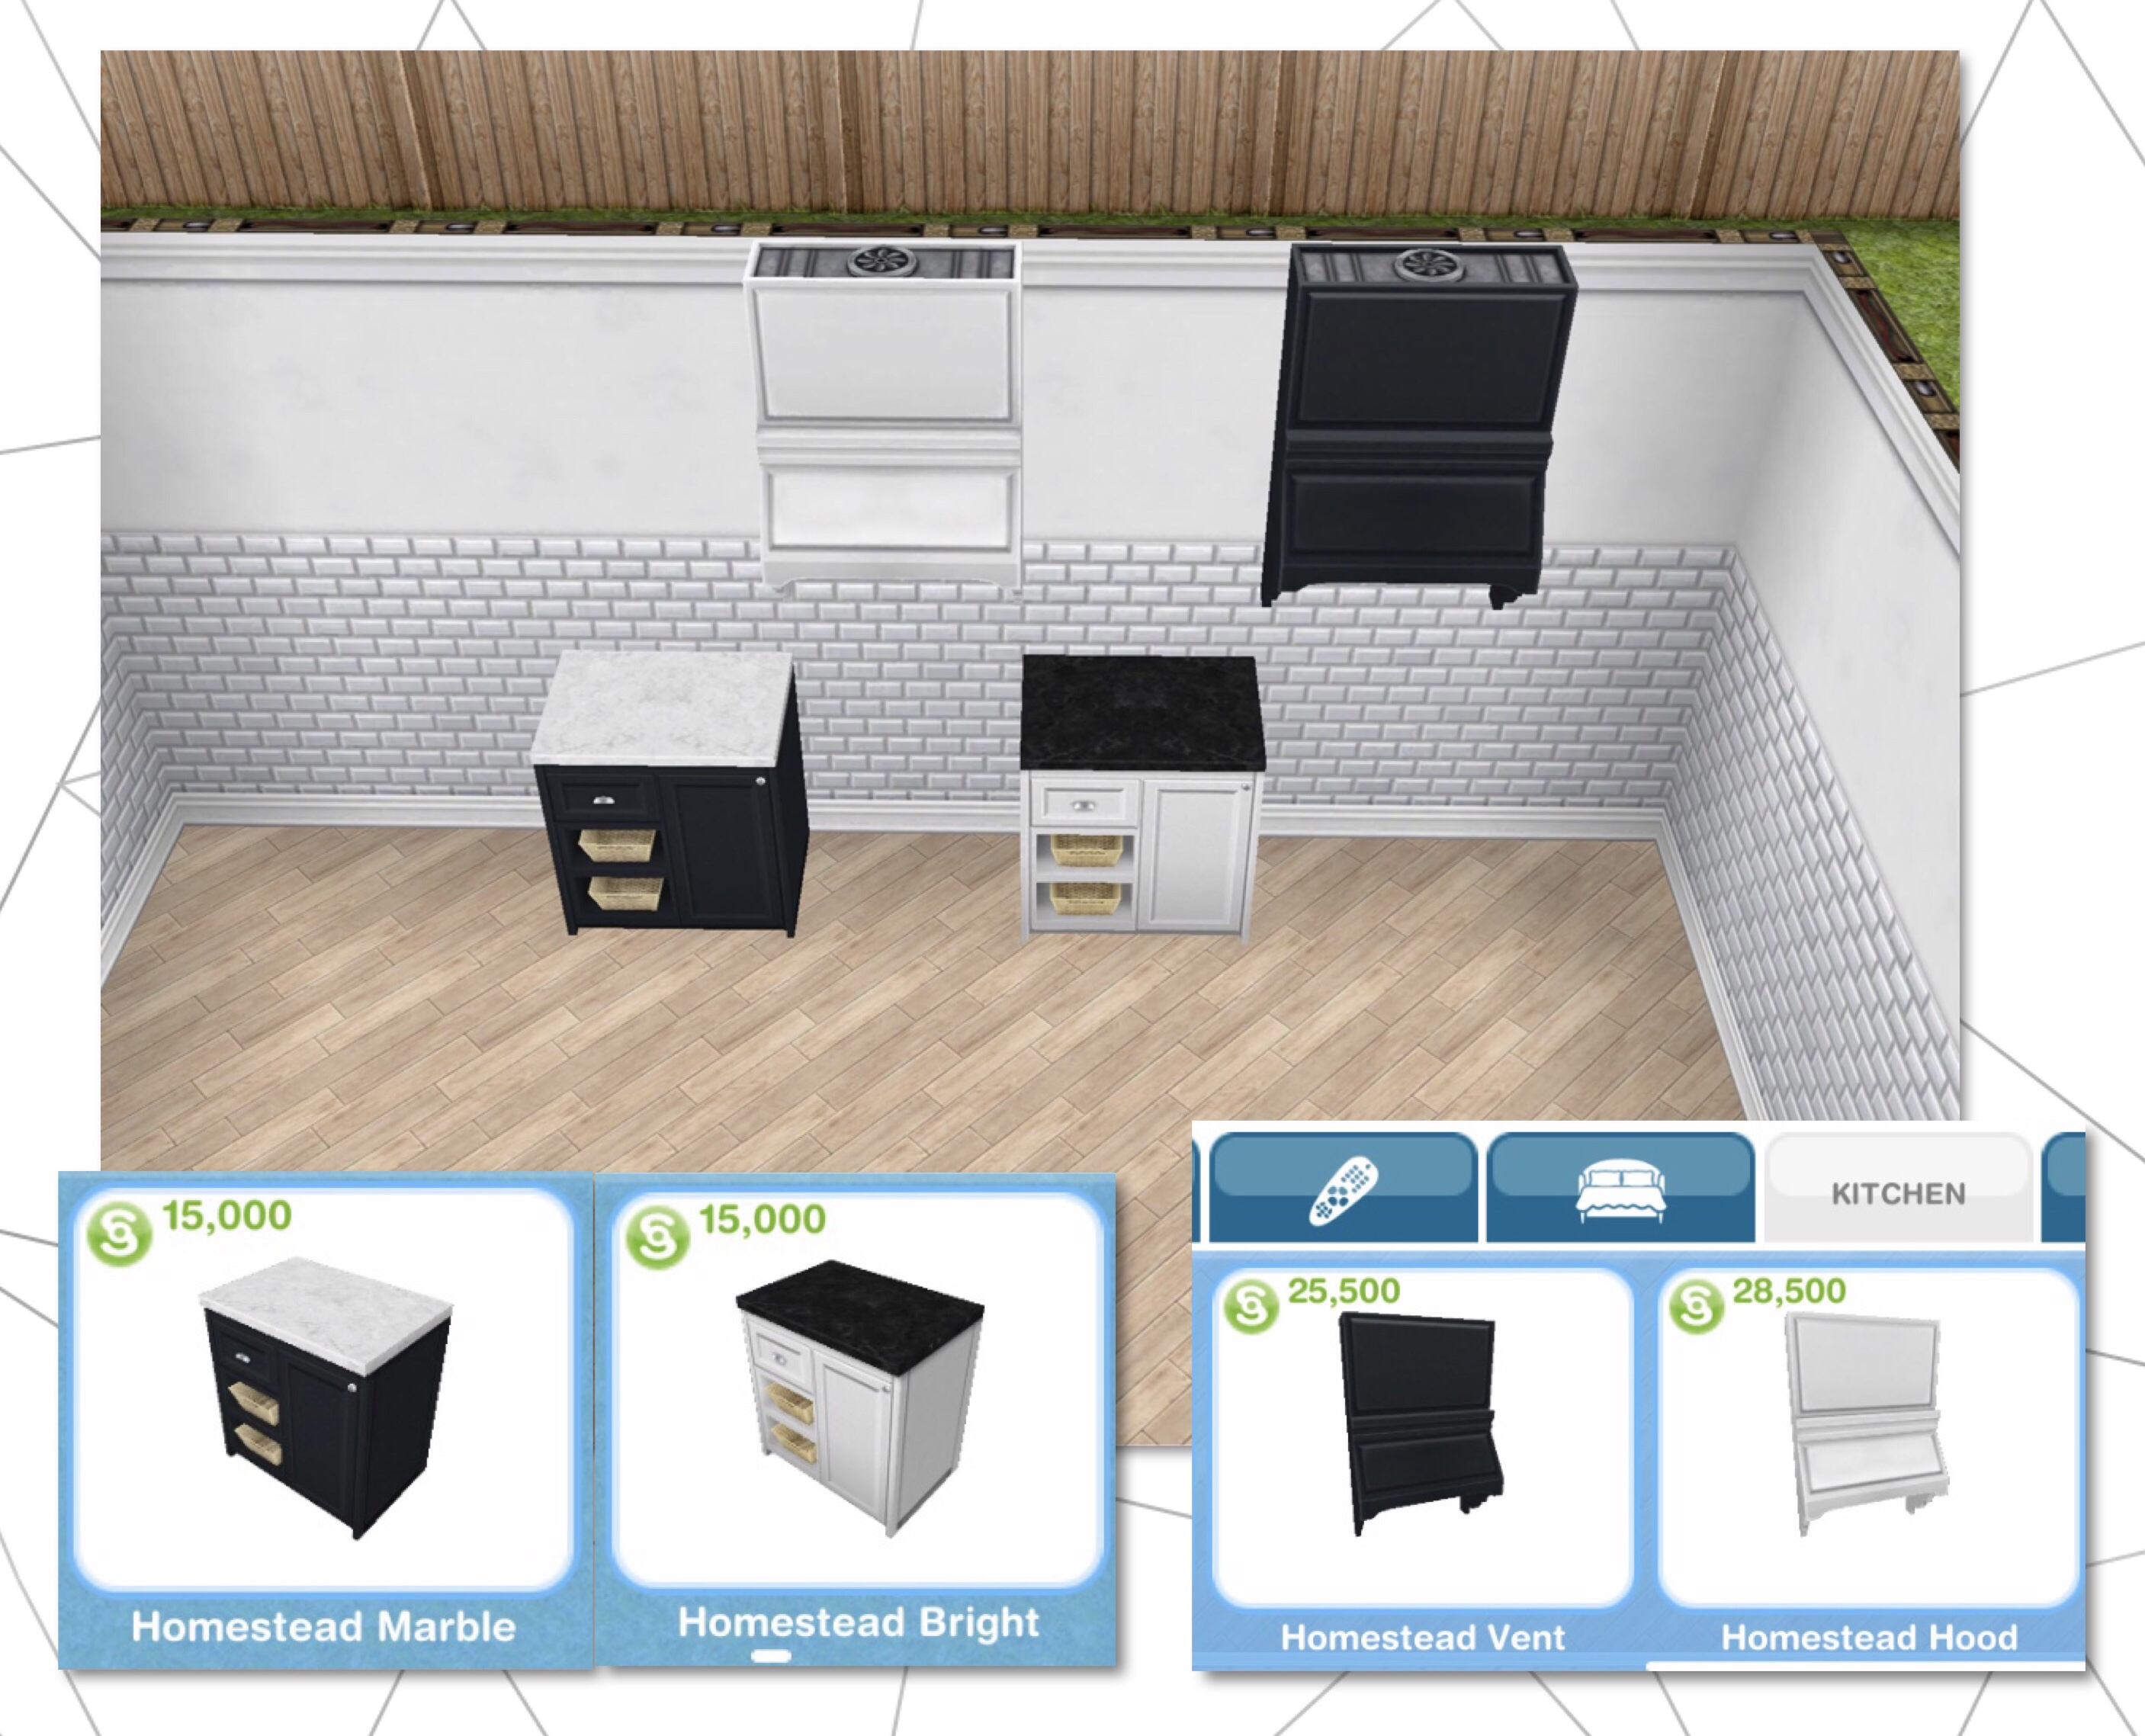
Kitchen Essentials
Countertops Section: Homestead Sink Light (S20,250) and Dark (S20,250)
Homestead White (S15,000) and Black (S15,000)
Living Space
Doors Section: Light (S1,350) and Dark (S1,350) Homestead Frame
Early Access to Beta Provided by EA/ Firemonkeys (Presented by EA Creator Network)
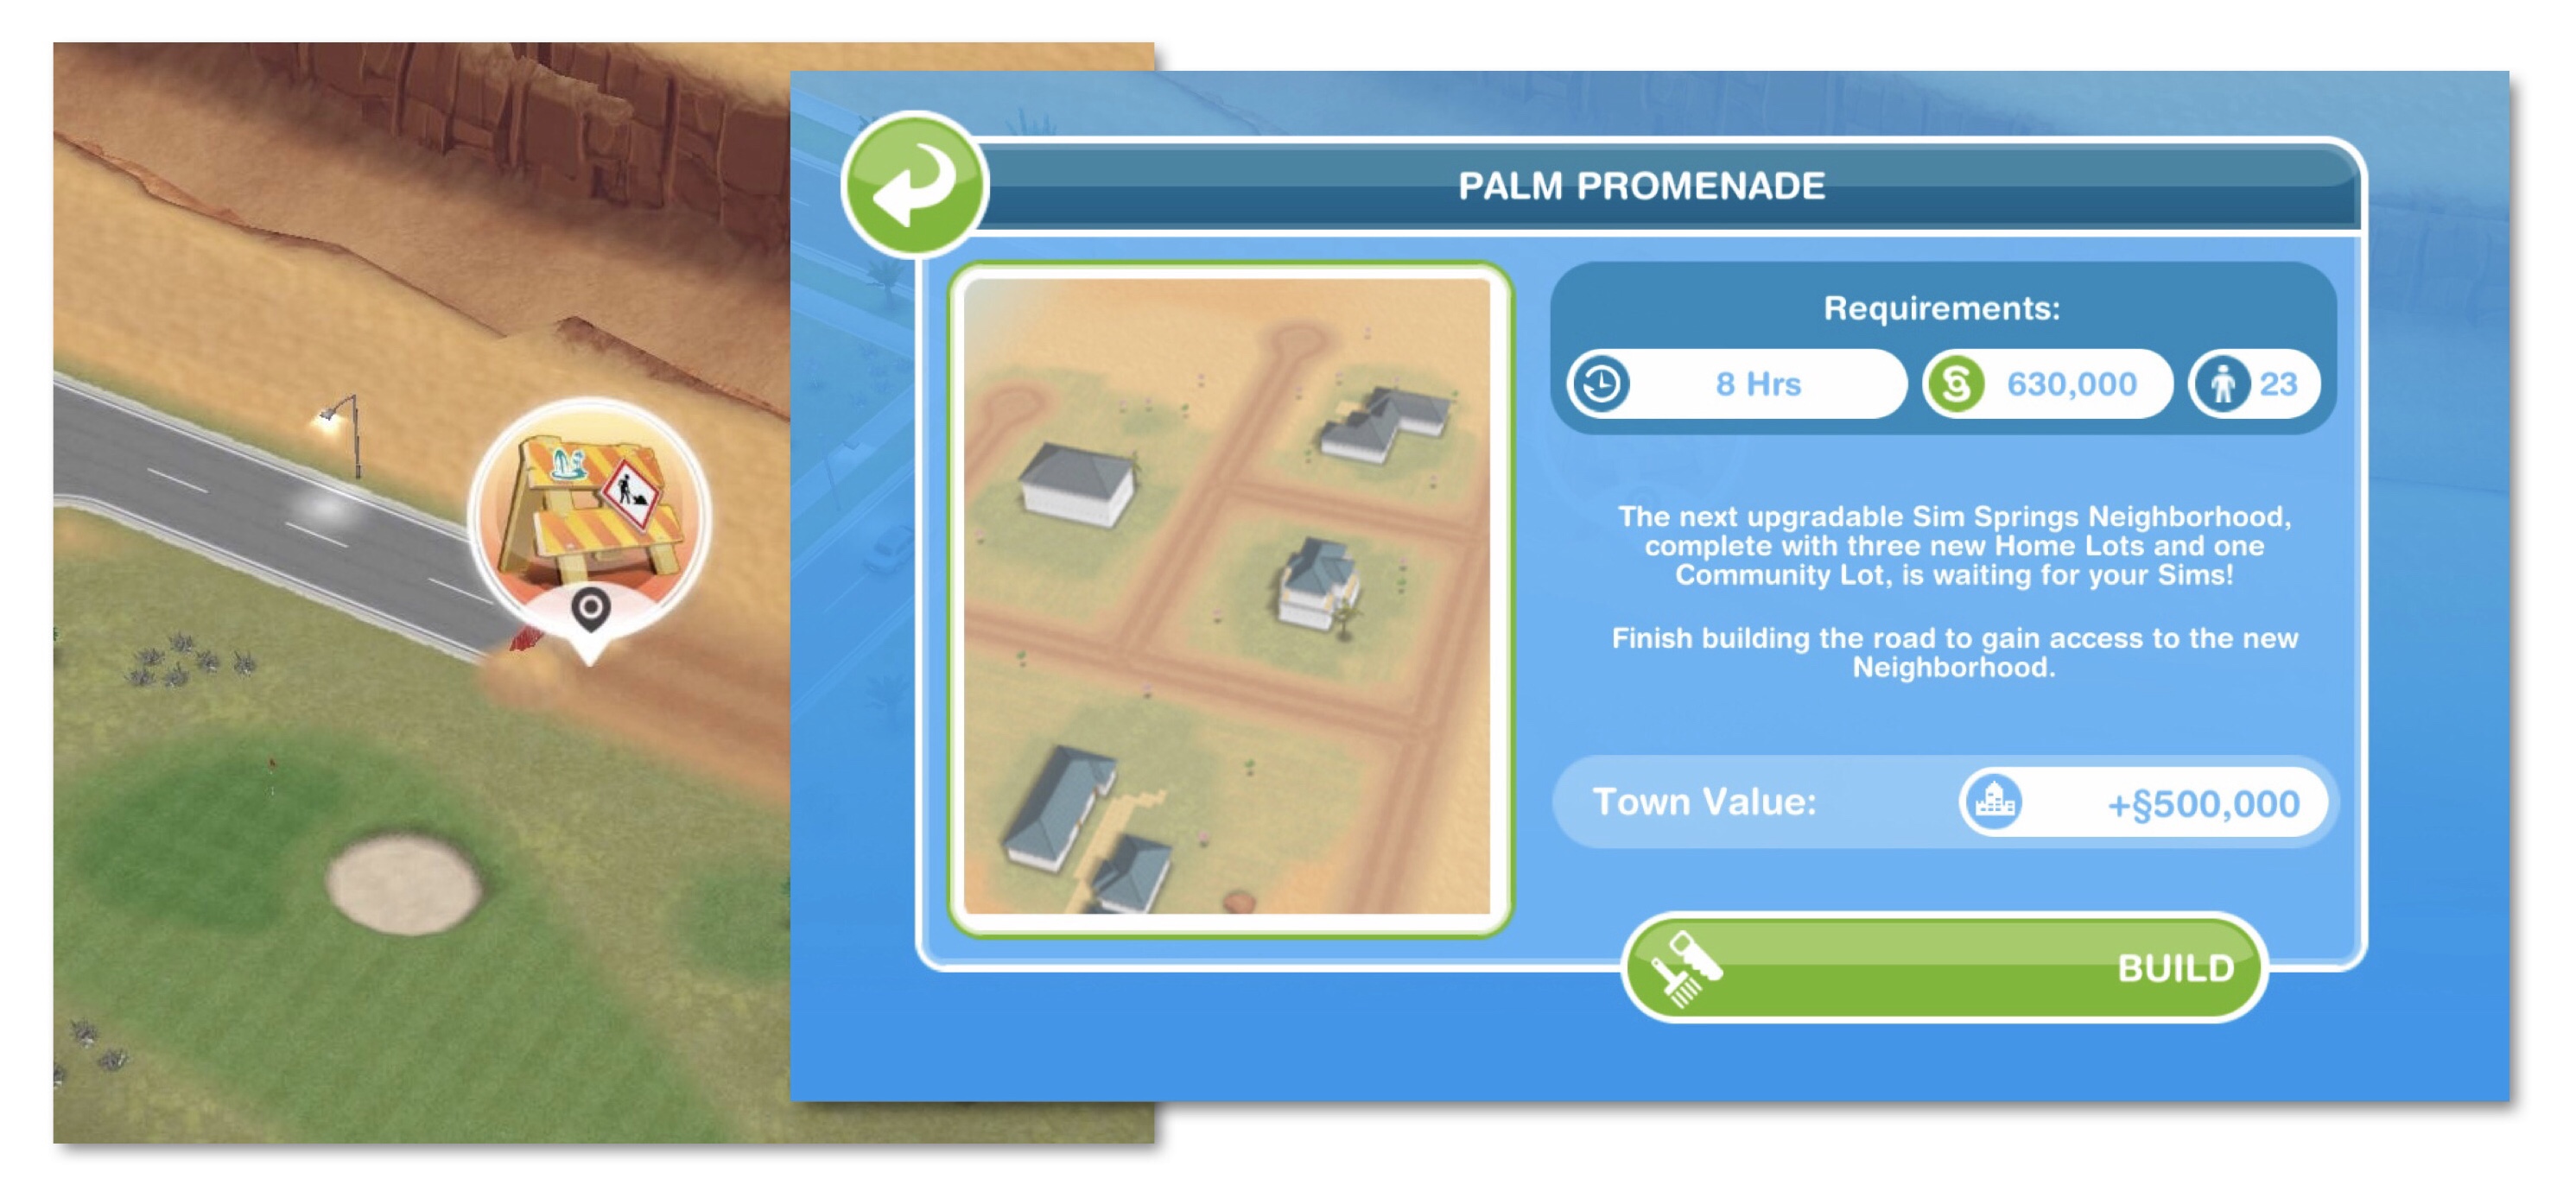
The second neighbourhood in Sim Springs, Palm Promenade is available. The aim of this event is to complete daily tasks to renovate house lots in the new neighbourhood, you will need to have completed the first neighbourhood, Sandy Suburbs before you can move on to this one. There is no rush to begin this, it will be available in the future when you are ready to start.
Click on the links above to see the daily tasks and prizes for that lot
3 of the lots are house lots and the final lot, Barter Boardwalk is a community lot which once unlocked can still be customised like a normal house lot but your sims cannot live in them. You will also be able to place any item from the decoration section of buy mode in the community lot for free!
The lots need to be renovated in the order listed above, you cannot do up more than one lot at a time and the next won’t unlock until the previous one has been completed. The time limit to complete a house is 10 days (14 days for community lot) with tasks to complete each day in Sim Springs, similar to Downtown Developer Events if you don’t complete in the time limit you will have to pay to be able to move on but there are prizes available, the extra zesty prizes contains a house template that can be placed in Sim Springs or Simtown.
Once Sandy Suburbs is complete you will get the task to ‘Build the Road to Palm Promenade’ click on the orange Sim Springs symbol on the task or the bus stop in Simtown to go to Sim Springs:
You will see the roadblock sign, click this to get the option to build Palm Promenade:
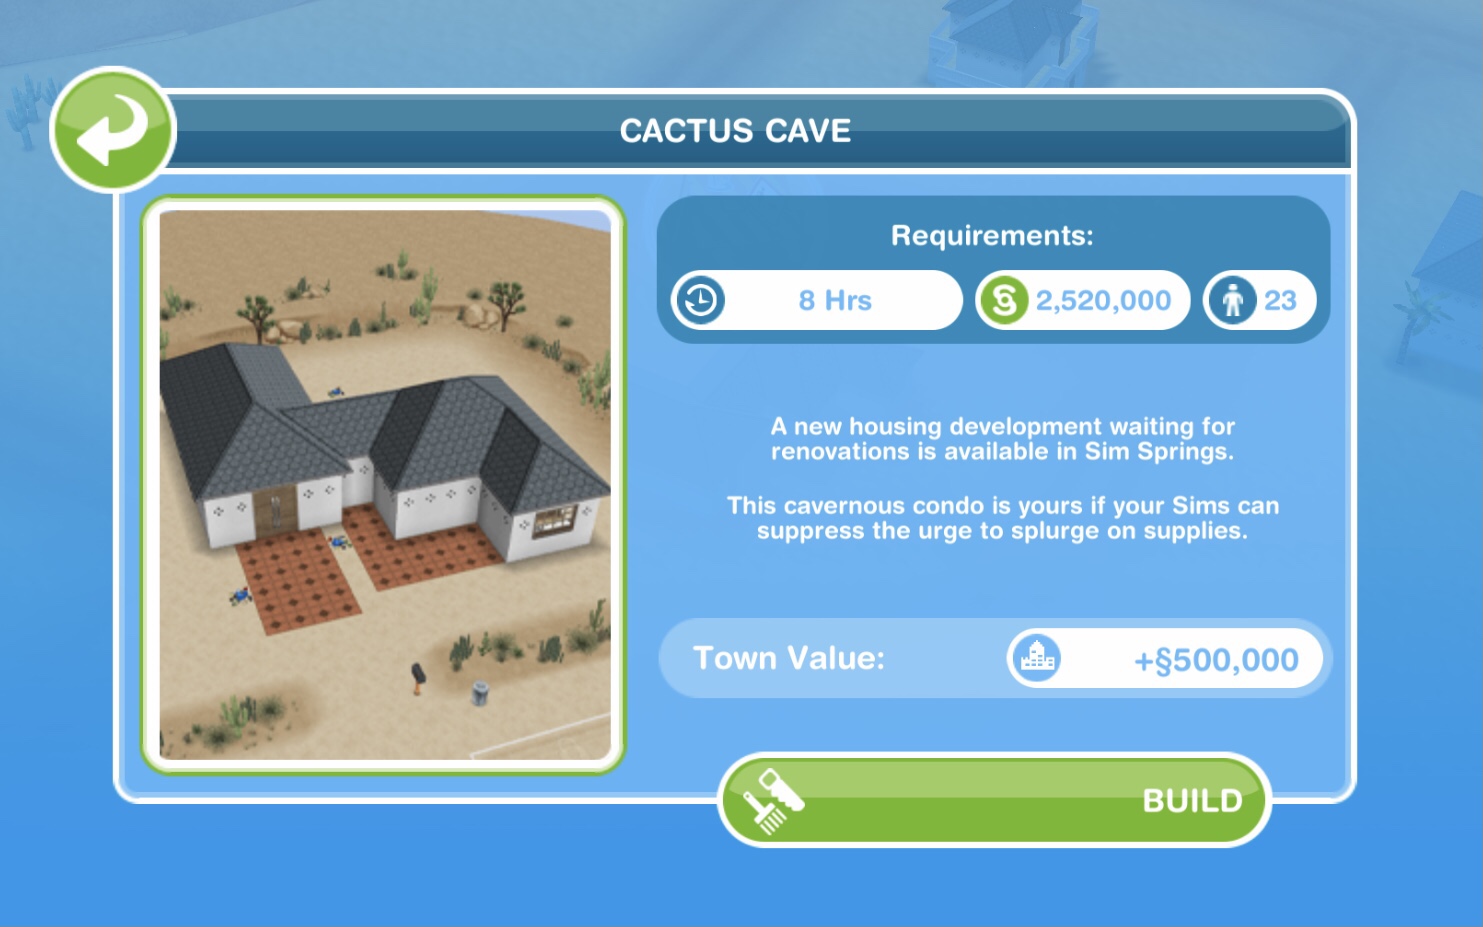
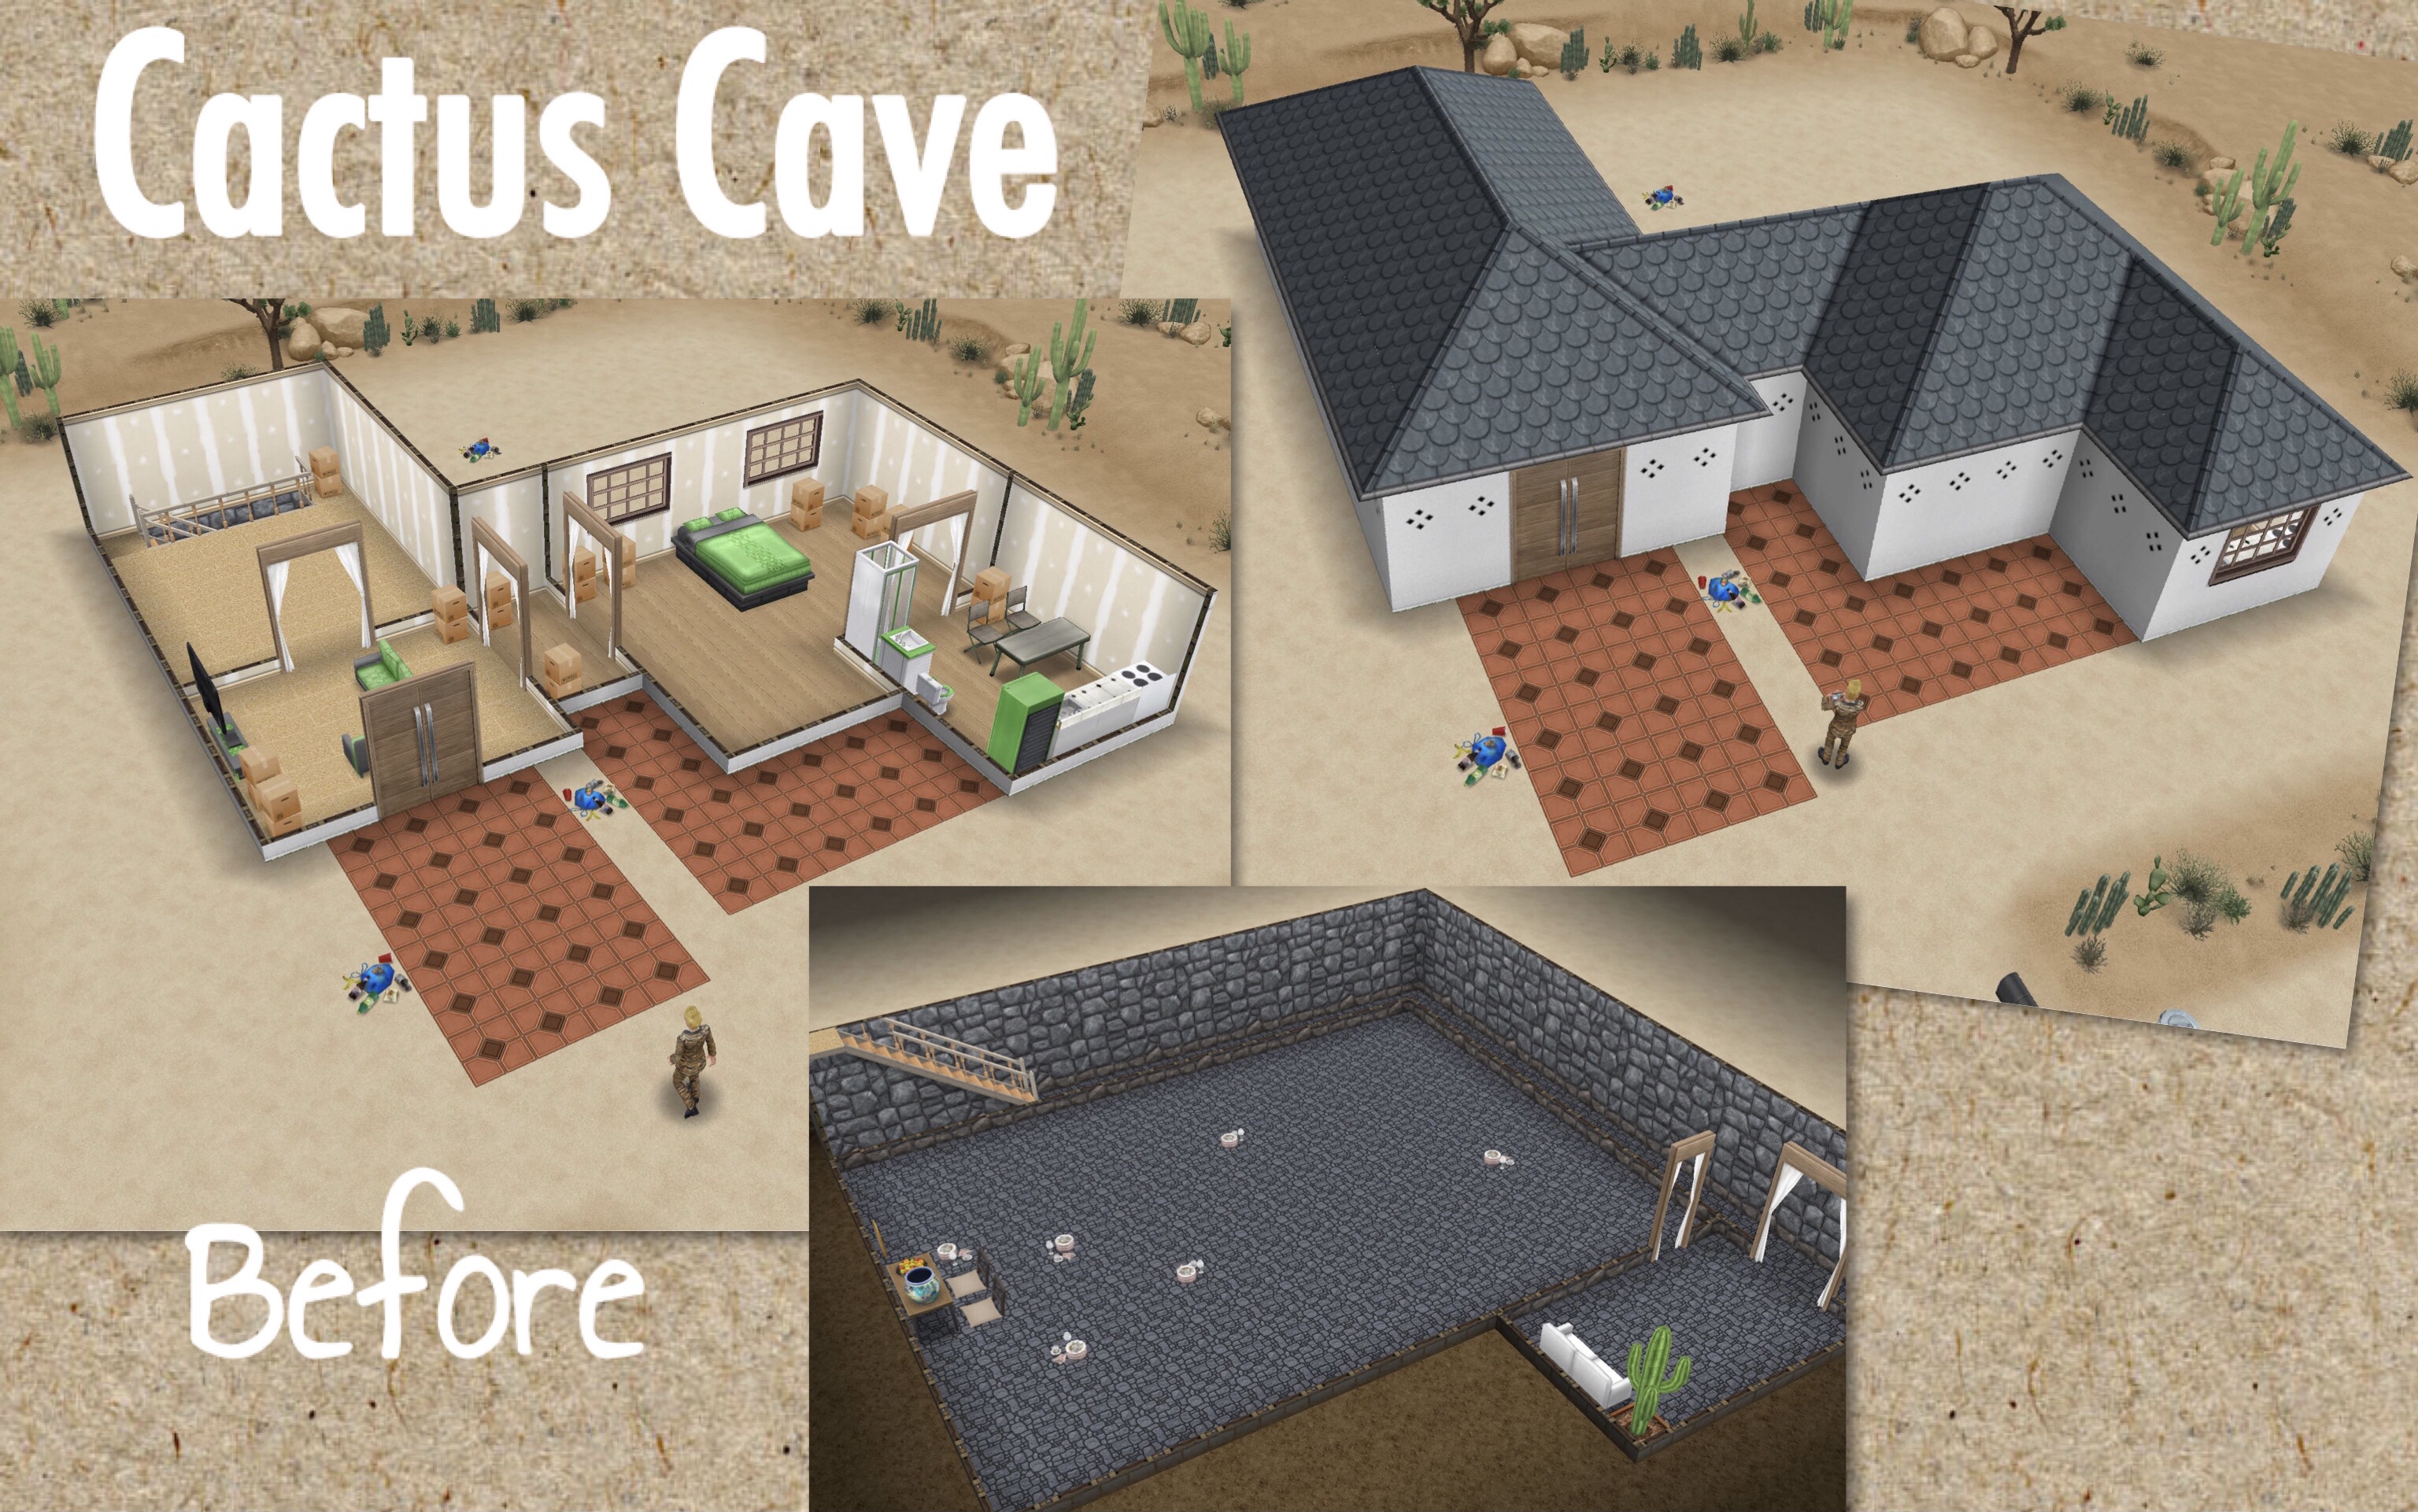
Once built you can build the first house Cactus Cave, the timer will begin once this house has finished building:
You can skip the tutorial if you remember how Sim Springs events work or you can complete the tutorial if you need a recap:
You can only complete one task at a time, unless it is a build task (buy items etc) then you can complete at the same time as another task
You can complete these tasks in any order
The tasks you need to complete will have the Sim Springs symbol on them:
More than one sim can be used for tasks that require multiple sims
You will need to buy some items such as trees, couches and computers to be able to complete tasks in Palm Promenade, if you have a 3 star item at a house in Simtown you can store it in your inventory and place it in Palm Promenade rather than buying a new one
Trash cannot be removed until you get the task to remove it
If you skip using SP on tasks that require you to clear up items it will remove those items
For tasks that require you to find items in objects if you use social points to quick complete you can find more
For tasks that require you to spend money you can buy items and then store them, this still counts TIP: I would save building rooms/ basements etc and placing flooring and wallpaper for when you need to spend money
For tasks that require you to place a certain number of items, if you store one of those items already in the house you will need to buy or replace it. For example, if you need to buy 6 windows and there are 3 there already but you store them all you will need to buy 6 windows rather than buying 3 more
Investment tasks are like mastery classes in SimChase, the more you spend, the less time it takes to complete TIP: check how much it would cost to skip with SP it may be cheaper or the same cost as the investment without the wait time
The lower the star rating, the longer a task will take to complete, I have included this in the tables below
If sims are inspired they will complete actions faster, I have also included these times in the tables below
You are aiming to complete the daily tasks within 24 hours, if you take too long you will have to pay to move on
For tasks that require more than 10 sims to complete at once you can spread them out throughout the houses you have unlocked in Palm Promenade, for example at Tall-Tree House you need to Take 12 Floral Photos of plants so you can have 10 sims at Tall-Tree House and the other 2 in Cactus Cave
Once Day 5’s tasks are complete you can wait for the next day or use SP to start early
ZEST ZONE BEGINS- complete day’s 6, 7, 8, 9 and 10 each within 24 hours to win Extra Zesty Prizes!
Day 6 Tasks
Time (3 Star Rating)
2 Star Rating
1 Star Rating
Skip Cost
Place 2 TVs at Cactus Cave
1SP
Check in with Johnny Zest
1 hr
INSPIRED: 57 mins
9SP
Order Excess Supplies (phone)
7 hrs
INSPIRED: 6 hrs 39 mins
8 hrs
INSPIRED: 7 hrs 36 mins
8 hrs 45 mins
INSPIRED: 8 hrs 19 mins
28SP
Investigate Investments (computer)
7 hrs
INSPIRED: 6 hrs 39 mins
8 hrs
INSPIRED: 7 hrs 36 mins
8 hrs 45 mins
INSPIRED: 8 hrs 19 mins
28SP
SKIP ALL: 45SP
REWARD: S10,000 and 1SP
Once Day 6’s tasks are complete you can wait for the next day or use SP to start early
Day 7 Tasks
Time (3 Star Rating)
2 Star Rating
1 Star Rating
Skip Cost
Spend S288,500 at Cactus Cave (may be less if you are at a lower level)
9SP
Check in with Johnny Zest
1 hr
INSPIRED: 57 mins
9SP
Search for Document (couch)
6 hrs 30 mins
INSPIRED: 6 hrs 11 mins
7 hrs 30 mins
INSPIRED: 7 hrs 7 mins
8 hrs 7 mins
INSPIRED: 7 hrs 43 mins
27SP
Write Mindful Memo (dining chair and table)
5 hrs
INSPIRED: 4 hrs 45 mins
5 hrs 30 mins
INSPIRED: 5 hrs 14 mins
6 hrs 15 mins
INSPIRED: 5 hrs 56 mins
22SP
Read Megaflora Magazine (magazine pile)
2 hrs 30 mins
INSPIRED: 2 hrs 23 mins
15SP
SKIP ALL: 54SP
REWARD: 2LP and 2SP
Once Day 7’s tasks are complete you can wait for the next day or use SP to start early
Day 8 Tasks
Time (3 Star Rating)
2 Star Rating
1 Star Rating
Skip Cost
Place 2 Dining Tables at Cactus Cave
1SP
Check in with Johnny Zest
1 hr
INSPIRED: 57 mins
9SP
Be Berated by Neighbours (phone)
4 hrs 30 mins
INSPIRED: 4 hrs 17 mins
5 hrs
INSPIRED: 4 hrs 45 mins
5 hrs 38 mins
INSPIRED: 5 hrs 21 mins
21SP
Reflect on Actions (mirror)
4 hrs
INSPIRED: 3 hrs 48 mins
4 hrs 30 mins
INSPIRED: 4 hrs 17 mins
5 hrs
INSPIRED: 4 hrs 45 mins
19SP
Examine Tree Roots
3 hrs 10 mins
INSPIRED: 3 hrs
3 hrs 30 mins
INSPIRED: 3 hrs 20 mins
3 hrs 58 mins
INSPIRED: 3 hrs 46 mins
17SP
Find 36 Old Water Cups (household objects)(9 sims)(quick complete to find extra)
4 hrs 30 mins
INSPIRED: 4 hrs 17 mins
5 hrs
INSPIRED: 4 hrs 45 mins
5 hrs 38 mins
INSPIRED: 5 hrs 21 mins
109SP
SKIP ALL: 129SP
REWARD: S12,000 and 1 Mystery Key
Once Day 8’s tasks are complete you can wait for the next day or use SP to start early
Day 9 Tasks
Time (3 Star Rating)
2 Star Rating
1 Star Rating
Skip Cost
Place 8 Dining Chairs at Cactus Cave
1SP
Check in with Johnny Zest
1 hr
INSPIRED: 57 mins
9SP
Clear Out Fridge
5 hrs
INSPIRED: 4 hrs 45 mins
5 hrs 30 mins INSPIRED: 5 hrs 14 mins
6 hrs 15 mins
INSPIRED: 5 hrs 56 mins
22SP
Return Supplies (computer)
4 hrs
INSPIRED: 3 hrs 48 mins
4 hrs 30 mins
INSPIRED: 4 hrs 17 mins
5 hrs
INSPIRED: 4 hrs 45 mins
19SP
Order Supplies (phone)
1 hr 15 mins
INSPIRED: 1 hr 11 mins
1 hr 24 mins
INSPIRED: 1 hr 20 mins
1 hr 34 mins
INSPIRED: 1 hr 29 mins
10SP
Check Council Regulations (bookshelf)
1 hr 30 mins
INSPIRED: 1 hr 26 mins
1 hr 41 mins
INSPIRED: 1 hr 36 mins
1 hr 53 mins
INSPIRED: 1 hr 47 mins
11SP
Tend to 9 Sick Plants (can use multiple sims)
4 hrs 30 mins
INSPIRED: 4 hrs 17 mins
5 hrs
INSPIRED: 4 hrs 45 mins
5 hrs 38 mins
INSPIRED: 5 hrs 21 mins
163SP
SKIP ALL: 175SP
REWARD: 4LP, 2SP and 1 Mystery Key
Once Day 9’s tasks are complete you can wait for the next day or use SP to start early
Day 10 Tasks
Time (3 Star Rating)
2 Star Rating
1 Star Rating
Skip Cost
Spend S385,000 at Cactus Cave (may be less if you are at a lower level)
13SP
Check in with Johnny Zest
1 hr
INSPIRED: 57 mins
9SP
Balance the Books (computer)
2 hrs 30 mins
INSPIRED: 2 hrs 23 mins
2 hrs 50 mins
INSPIRED: 2 hrs 42 mins
3 hrs 7 mins
INSPIRED: 2 hrs 58 mins
15SP
Order 9 Clearance Seedlings (computer)(can use multiple sims)
5 hrs
INSPIRED: 4 hrs 45 mins
5 hrs 30 mins
INSPIRED: 5 hrs 14 mins
6 hrs 15 mins
INSPIRED: 5 hrs 56 mins
175SP
Update Johnny Zest on Progress
5 hrs
INSPIRED: 4 hrs 45 mins
22SP
Find 45 Golden Pollen (household objects)(9 sims)(quick complete to find extra)
5 hrs
INSPIRED: 4 hrs 45 mins
5 hrs 30 mins
INSPIRED: 5 hrs 14 mins
6 hrs 15 mins
INSPIRED: 5 hrs 56 mins
116SP
SKIP ALL: 263SP
REWARD: S10,000, 6LP, 6SP and 1 Mystery Key
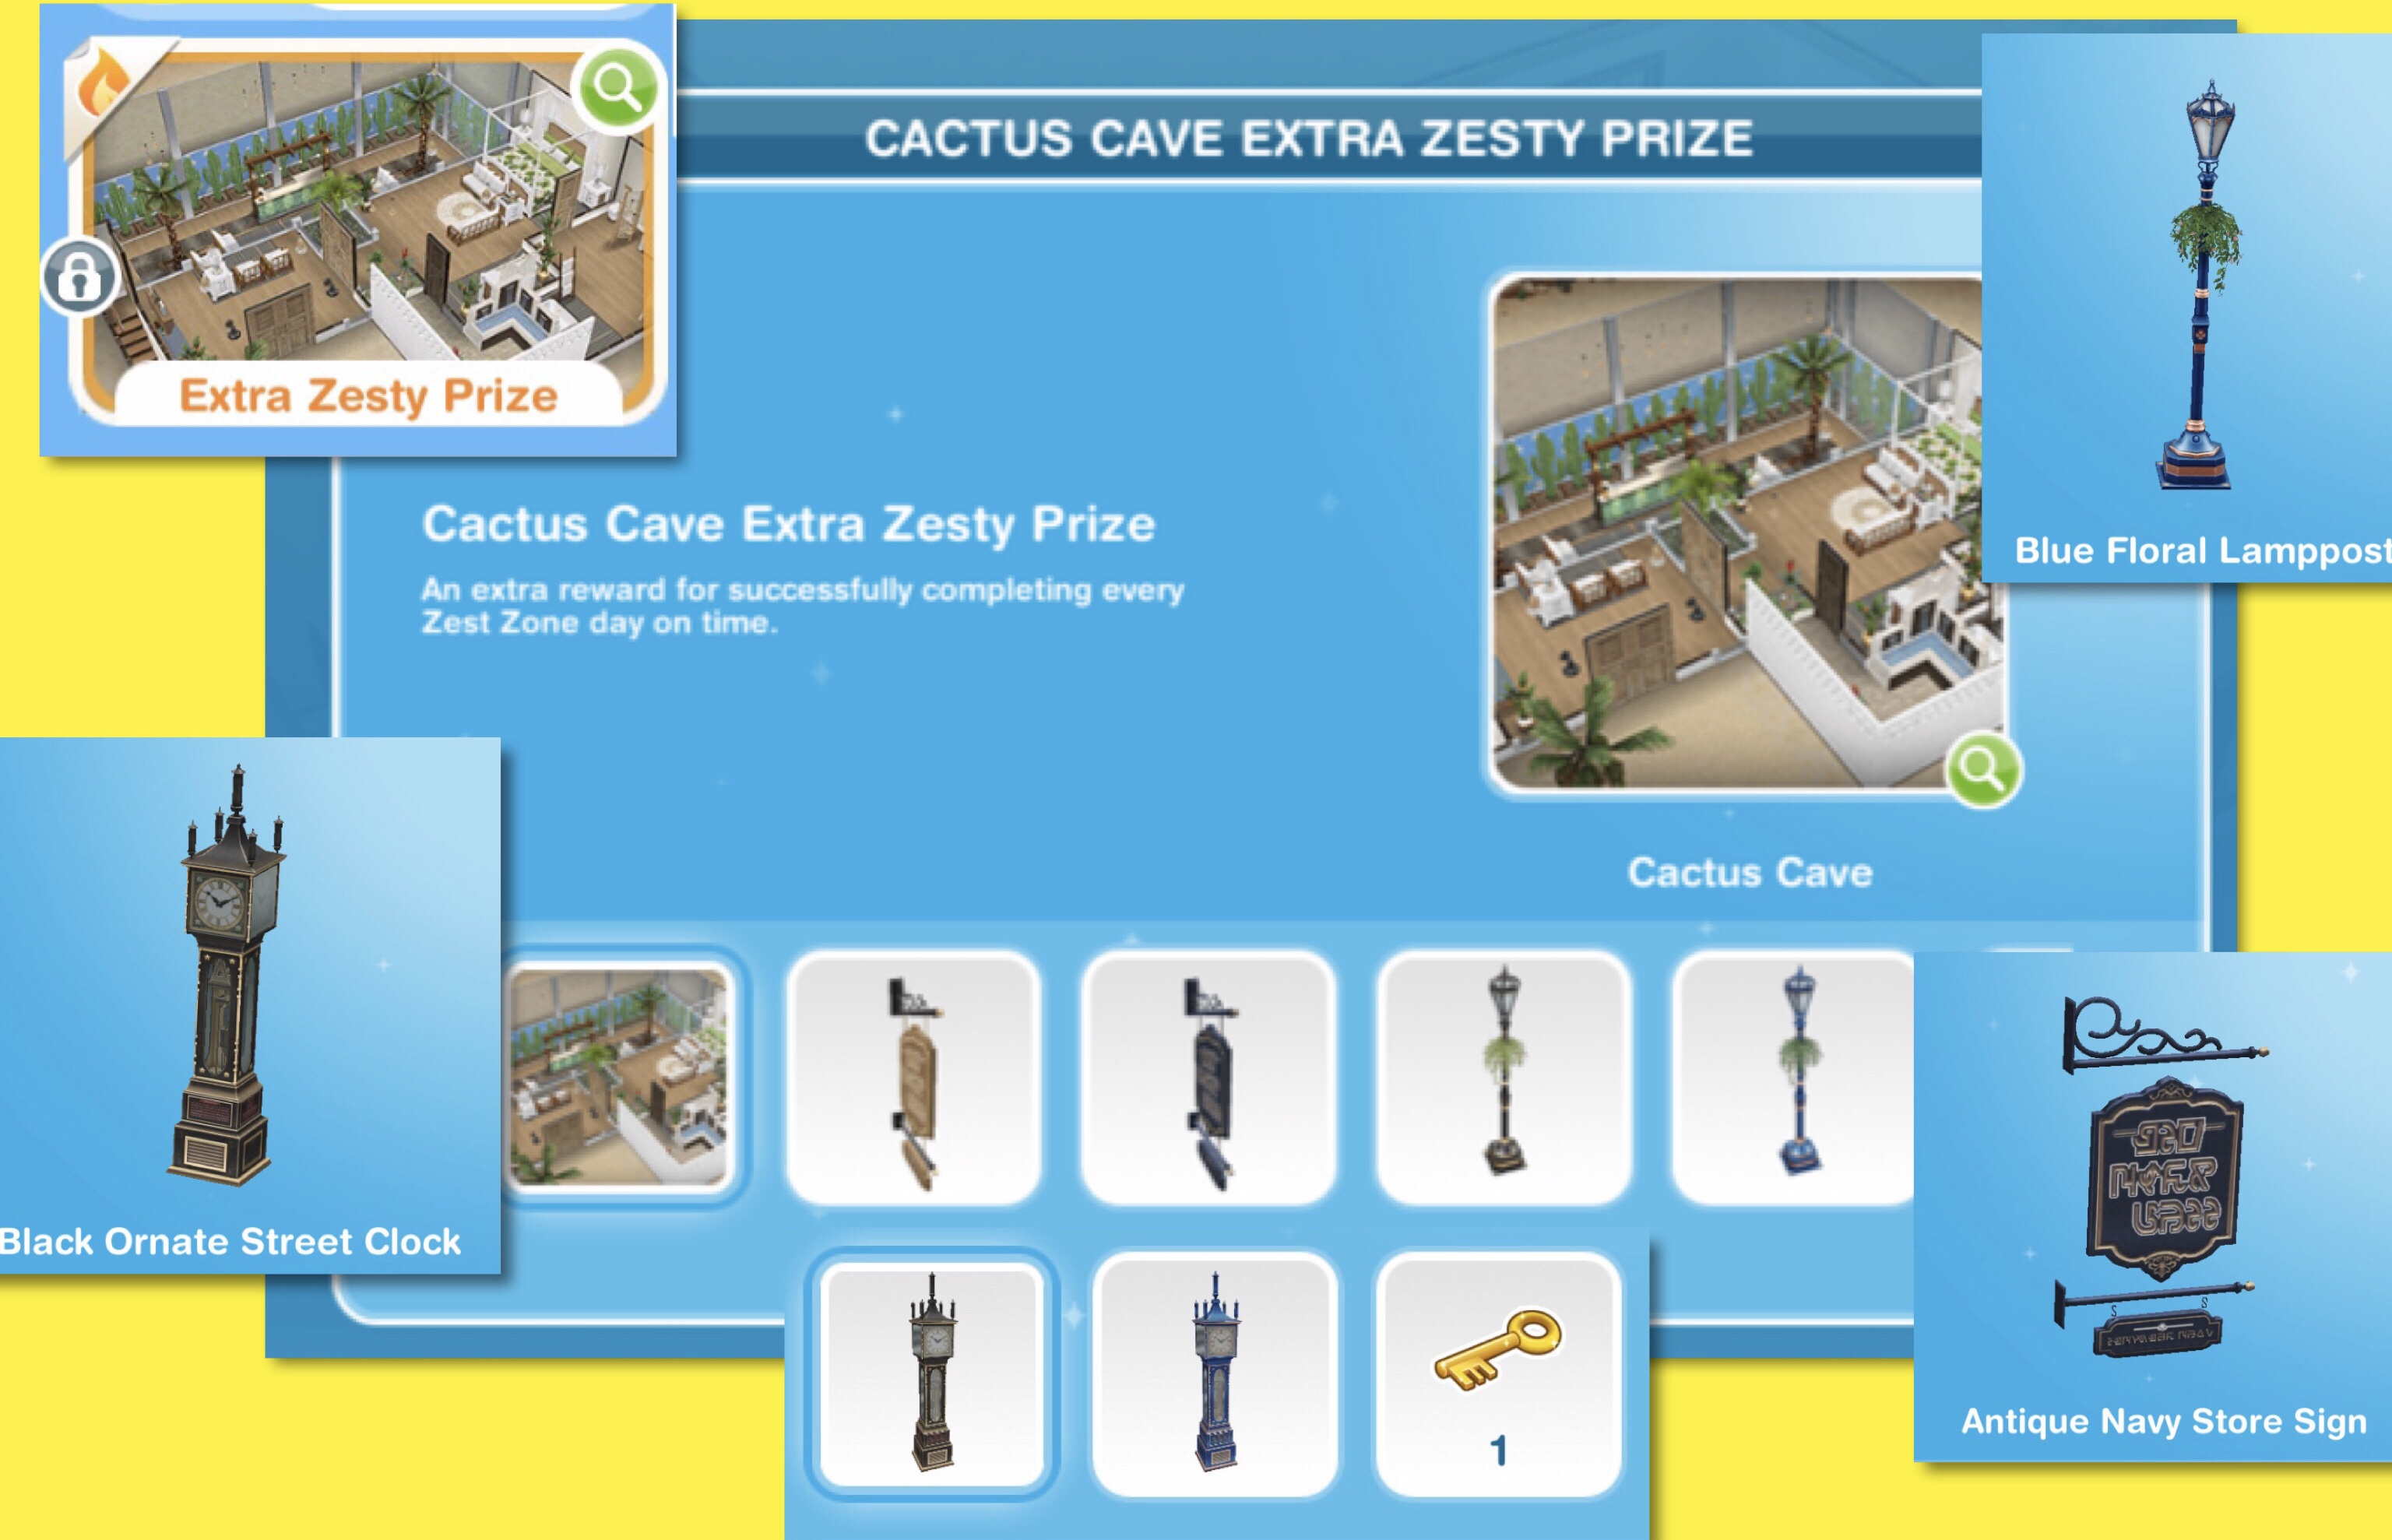
If you complete day’s 6, 7, 8, 9 and 10 (each within 24 hours) you will unlock the Extra Zesty Prizes which contains the Cactus Cave house template, store signs, street clocks, lampposts and 1 Mystery Key:
Decorations: Antique Brown (S84,000) and Navy (8LP) Store Sign
Lighting: Black (S94,000) and Blue (9SP) Floral Lamppost
Outdoor Decorations: Black (S61,000) and Blue (6SP) Ornate Street Clock
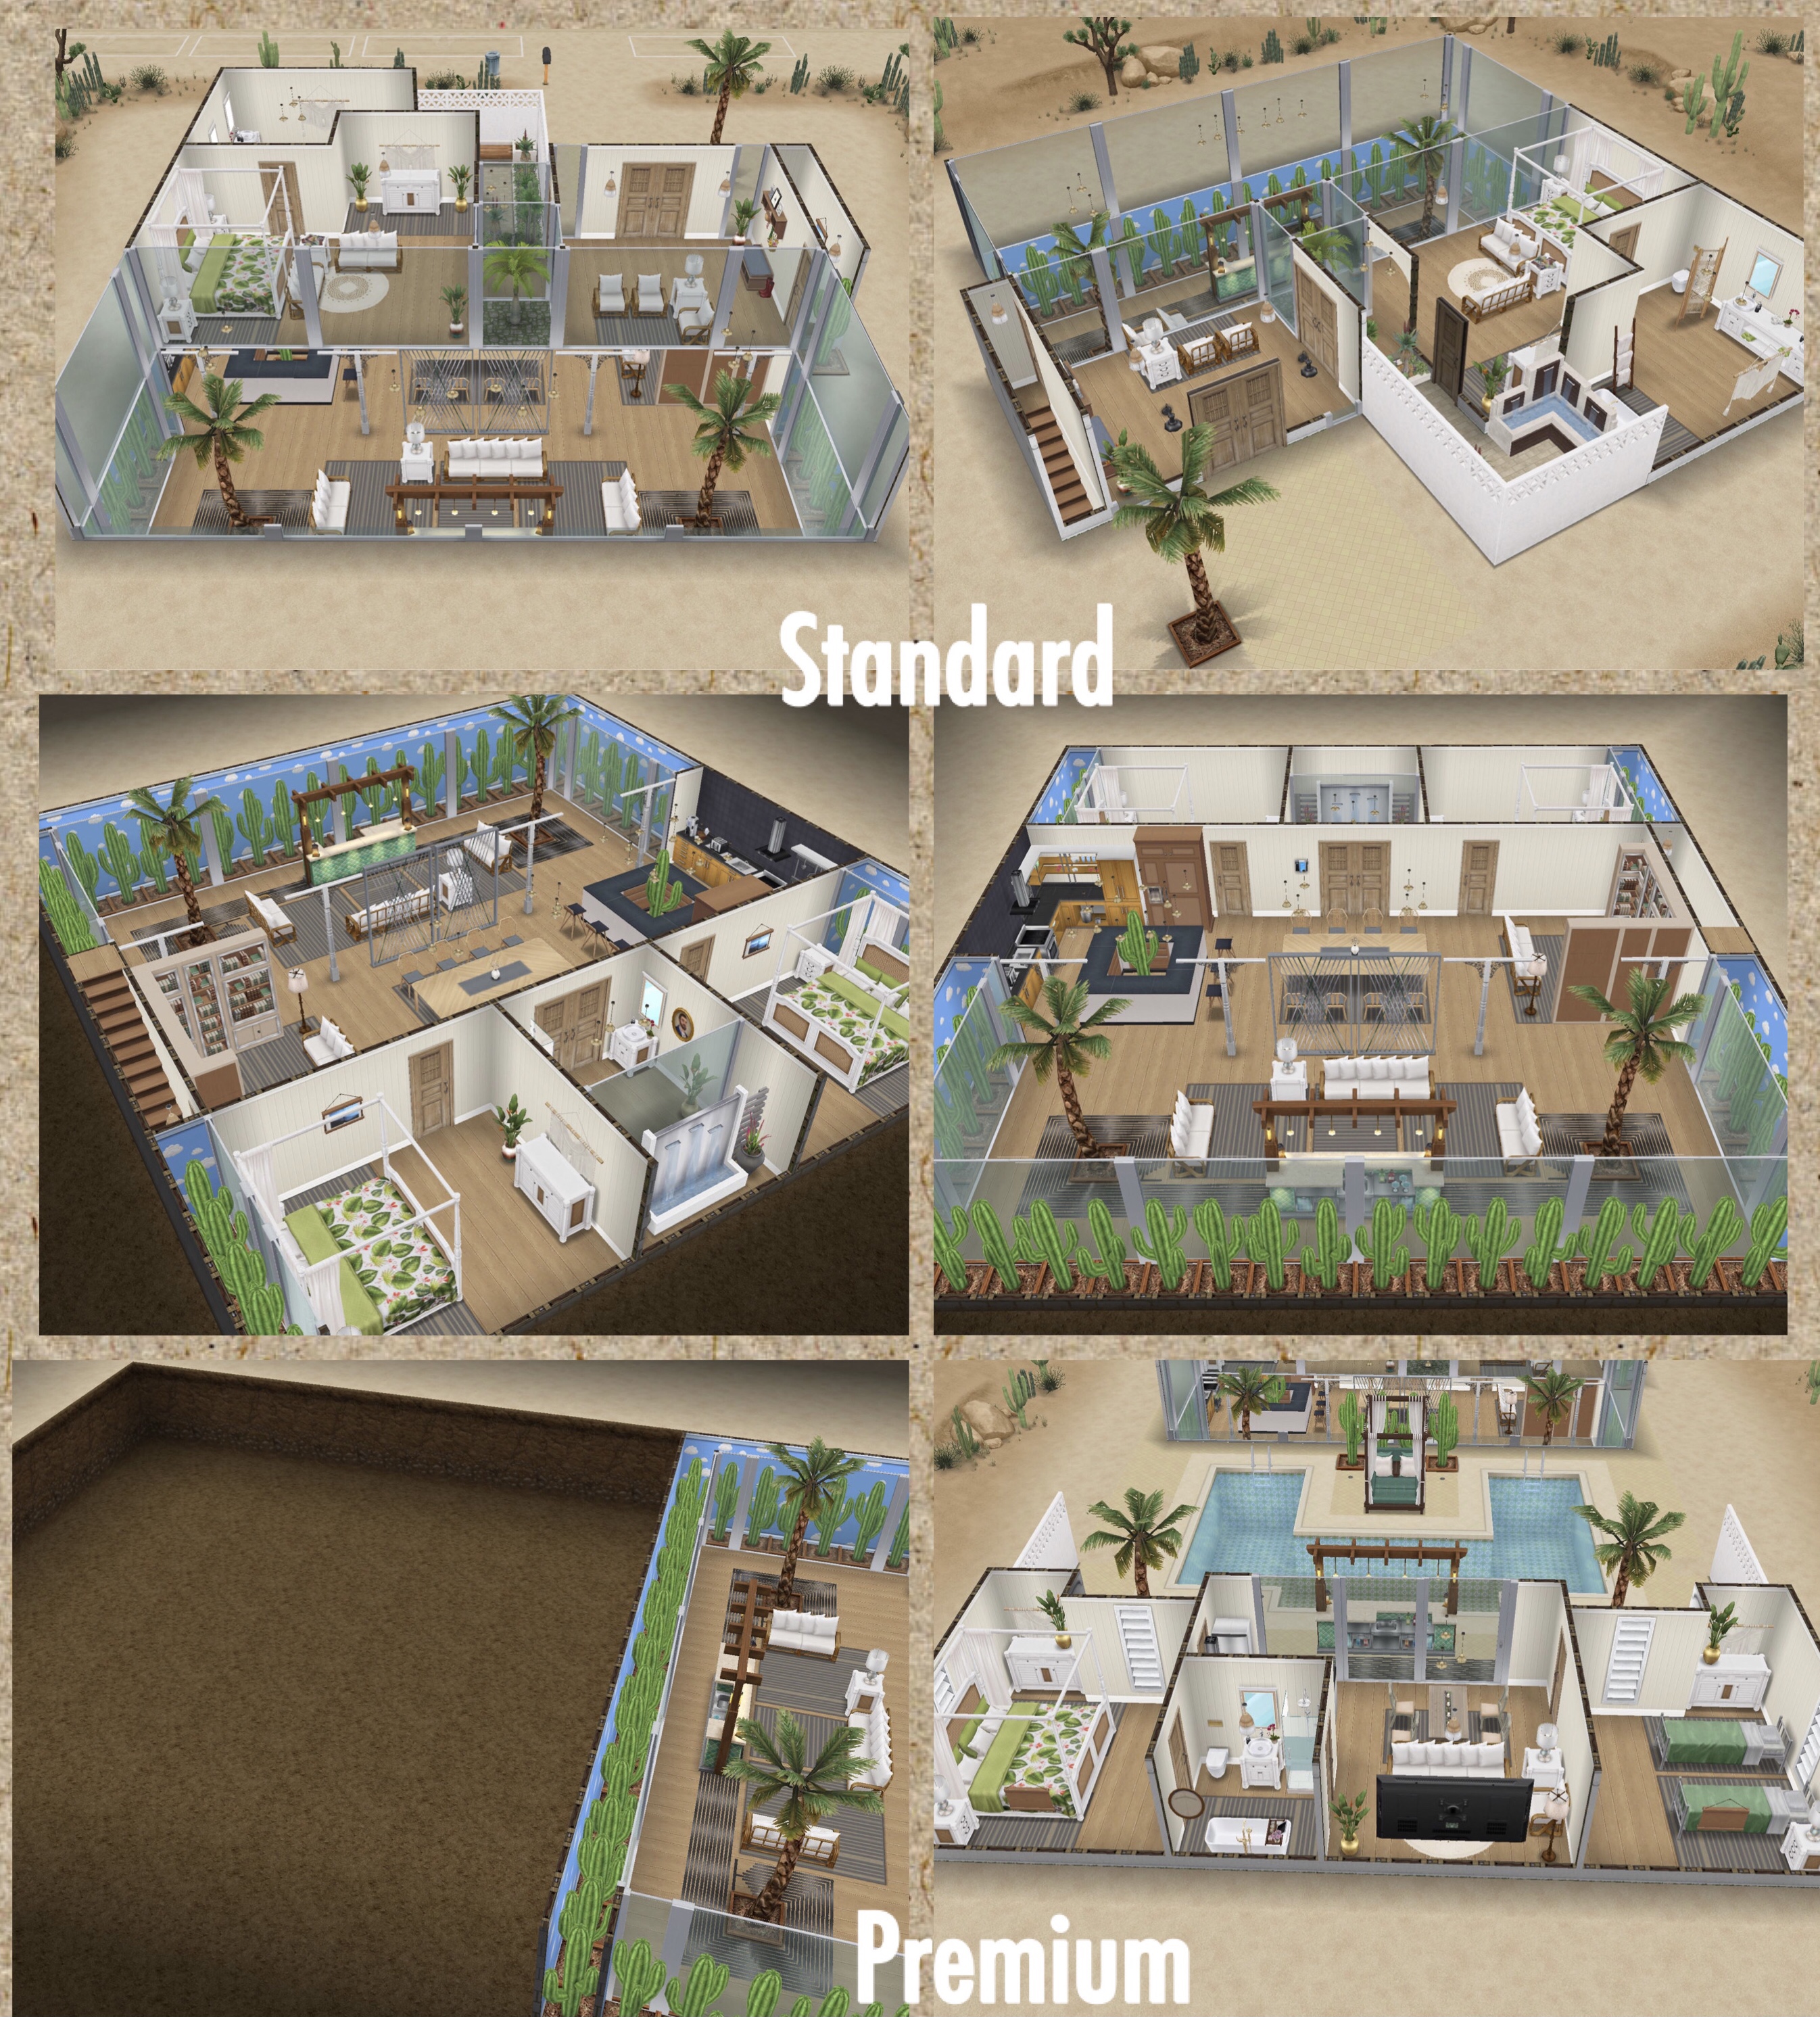
This house template is available on a standard and a premium residence under the driveway homes tab (if you build it on the Cactus Cave lot in Sim Springs you will be building the standard as that lot is 18×18) the first one is free, after this it will cost simoleons depending on how many houses you have already built:
The premium has a pool and outhouse to the back of the main house:
I really like this house template, I love how they have a mezzanine to see into the basement from the ground floor, it makes it feel more open and less dark like most basements do. The only part I don’t like is the kitchen as it feels dark rather than following the light theme like the rest of the house
Do I have to use the House Templates given during the event? No, you can keep the house you have been creating during the event but there is always the option to demolish that house and replace it with the template
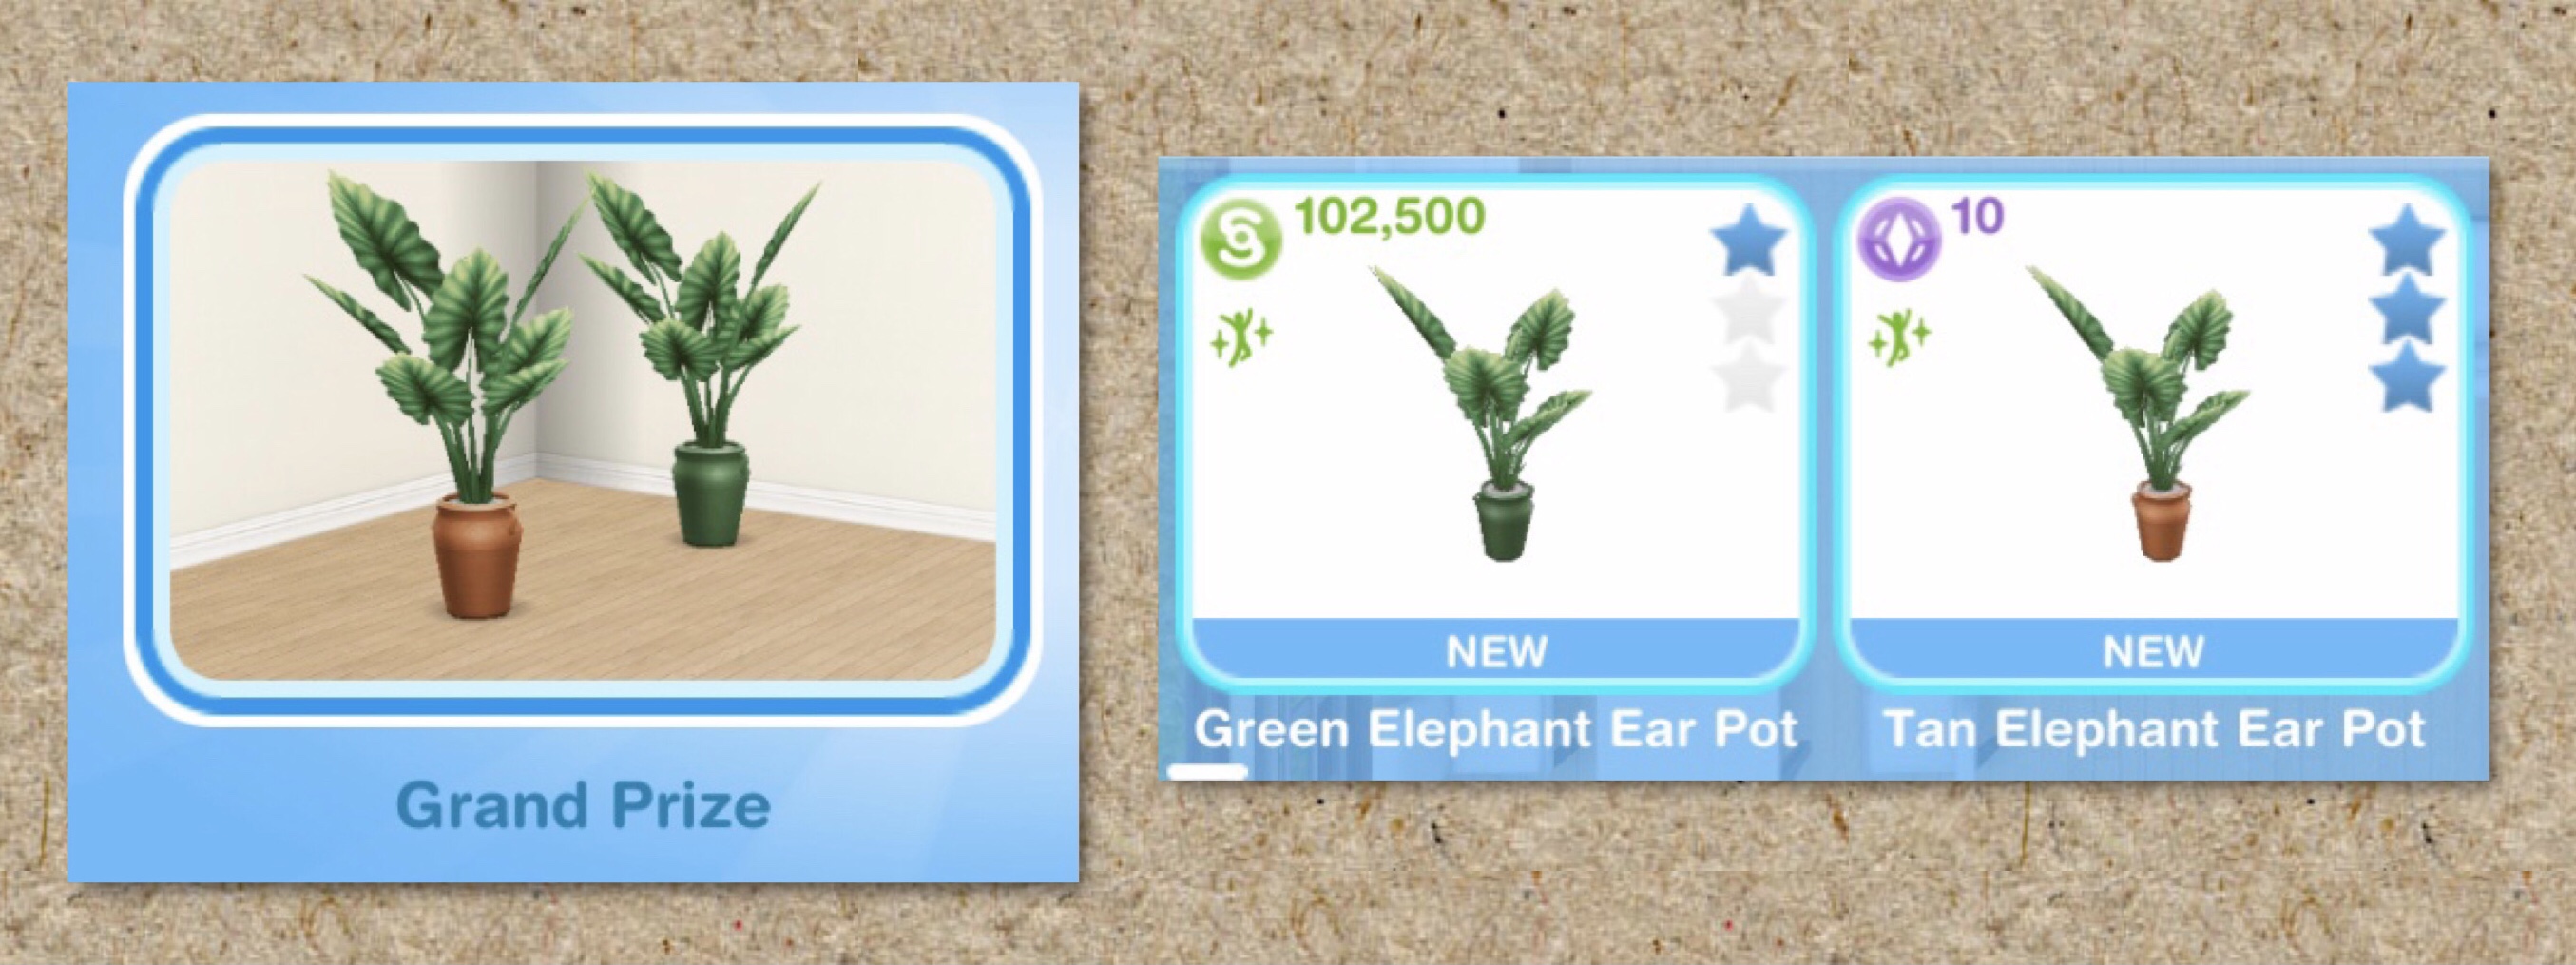
Once you have completed the whole 10 day event you will unlock the Green (S102,500) and Tan (10SP) Elephant Ear Pots. You don’t have to complete this event in the time limit to unlock these prizes:
Once you have complete Cactus Cave you can take a break for up to 7 days before the next timer begins, to start Tall-Tree House you will need to click on the house lot to build it:
Once Day 5’s tasks are complete you can wait for the next day or use SP to start early
Day 6 Tasks
Time (3 Star Rating)
2 Star Rating
1 Star Rating
Skip Cost
Place 2 TVs at Tall-Tree House
1SP
Check in with Johnny Zest
1 hr
INSPIRED: 57 mins
9SP
Spruce Up Plants (plant)
9 hrs
INSPIRED: 8 hrs 33 mins
10 hrs
INSPIRED: 9 hrs 30 mins
11 hrs 15 mins
INSPIRED: 10 hrs 41 mins
32SP
Investigate Investments (computer)
6 hrs
INSPIRED: 5 hrs 42 mins
7 hrs
INSPIRED: 6 hrs 39 mins
7 hrs 30 mins
INSPIRED: 7 hrs 7 mins
23SP
SKIP ALL: 42SP
REWARD: S14,000 and 4SP
Once Day 6’s tasks are complete you can wait for the next day or use SP to start early
Day 7 Tasks
Time (3 Star Rating)
2 Star Rating
1 Star Rating
Skip Cost
Spend S384,500 at Tall-Tree House (may be less if you are at a lower level)
13SP
Check in with Johnny Zest
1 hr
INSPIRED: 57 mins
9SP
Consider Sabotage (mirror)
7 hrs
INSPIRED: 6 hrs 39 mins
8 hrs
INSPIRED: 7 hrs 36 mins
8 hrs 45 mins
INSPIRED: 8 hrs 19 mins
26SP
Write Mindful Memo (dining chair and table)
4 hrs
INSPIRED: 3 hrs 48 mins
4 hrs 30 mins
INSPIRED: 4 hrs 17 mins
5 hrs
INSPIRED: 4 hrs 45 mins
18SP
Read Megaflora Magazine
4 hrs
INSPIRED: 3 hrs 48 mins
18SP
SKIP ALL: 52SP
REWARD: 3LP and 5SP
Once Day 7’s tasks are complete you can wait for the next day or use SP to start early
Day 8 Tasks
Time (3 Star Rating)
2 Star Rating
1 Star Rating
Skip Cost
Place 2 Dining Tables at Tall-Tree House
1SP
Check in with Johnny Zest
1 hr
INSPIRED: 57 mins
9SP
Accept Fate (couch)
4 hrs 30 mins
INSPIRED: 4 hrs 17 mins
5 hrs
INSPIRED: 4 hrs 45 mins
5 hrs 38 mins
INSPIRED: 5 hrs 21 mins
19SP
Photograph Plants (plant)
4 hrs 30 mins INSPIRED: 4 hrs 17 mins
5 hrs
INSPIRED: 4 hrs 45 mins
5 hrs 38 mins
INSPIRED: 5 hrs 21 mins
19SP
Examine Tree Roots
3 hrs
INSPIRED: 2 hrs 51 mins
3 hrs 20 mins
INSPIRED: 3 hrs 10 mins
3 hrs 45 mins
INSPIRED: 3 hrs 34 mins
15SP
Find 64 Old Water Cups (household objects)(16 sims)(quick complete to find extra)
5 hrs
INSPIRED: 4 hrs 45 mins
5 hrs 30 mins
INSPIRED: 5 hrs 14 mins
6 hrs 15 mins
INSPIRED: 5 hrs 56 mins
180SP
SKIP ALL: 176SP
REWARD: S16,000 and 1 Mystery Key
Once Day 8’s tasks are complete you can wait for the next day or use SP to start early
Day 9 Tasks
Time (3 Star Rating)
2 Star Rating
1 Star Rating
Skip Cost
Place 8 Dining Chairs at Tall-Tree House
1SP
Check in with Johnny Zest
1 hr
INSPIRED: 57 mins
9SP
Enjoy the Garden (tree)
4 hrs 30 mins
INSPIRED: 4 hrs 17 mins
5 hrs
INSPIRED: 4 hrs 45 mins
5 hrs 38 mins
INSPIRED: 5 hrs 21 mins
19SP
Celebrate Progress (stereo)
3 hrs 30 mins
INSPIRED: 3 hrs 20 mins
4 hrs
INSPIRED: 3 hrs 48 mins
4 hrs 23 mins
INSPIRED: 4 hrs 9 mins
16SP
Order Supplies (phone)
2 hrs
INSPIRED: 1 hr 54 mins
2 hrs 20 mins
INSPIRED: 2 hrs 13 mins
2 hrs 30 mins
INSPIRED: 2 hrs 23 mins
12SP
Check Council Regulations (bookshelf)
2 hrs
INSPIRED: 1 hr 54 mins
2 hrs 20 mins
INSPIRED: 2 hrs 13 mins
2 hrs 30 mins
INSPIRED: 2 hrs 23 mins
12SP
Tend 17 Sick Plants (can use multiple sims)
5 hrs
INSPIRED: 4 hrs 45 mins
5 hrs 30 mins
INSPIRED: 5 hrs 14 mins
6 hrs 15 mins
INSPIRED: 5 hrs 56 mins
306SP
SKIP ALL: 275SP
REWARD: 6LP, 6SP and 1 Mystery Key
Once Day 9’s tasks are complete you can wait for the next day or use SP to start early
Day 10 Tasks
Time (3 Star Rating)
2 Star Rating
1 Star Rating
Skip Cost
Spend S513,000 at Tall-Tree House (may be less if you are at a lower level)
17SP
Check in with Johnny Zest
1 hr
INSPIRED: 57 mins
9SP
Balance the Books (computer)
2 hrs
INSPIRED: 1 hr 54 mins
2 hrs 20 mins
INSPIRED: 2 hrs 13 mins
2 hrs 30 mins
INSPIRED: 2 hrs 23 mins
12SP
Order 17 Clearance Seedlings (computer)(can use multiple sims)
6 hrs 30 mins
INSPIRED: 6 hrs 11 mins
7 hrs 30 mins
INSPIRED: 7 hrs 7 mins
8 hrs 7 mins
INSPIRED: 7 hrs 43 mins
367SP
Update Johnny Zest on Progress
3 hrs 20 mins
INSPIRED: 3 hrs 10 mins
16SP
Find 85 Golden Pollen (household objects)(17 sims)(quick complete to find extra)
6 hrs 30 mins
INSPIRED: 6 hrs 11 mins
7 hrs 30 mins
INSPIRED: 7 hrs 7 mins
8 hrs 7 mins
INSPIRED: 7 hrs 43 mins
280SP
SKIP ALL: 517SP
REWARD: S20,000, 8LP, 10SP and 2 Mystery Keys
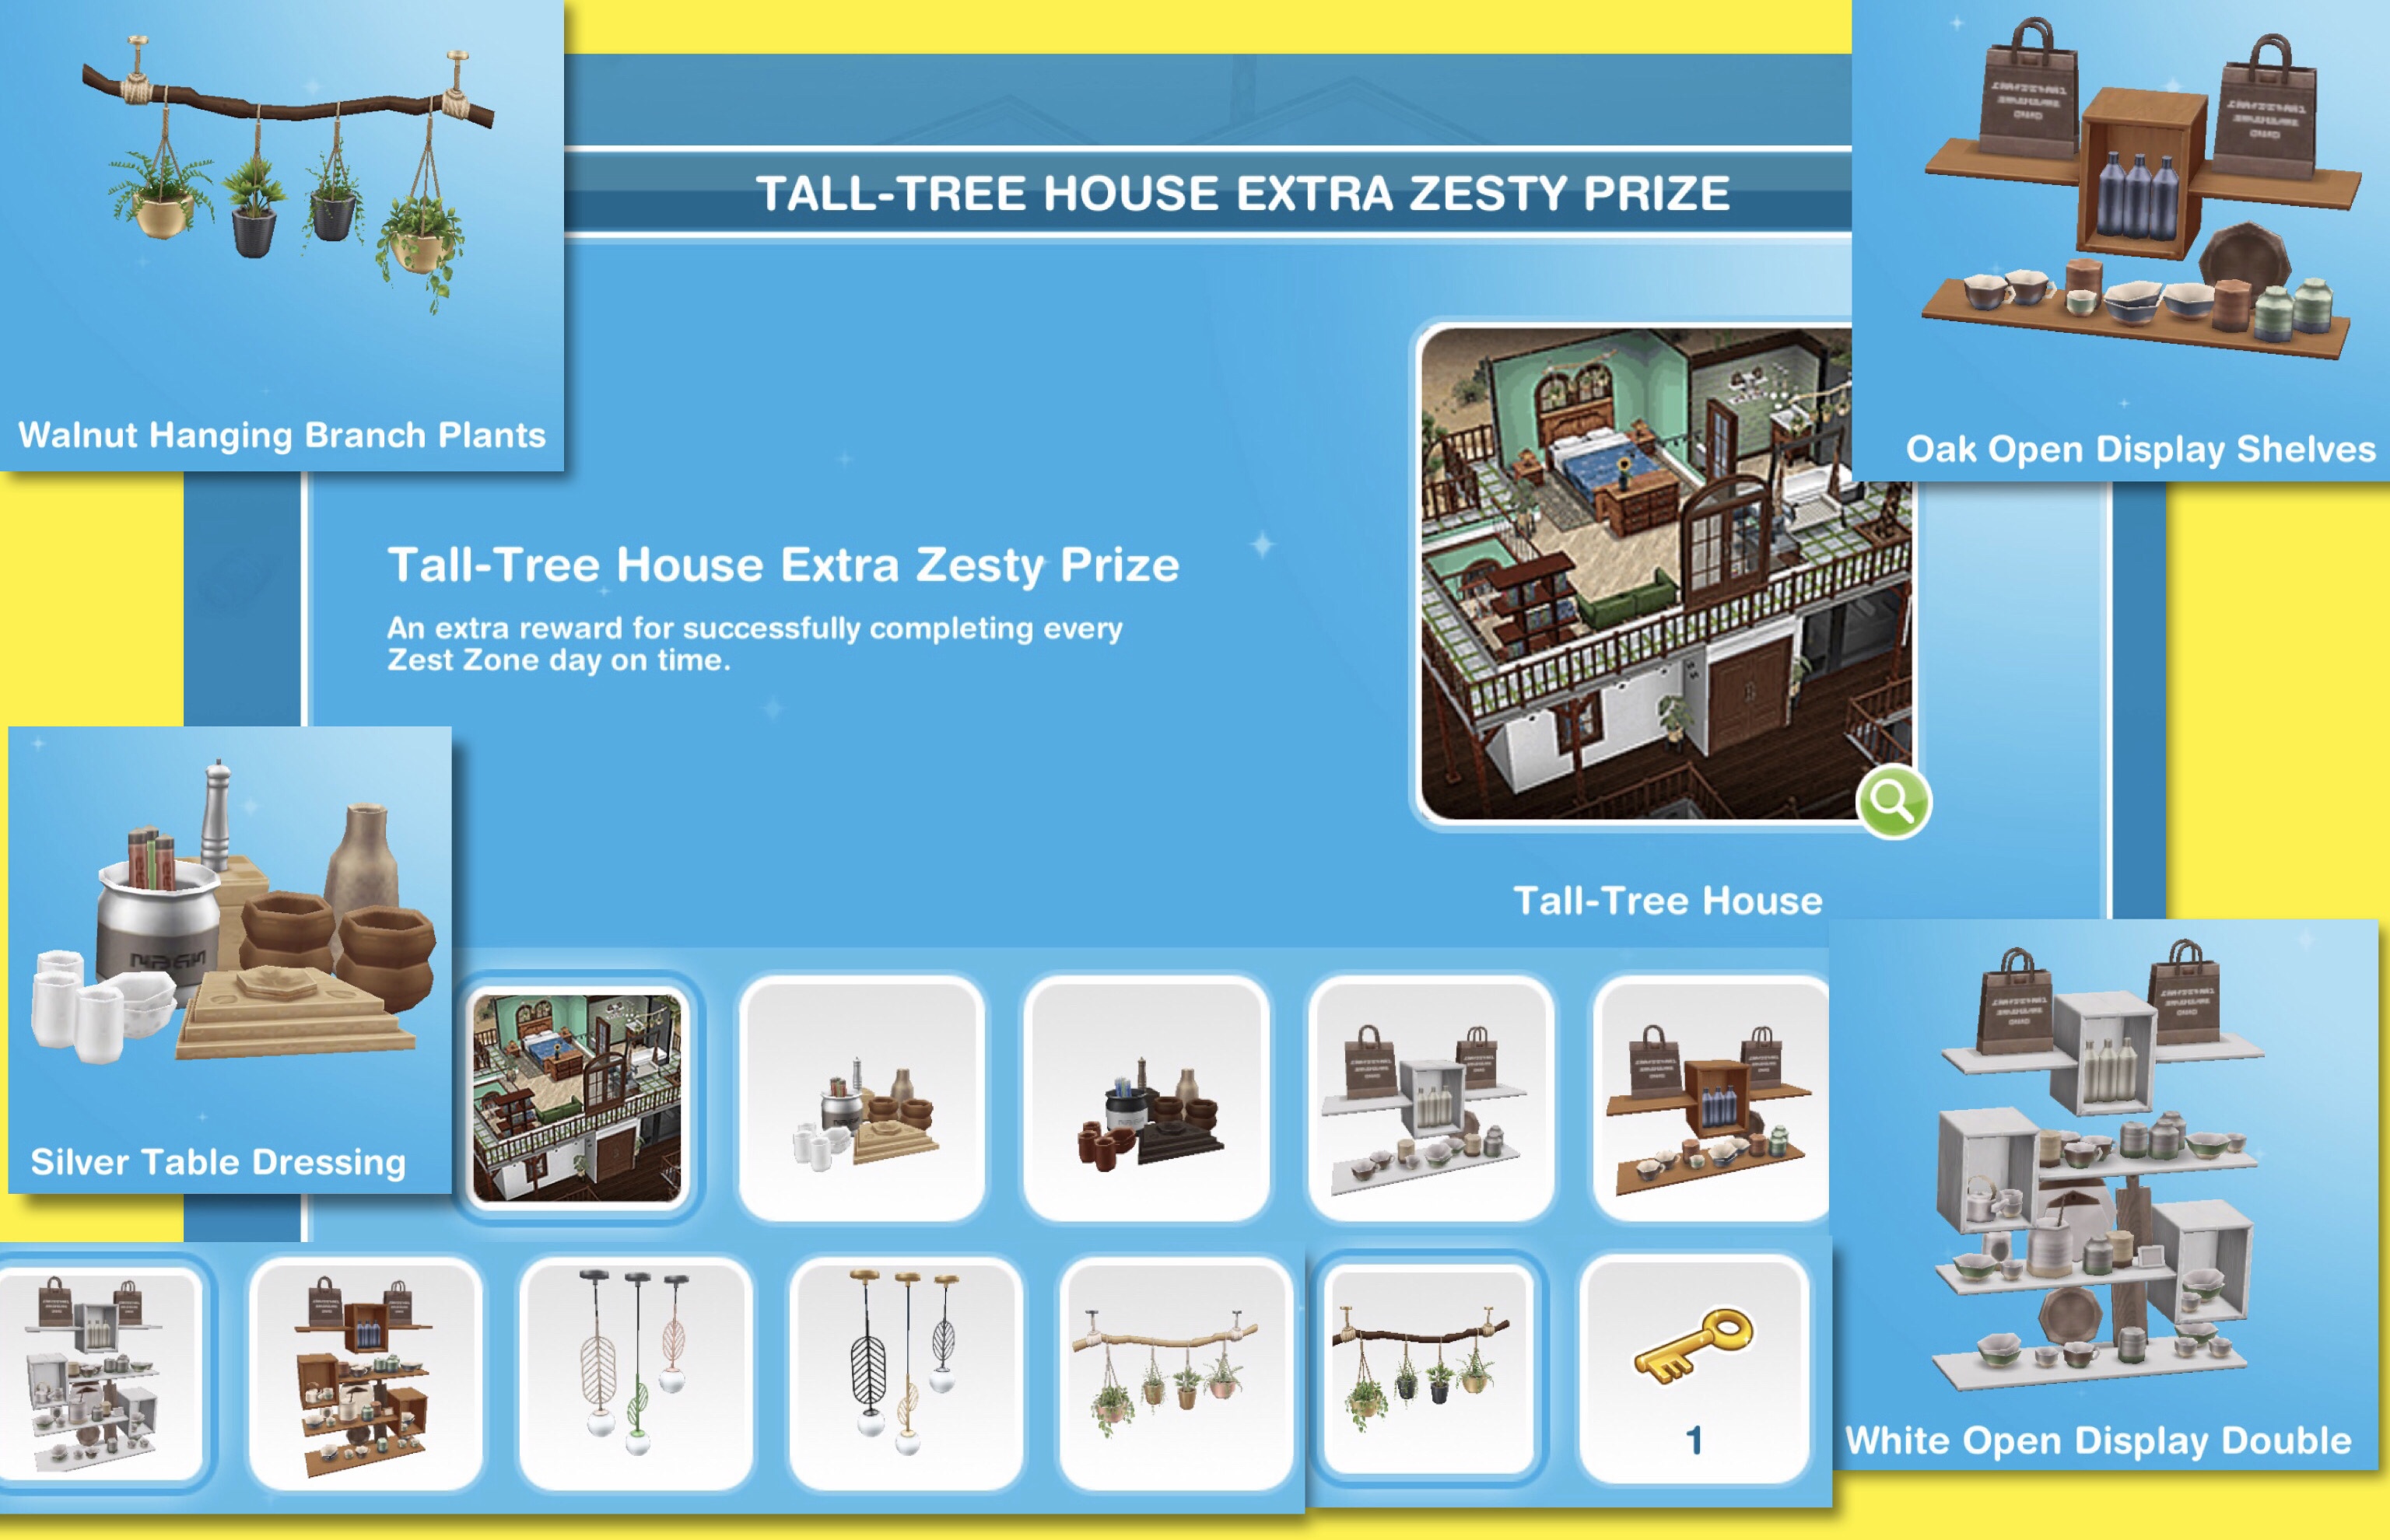
If you complete day’s 5, 6, 7, 8, 9 and 10 (each within 24 hours) you will unlock the Extra Zesty Prizes which contains the Tall-Tree House template, display shelves, table dressings, hanging branch plants and 1 Mystery Key:
Decorations: Silver (S51,500) and Black (5LP) Table Dressings
Pine (S87,500) and Walnut (8SP) Hanging Branch Plants
Countertops: White (S99,000) and Oak (9LP) Open Display Shelves
White (S101,000) and Oak (10LP) Open Display Doubles
Lighting: Silver (S83,000) and Brass (8LP) Triple Leaf Pendants
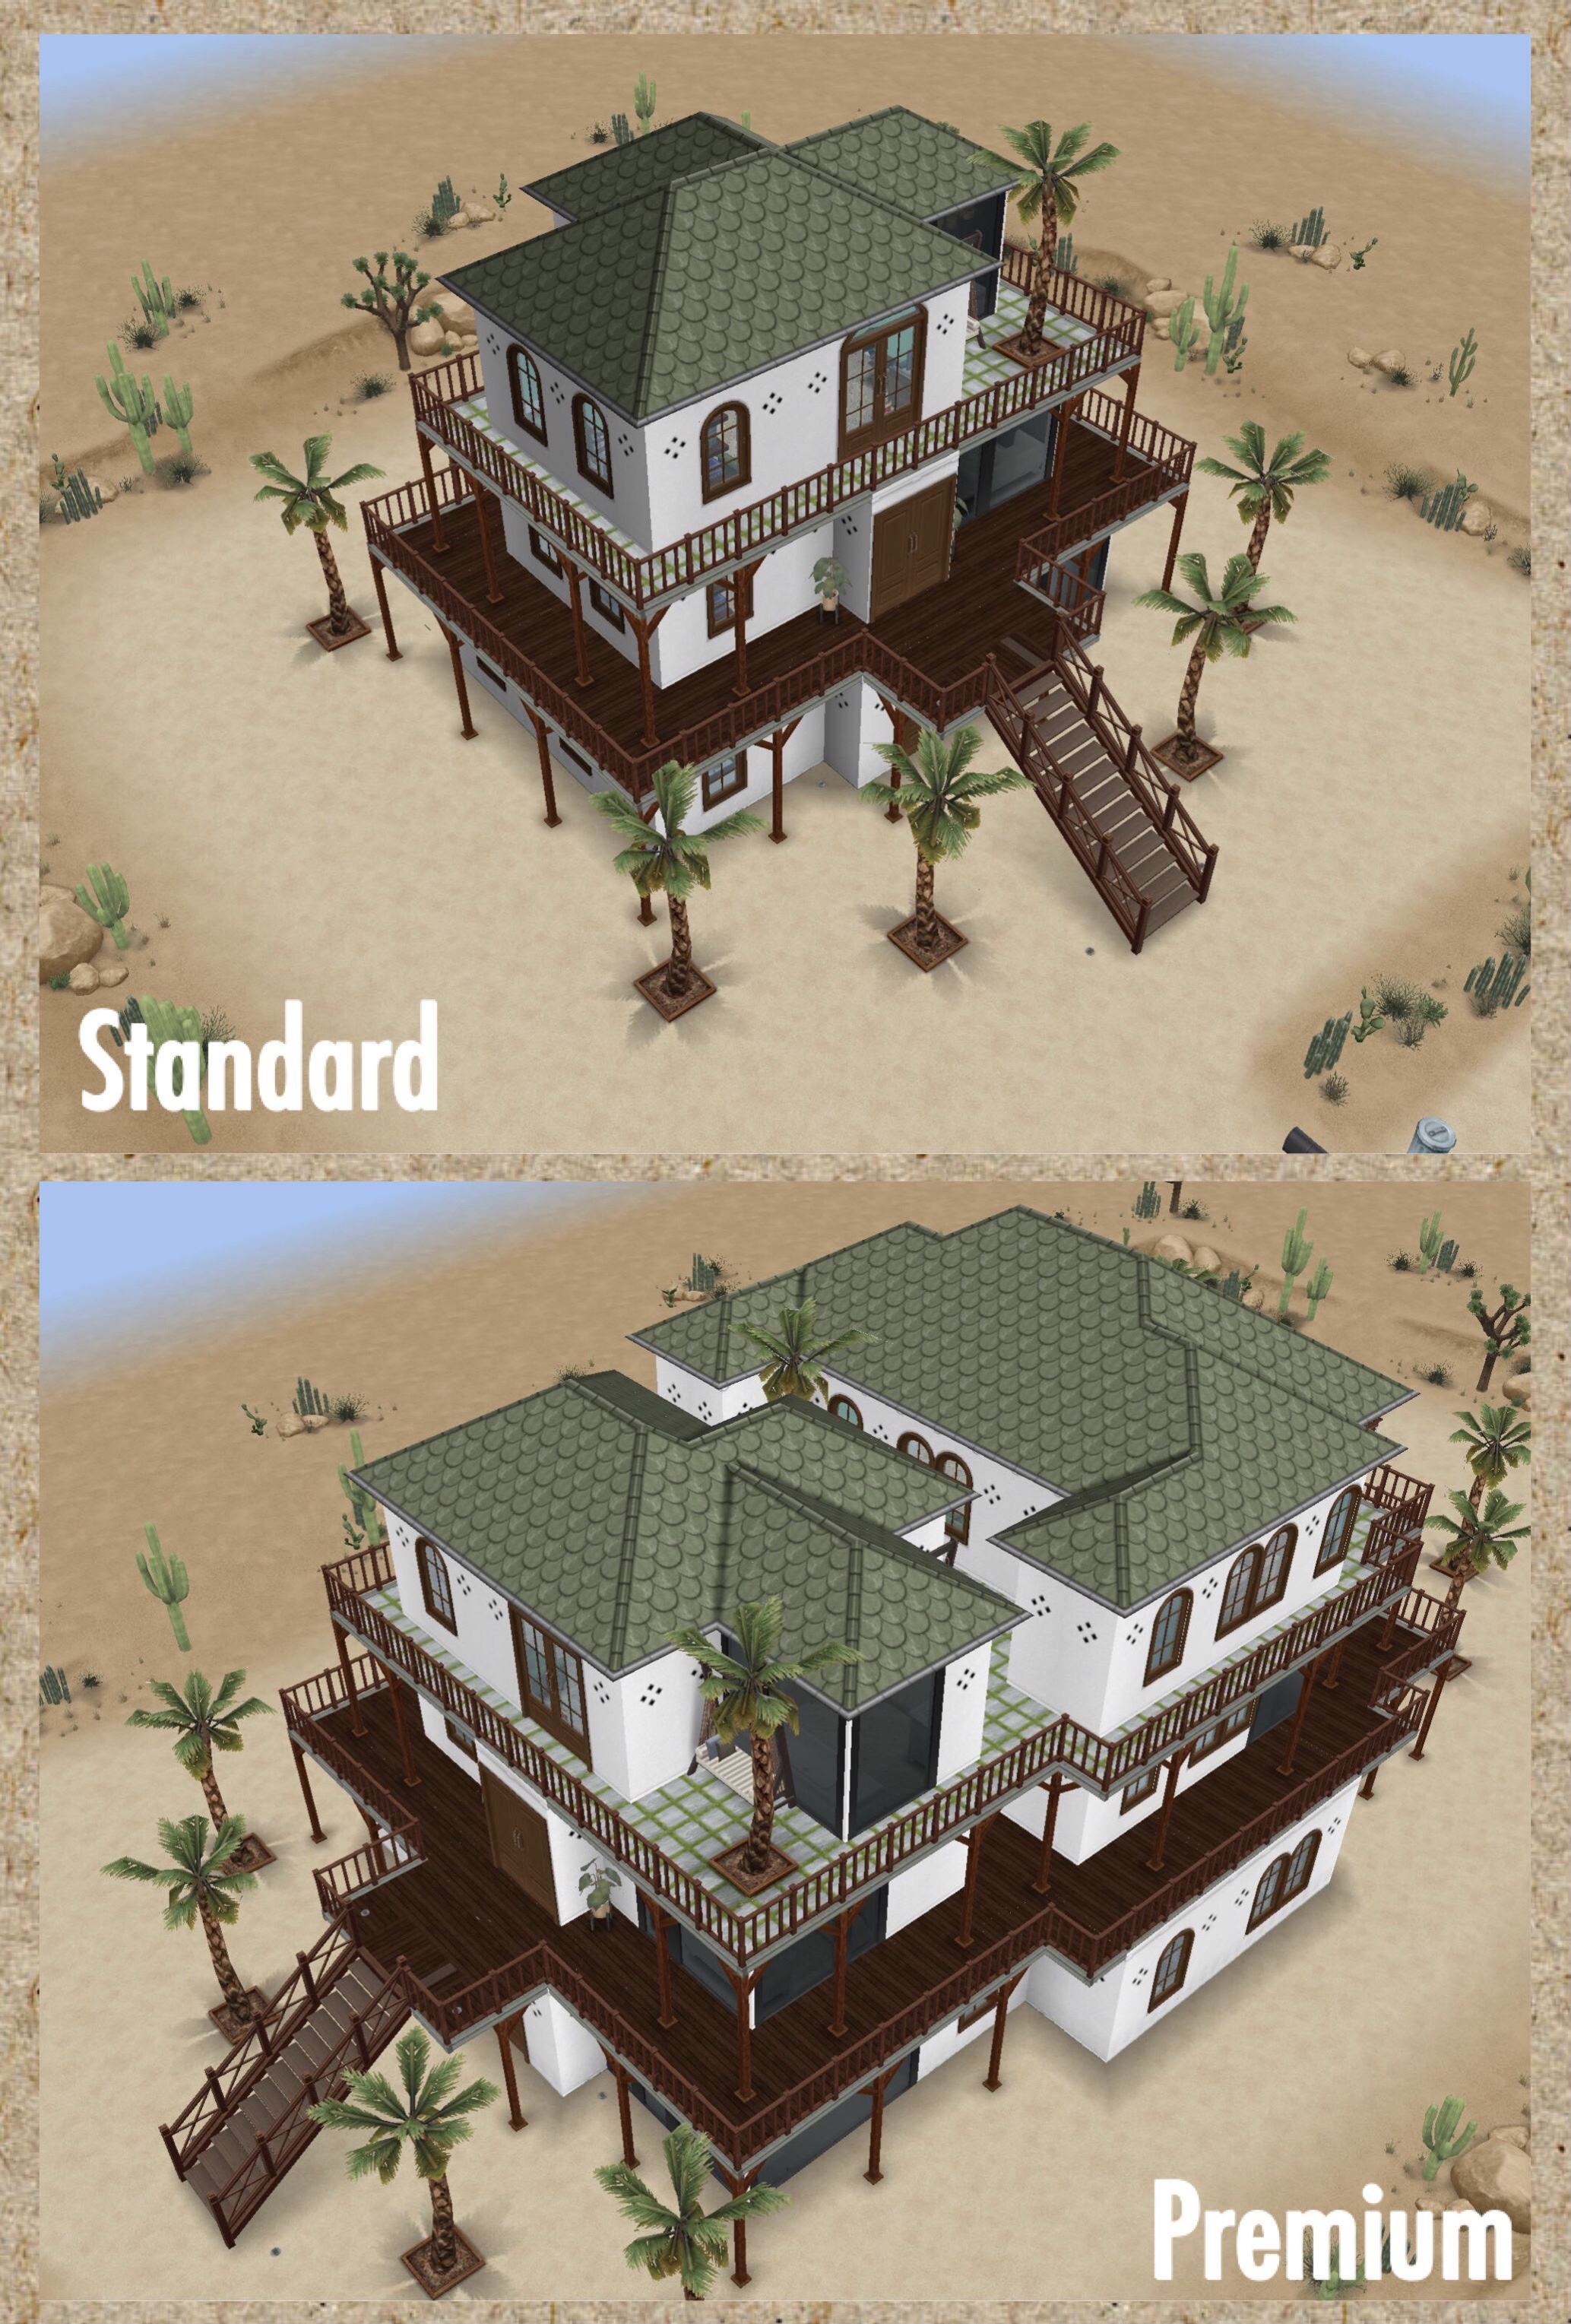
This house template is available on a standard and a premium residence under the driveway homes tab (if you build it on the Tall-Tree House lot in Sim Springs you will be building the standard as that lot is 18×18) the first one is free, after this it will cost simoleons depending on how many houses you have already built:
The premium house is double the size of the standard. The standard looks like it is two apartments, one on the ground floor and one on the second and third floor whereas the premium has a separate building- the ground floor is attached but the second and third floor has 1-2 squares gap between the apartments. The premium makes this into four apartments, the two apartments on the premium are a slightly different layout. That explanation probably makes no sense but there is far too much going on on this house lot and it’s difficult to describe as it’s hard to see exactly how the layout works!
Do I have to use the House Templates given during the event? No, you can keep the house you have been creating during the event but there is always the option to demolish that house and replace it with the template
Once you have completed the whole 10 day event you will unlock the Black Telephone Box (15LP, Outdoor Decorations) and Red (S89,000) and Walnut (9LP) Tudor Entrance Doors. You don’t have to complete this event in the time limit to unlock these prizes:
Once you have complete Tall-Tree House you can take a break for up to 7 days before the next timer begins, to start Forest Flat you will need to click on the house lot to build it:
Once Day 5’s tasks are complete you can wait for the next day or use SP to start early
Day 6 Tasks
Time (3 Star Rating)
2 Star Rating
1 Star Rating
Skip Cost
Place 2 TVs at Forest Flat
1SP
Check in with Johnny Zest
1 hr
INSPIRED: 57 mins
8SP
Browse Sports Cars (computer)
9 hrs
INSPIRED: 8 hrs 33 mins
10 hrs
INSPIRED: 9 hrs 30 mins
11 hrs 15 mins
INSPIRED: 10 hrs 41 mins
29SP
Investigate Investments (computer)
7 hrs
INSPIRED: 6 hrs 39 mins
8 hrs
INSPIRED: 7 hrs 36 mins
8 hrs 45 mins
INSPIRED: 8 hrs 19 mins
24SP
SKIP ALL: 39SP
REWARD: S16,000 and 4LP
Once Day 6’s tasks are complete you can wait for the next day or use SP to start early
Day 7 Tasks
Time (3 Star Rating)
2 Star Rating
1 Star Rating
Skip Cost
Place 4 Couches at Forest Flat
1SP
Check in with Johnny Zest
1 hr
INSPIRED: 57 mins
8SP
Invest in Forest Flat TIP: if you are using SP just skip this task as it costs the same without the wait time
Incredible Investment: 2 hrs 30 mins (costs 16SP)
INSPIRED: 2 hrs 23 mins
Token Investment: 5 hrs (costs S481,000) (may be less if you are at a lower level)
INSPIRED: 4 hrs 45 mins
16SP
Soul Search (mirror)
6 hrs
INSPIRED: 5 hrs 42 mins
7 hrs
INSPIRED: 6 hrs 39 mins
7 hrs 30 mins
INSPIRED: 7 hrs 7 mins
22SP
Write Mindful Memo (dining chair and table)
3 hrs
INSPIRED: 2 hrs 51 mins
3 hrs 20 mins
INSPIRED: 3 hrs 10 mins
3 hrs 45 mins
INSPIRED: 3 hrs 34 mins
14SP
Read Megaflora Magazine
2 hrs
INSPIRED: 1 hr 54 mins
11SP
SKIP ALL: 41SP
REWARD: 4LP and 6SP
Once Day 7’s tasks are complete you can wait for the next day or use SP to start early
Day 8 Tasks
Time (3 Star Rating)
2 Star Rating
1 Star Rating
Skip Cost
Place 2 Dining Tables at Forest Flat
1SP
Check in with Johnny Zest
1 hr
INSPIRED: 57 mins
8SP
Enjoy Downtime (bath)
4 hrs
INSPIRED: 3 hrs 48 mins
4 hrs 30 mins
INSPIRED: 4 hrs 17 mins
5 hrs
INSPIRED: 4 hrs 45 mins
16SP
Tend Trees
4 hrs 30 mins
INSPIRED: 4 hrs 17 mins
5 hrs
INSPIRED: 4 hrs 45 mins
5 hrs 38 mins
INSPIRED: 5 hrs 21 mins
18SP
Examine Tree Roots
3 hrs 30 mins
INSPIRED: 3 hrs 20 mins
4 hrs
INSPIRED: 3 hrs 48 mins
4 hrs 23 mins
INSPIRED: 4 hrs 9 mins
15SP
Find 76 Old Water Cups (household objects)(19 sims)(quick complete to find extra)
6 hrs
INSPIRED: 5 hrs 42 mins
7 hrs
INSPIRED: 6 hrs 39 mins
7 hrs 30 mins
INSPIRED: 7 hrs 7 mins
243SP
SKIP ALL: 213SP
REWARD: S18,000 and 1 Mystery Key
Once Day 8’s tasks are complete you can wait for the next day or use SP to start early
Day 9 Tasks
Time (3 Star Rating)
2 Star Rating
1 Star Rating
Skip Cost
Place 8 Dining Chairs at Forest Flat
1SP
Check in with Johnny Zest
1 hr
INSPIRED: 57 mins
8SP
Call Family (phone)
4 hrs
INSPIRED: 3 hrs 48 mins
4 hrs 30 mins
INSPIRED: 4 hrs 17 mins
5 hrs INSPIRED: 4 hrs 45 mins
16SP
Enjoy Life (stereo)
3 hrs
INSPIRED: 2 hrs 51 mins
3 hrs 20 mins
INSPIRED: 3 hrs 10 mins
3 hrs 45 mins
INSPIRED: 3 hrs 34 mins
14SP
Order Supplies (phone)
3 hrs
INSPIRED: 2 hrs 51 mins
3 hrs 20 mins
INSPIRED: 3 hrs 10 mins
3 hrs 45 mins
INSPIRED: 3 hrs 34 mins
14SP
Check Council Regulations (bookshelf)
2 hrs
INSPIRED: 1 hr 54 mins
2 hrs 20 mins
INSPIRED: 2 hrs 13 mins
2 hrs 30 mins
INSPIRED: 2 hrs 23 mins
11SP
Tend 21 Sick Plants (can use multiple sims)
6 hrs
INSPIRED: 5 hrs 42 mins
7 hrs
INSPIRED: 6 hrs 39 mins
7 hrs 30 mins
INSPIRED: 7 hrs 7 mins
392SP
SKIP ALL: 326SP
REWARD: 8LP, 8SP and 1 Mystery Key
Once Day 9’s tasks are complete you can wait for the next day or use SP to start early
Day 10 Tasks
Time (3 Star Rating)
2 Star Rating
1 Star Rating
Skip Cost
Spend S641,000 at Forest Flat (may be less if you are at a lower level)
21SP
Check in with Johnny Zest
1 hr
INSPIRED: 57 mins
8SP
Balance the Books (computer)
1 hr
INSPIRED: 57 mins
1 hr 8 mins
INSPIRED: 1 hr 4 mins
1 hr 15 mins
INSPIRED: 1 hr 11 mins
8SP
Order 21 Clearance Seedlings (computer)
8 hrs
INSPIRED: 7 hrs 36 mins
9 hrs
INSPIRED: 8 hrs 33 mins
10 hrs
INSPIRED: 9 hrs 30 mins
485SP
Update Johnny Zest on Progress
1 hr 50 mins
INSPIRED: 1 hr 45 mins
11SP
Find 105 Golden Pollen (household objects)(21 sims)(quick complete to find extra)
8 hrs
INSPIRED: 7 hrs 36 mins
9 hrs
INSPIRED: 8 hrs 33 mins
10 hrs
INSPIRED: 9 hrs 30 mins
346SP
SKIP ALL: 630SP
REWARD: S25,000, 10LP, 15SP and 2 Mystery Keys
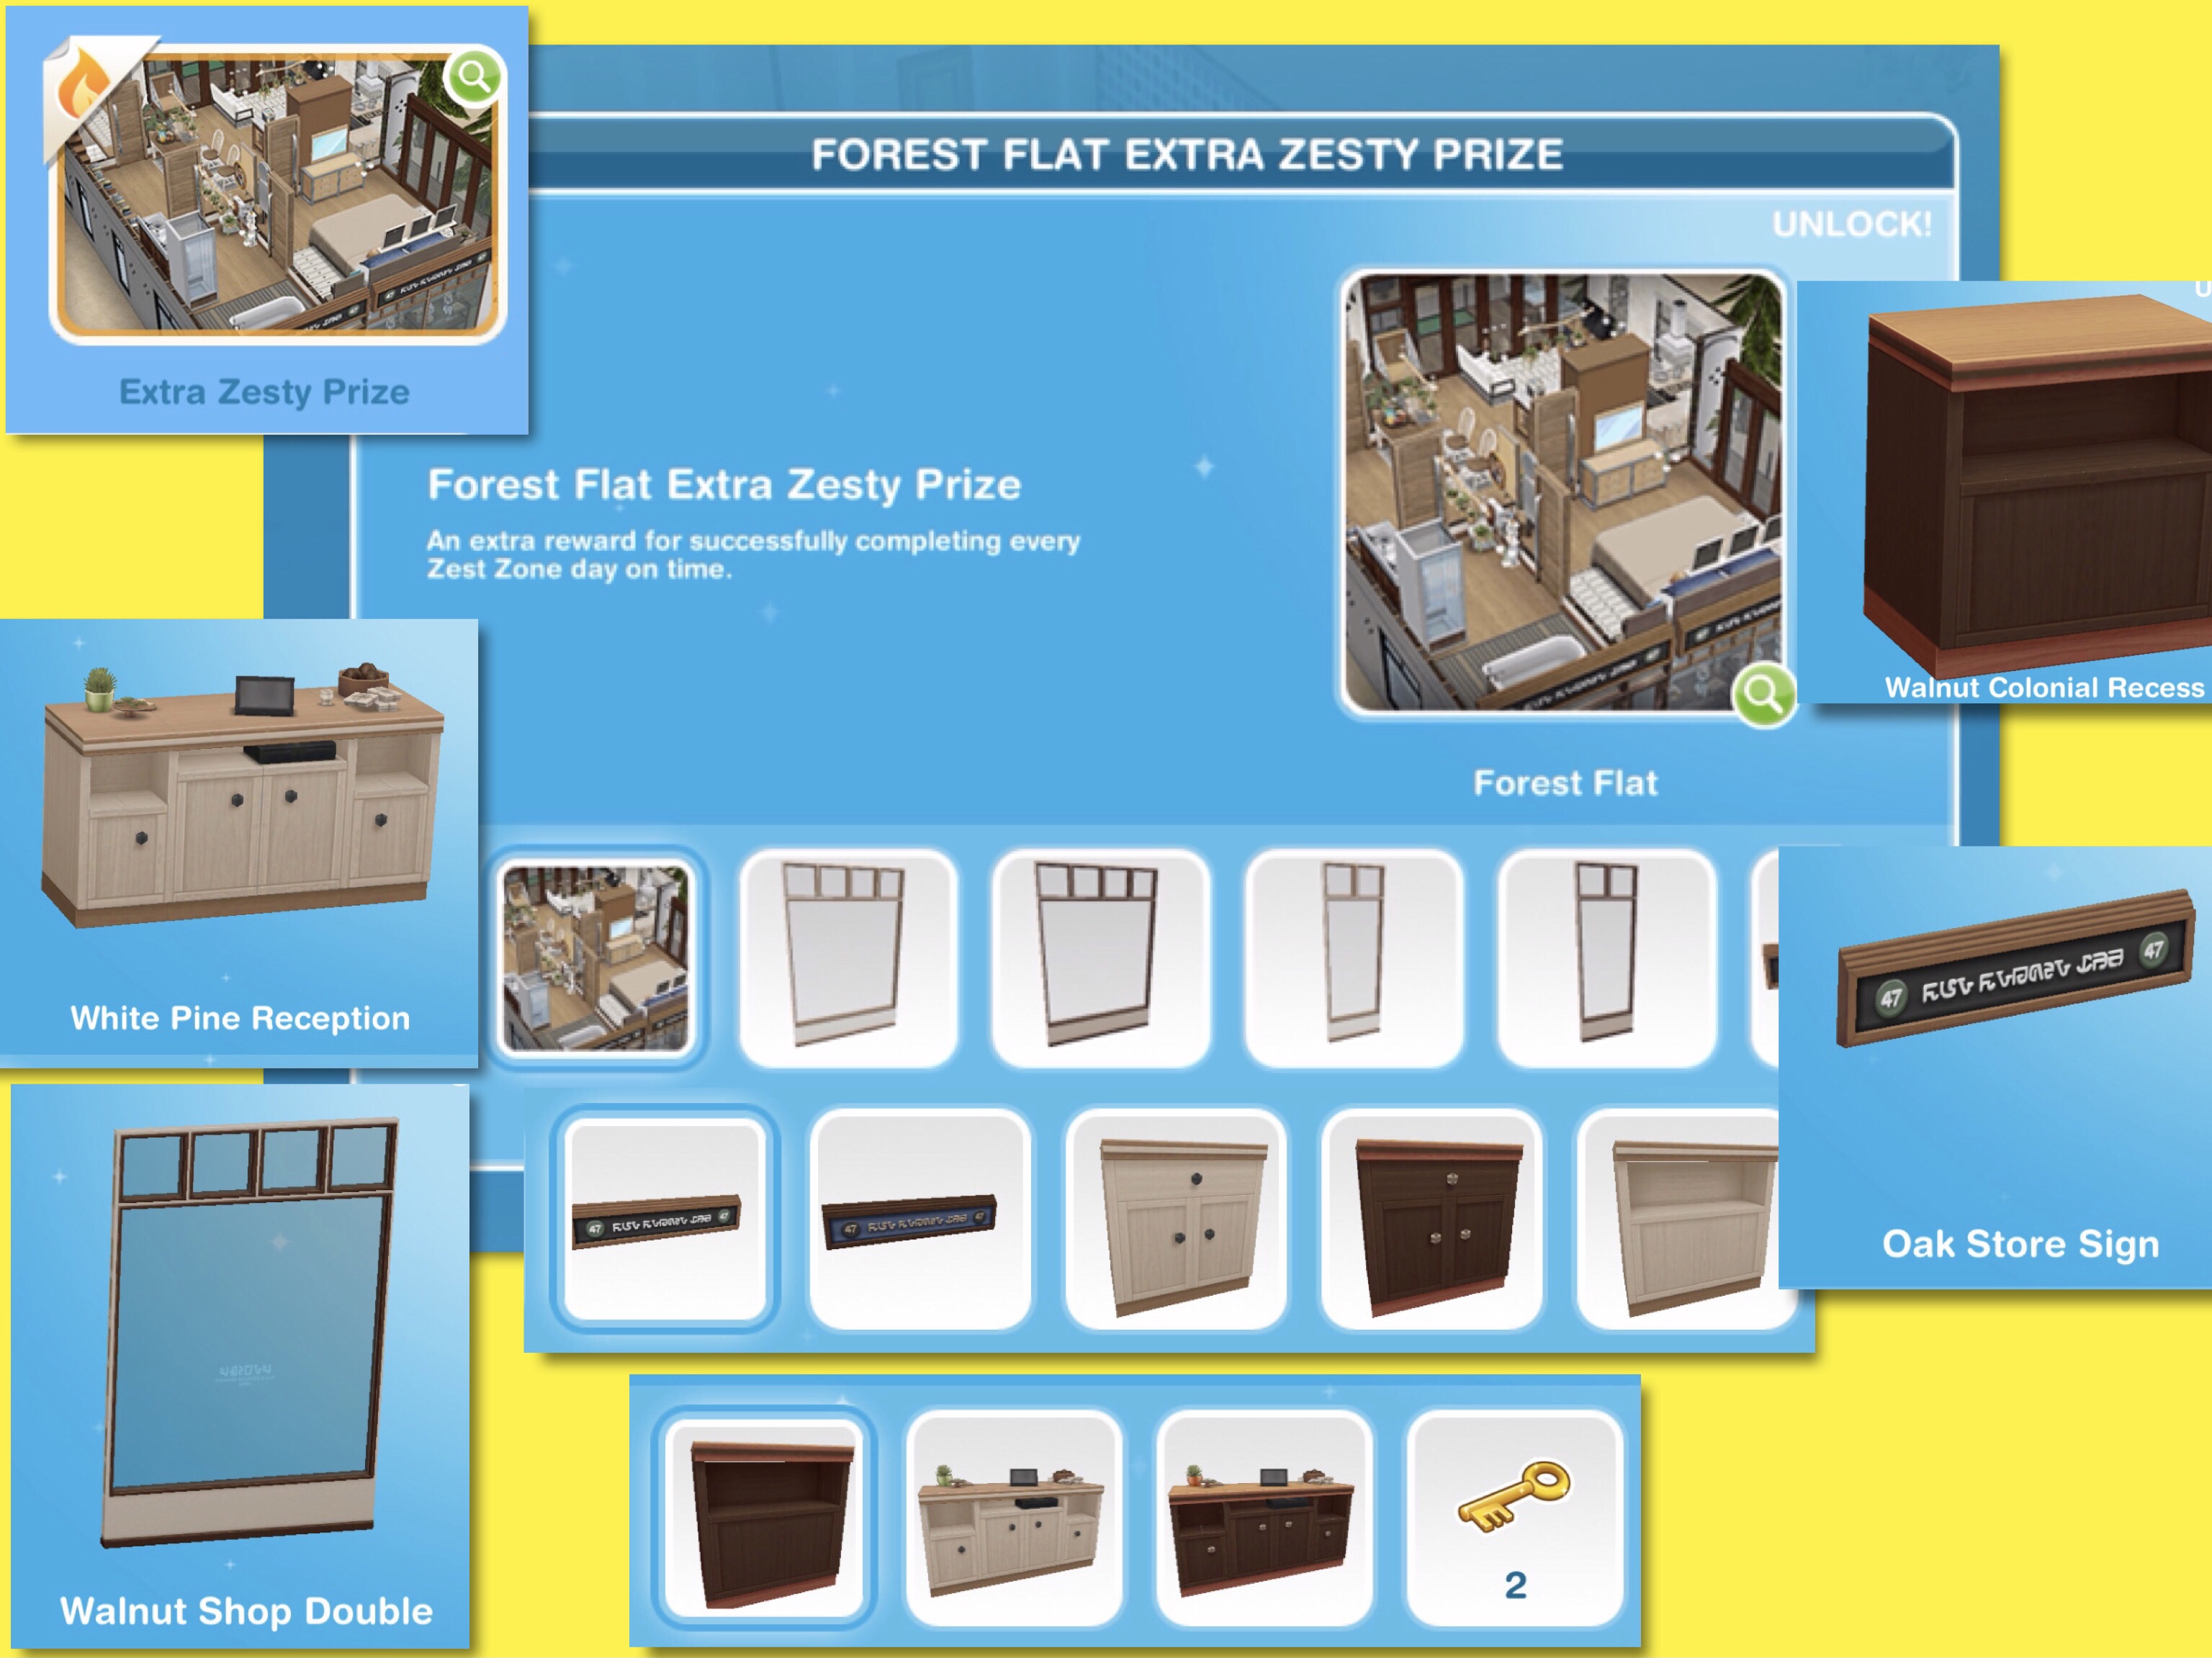
If you complete day’s 5, 6, 7, 8, 9 and 10 (each within 24 hours) you will unlock the Extra Zesty Prizes which contains the Forest Flat house template, shop windows, reception desks, store signs, countertops and 1 Mystery Key:
Windows: Oak (S89,000) and Walnut (8SP) Shop Doubles
Oak (S73,000) and Walnut (7LP) Shop Singles
Decorations: Oak (S72,500) and Walnut (7LP) Store Signs
Countertops: Beige (S81,500) and Walnut (8LP) Colonial
Beige (S72,500) and Walnut (7SP) Colonial Recess
White Pine (S140,000) and Blue Walnut (14LP) Reception Desks
This house template is available on a standard and a premium residence under the driveway homes tab (if you build it on the Forest Flat lot in Sim Springs you will be building the standard as that lot is 18×18) the first one is free, after this it will cost simoleons depending on how many houses you have already built:
The ground floor of this house lot is a shop and the first floor is the apartment. On the premium residence the shop and apartment are twice the size they are on the standard:
I like this template, some of the extra zesty prizes have been put to good use to create this with a bright, natural theme that looks like a cute shop and seems perfect for Palm Promenade. My only criticism would be the kitchen, I need more countertops and they need to match! The counter nearest the door frame on the premium residence (fridge on the standard) is a different colour to the other one and the sink. The oven is also too dark, it doesn’t match the light wood in this build.
Do I have to use the House Templates given during the event? No, you can keep the house you have been creating during the event but there is always the option to demolish that house and replace it with the template
Once you have completed the whole 10 day event you will unlock the Rose Gold (9SP) and Gold (S89,500) Moroccan Stairs and Rose Gold (S5,800) and Gold (S6,000) Moroccan Railings. You don’t have to complete this event in the time limit to unlock these prizes:
Once you have complete Forest Flat you can take a break for up to 7 days before the next timer begins, to start Barter Boardwalk you will need to click on the house lot to build it:
Barter Boardwalk
This final lot is a community lot so your sims cannot live here but they can visit. Building works the same as a normal lot but one category in buy mode will be FREE, at Barter Boardwalk this is the decoration section:
The timer for Barter Boardwalk is 14 days rather than 10 days like the other 3 lots
Once Day 13’s tasks are complete you can wait for the next day or use SP to start early
Day 14 Tasks
Time (3 Star Rating)
2 Star Rating
1 Star Rating
Skip Cost
Check in with Johnny Zest
1 hr
INSPIRED: 57 mins
7SP
Dance with Johnny Zest
6 mins
INSPIRED: 5 mins 42 secs
4SP
Declare Boardwalk Open (tree)
12 mins
INSPIRED: 11 mins
14 mins
INSPIRED: 13 mins
15 mins
INSPIRED: 14 mins
4SP
Update Johnny Zest on Progress
12 mins
INSPIRED: 11 mins
4SP
Renovation Conversation (phone)
12 mins
INSPIRED: 11 mins
14 mins
INSPIRED: 13 mins
15 mins
INSPIRED: 14 mins
4SP
Joke Around with Johnny Zest
12 mins
INSPIRED: 11 mins
4SP
Listen to 25 Public Opinions (phone) (can use multiple sims)
9 hrs 30 mins
INSPIRED: 9 hrs 1 min
10 hrs 30 mins
INSPIRED: 9 hrs 59 mins
11 hrs 53 mins
INSPIRED: 11 hrs 17 mins
587SP
Find 125 Missing Nails (household objects)(25 sims)(quick complete to find extra)
9 hrs 30 mins
INSPIRED: 9 hrs 1 min
10 hrs 30 mins
INSPIRED: 9 hrs 59 mins
11 hrs 53 mins
INSPIRED: 11 hrs 17 mins
423SP
Invest in Barter Boardwalk TIP: if you are using SP just skip this task as it costs the same without the wait time
Incredible Investment: 30 mins (costs 42SP)
INSPIRED: 29 mins
Token Investment: 1 hr (costs S1,282,000 (may be less if you are at a lower level)
INSPIRED: 57 mins
42SP
SKIP ALL: 636SP
REWARD: S50,000, 15LP, 20SP and 3 Mystery Keys
If you complete day’s 6 to 14 (each within 24 hours) you will unlock the Extra Zesty Prizes which contains the Barter Boardwalk template, shop doors, stairs, railings, fences, gates and 1 Mystery Key:
Doors: Oak (S90,000) and Walnut (9LP) Store Singles
Oak (S110,000) and Walnut (S105,000) Store Doubles
Stairs: Black (S275,000) and Blue (27LP) Wire Stairs
Railings: Blue (S5,225) and Black (S5,350) Wire Railings
Fences: Black (S86,500) and Blue (8SP) Ornate Double Gates
Black (S54,000) and Blue (5SP) Ornate Single
Black (S55,000) and Blue (5LP) Ornate Double
Black (S56,000) and Blue (5SP) Ornate Quad
Black (S54,500) and Blue (5LP) Ornate Corner
This template is available on a standard and a premium residence under the driveway homes tab (if you build it on the Barter Boardwalk lot in Sim Springs you will be building the standard (even though it is actually a premium sized lot to begin with!) the first one is free, after this it will cost simoleons depending on how many houses you have already built. If you build it in Sim Springs it will on the community lot so your sims cannot live there but if you build in Simtown your sims will be able to live at the boardwalk as it will be a normal house lot.
Barter Boardwalk is a row of shops and at the end there is a park, on the premium residence there are more shops and a bigger park. Again I really like this template, between the shops on each side you have the lampposts and clocks and tables outside the cafe to create a realistic looking path.
The shops on one side are two story, the other side is a one story building but the coffee shop has a basement which is the storage area and toilets
Do I have to use the House Templates given during the event? No, you can keep the house you have been creating during the event but there is always the option to demolish that house and replace it with the template
Once you have completed the whole 10 day event you will unlock the Blue (S84,750) and Cream (8SP) Modular Succulents Corner, Blue (S89,500) and Cream (9SP) Modular Succulents and Blue (S99,500) and Teracotta (10LP) Cacti and Succulents. You don’t have to complete this event in the time limit to unlock these prizes:
Neighbourhood Tasks
Once you have completed all 4 lots you will be able to complete Neighbourhood Tasks to raise your neighbourhood ranking, improve the look of Palm Promenade and earn rewards! You will reach the rank of Ghost Town when you complete all 4 lots:
Outdoor Decorations: Pink (S145,000) and Black (14SP) Floral Drink Stalls
Outdoor Furniture: Black (S800,000) and Blue (80LP) Ornate Gazebos
The prizes you can earn are:
Ghost Town- Grass Seedlings and Pink Saplings (both visual changes to Palm Promenade) hairstyle and outfit for female adult sims, gazebos and drink stalls
Adequate- Small Trees and Grass Seedlings (visual changes to Palm Promenade) and S1,000
Amazing- Gravel Roads and Small Trees (visual changes to Palm Promenade) Sims will use landline phones autonomously (on their own) S2,000 and 2LP
Dazzling- Neighbourhood Light Poles, Grass Seedlings and Small Trees (visual changes to Palm Promenade) Sims will admire some decorations autonomously (on their own) S3,000 and 2SP
Ultimate- Neighbourhood Landmark, Improved Roads and Neighbourhood Footpaths (visual changes to Palm Promenade) Sims will use wardrobes autonomously (on their own) S8,500, 3LP, 3SP and 1 Mystery Key
NOTE: tasks that require you to place a certain amount of items will appear in each set of neighbourhood tasks- if you skip the first one with SP it will appear on your list to complete on the next set
Adequate to Amazing
Time (3 Star Rating)
2 Star Rating
1 Star Rating
Skip Cost
Spend S96,000 in Palm Promenade
2SP
Place 15 Trees in Palm Promenade
1SP
Place 20 Couches in Palm Promenade
1SP
Talk to 3 Plants
8 hrs 30 mins
INSPIRED: 8 hrs 4 mins
9 hrs 30 mins
INSPIRED: 9 hrs 1 min
10 hrs 38 mins
INSPIRED: 10 hrs 5 mins
66SP
Make 3 Online Connections (computer)
8 hrs 30 mins
INSPIRED: 8 hrs 4 mins
9 hrs 30 mins
INSPIRED: 9 hrs 1 min
10 hrs 38 mins
INSPIRED: 10 hrs 5 mins
66SP
Drink 3 Hydrating Waters (fridge)
8 hrs 30 mins
INSPIRED: 8 hrs 4 mins
9 hrs 30 mins
INSPIRED: 9 hrs 1 min
10 hrs 38 mins
INSPIRED: 10 hrs 5 mins
66SP
Feed 3 Plants
8 hrs 30 mins
INSPIRED: 8 hrs 4 mins
9 hrs 30 mins
INSPIRED: 9 hrs 1 min
10 hrs 38 mins
INSPIRED: 10 hrs 5 mins
66SP
Amazing to Dazzling
Time (3 Star Rating)
2 Star Rating
1 Star Rating
Skip Cost
Spend S128,000 in Palm Promenade
3SP
Place 20 Dining Tables in Palm Promenade
1SP
Place 85 Dining Chairs in Palm Promenade
1SP
Talk to 4 Plants
13 hrs 30 mins
INSPIRED: 12 hrs 50 mins
15 hrs
INSPIRED: 14 hrs 15 mins
16 hrs 53 mins
INSPIRED: 16 hrs 1 min
122SP
Make 4 Online Connections (computer)
13 hrs 30 mins
INSPIRED: 12 hrs 50 mins
15 hrs
INSPIRED: 14 hrs 15 mins
16 hrs 53 mins
INSPIRED: 16 hrs 1 min
122SP
Find 4 Rare Beetles (couch)
13 hrs 30 mins
INSPIRED: 12 hrs 50 mins
15 hrs
INSPIRED: 14 hrs 15 mins
16 hrs 53 mins
INSPIRED: 16 hrs 1 min
122SP
Have 4 Lengthy Baths
13 hrs 30 mins
INSPIRED: 12 hrs 50 mins
15 hrs
INSPIRED: 14 hrs 15 mins
16 hrs 53 mins
INSPIRED: 16 hrs 1 min
122SP
Drink 4 Hydrating Waters (fridge)
13 hrs 30 mins
INSPIRED: 12 hrs 50 mins
15 hrs
INSPIRED: 14 hrs 15 mins
16 hrs 53 mins
INSPIRED: 16 hrs 1 min
122SP
Feed 4 Plants
13 hrs 30 mins
INSPIRED: 12 hrs 50 mins
15 hrs
INSPIRED: 14 hrs 15 mins
16 hrs 53 mins
INSPIRED: 16 hrs 1 min
122SP
Dazzling to Ultimate
Time (3 Star Rating)
2 Star Rating
1 Star Rating
Skip Cost
Spend S176,500 in Palm Promenade
9SP
Place 250 Windows in Palm Promenade
1SP
Place 100 Doors in Palm Promenade
1SP
Talk to 5 Plants
1 day
INSPIRED: 22 hrs 48 mins
1 day 3 hrs
INSPIRED: 1 day 1 hr 39 mins
1 day 6 hrs
INSPIRED: 1 day 4 hrs 30 mins
215SP
Make 5 Online Connections (computer)
1 day
INSPIRED: 22 hrs 48 mins
1 day 3 hrs
INSPIRED: 1 day 1 hr 39 mins
1 day 6 hrs
INSPIRED: 1 day 4 hrs 30 mins
215SP
Find 5 Rare Beetles (couch)
1 day
INSPIRED: 22 hrs 48 mins
1 day 3 hrs
INSPIRED: 1 day 1 hr 39 mins
1 day 6 hrs
INSPIRED: 1 day 1 day 4 hrs 30 mins
215SP
Sell 5 Old Clothes (computer)
1 day
INSPIRED: 22 hrs 48 mins
1 day 3 hrs
INSPIRED: 1 day 1 hr 39 mins
1 day 6 hrs
INSPIRED: 1 day 1 day 4 hrs 30 mins
215SP
Prepare 5 Local Stews (oven)
1 day
INSPIRED: 22 hrs 48 mins
1 day 3 hrs
INSPIRED: 1 day 1 hr 39 mins
1 day 6 hrs
INSPIRED: 1 day 1 day 4 hrs 30 mins
215SP
Brew 5 Flower Teas (kettle)
1 day
INSPIRED: 22 hrs 48 mins
1 day 3 hrs
INSPIRED: 1 day 1 hr 39 mins
1 day 6 hrs
INSPIRED: 1 day 1 day 4 hrs 30 mins
215SP
Have 5 Lengthy Baths
1 day
INSPIRED: 22 hrs 48 mins
1 day 3 hrs
INSPIRED: 1 day 1 hr 39 mins
1 day 6 hrs
INSPIRED: 1 day 1 day 4 hrs 30 mins
215SP
Drink 5 Hydrating Waters (fridge)
1 day
INSPIRED: 22 hrs 48 mins
1 day 3 hrs
INSPIRED: 1 day 1 hr 39 mins
1 day 6 hrs
INSPIRED: 1 day 1 day 4 hrs 30 mins
215SP
Feed 5 Plants
1 day
INSPIRED: 22 hrs 48 mins
1 day 3 hrs
INSPIRED: 1 day 1 hr 39 mins
1 day 6 hrs
INSPIRED: 1 day 1 day 4 hrs 30 mins
215SP
Enjoy the Environment 5 times (tree)
1 day
INSPIRED: 22 hrs 48 mins
1 day 3 hrs
INSPIRED: 1 day 1 hr 39 mins
1 day 6 hrs
INSPIRED: 1 day 1 day 4 hrs 30 mins
215SP
Happiness Level
You will need to complete a certain amount of Neighbourhood tasks to level up the Sim Springs Happiness:
Content- 55 Neighbourhood Tasks
Optimistic- 105 Neighbourhood Tasks
Exuberant- 175 Neighbourhood Tasks
Sim-sational- 250 Neighbourhood Tasks
Once you reach these milestones you will earn these prizes:
Content- Improved Highway and Birds in Sim Springs (visual changes to Sim Springs) S5,000 and 1 Mystery Key
Optimistic- More Birds in Sim Springs and Basic Canal (visual changes to Sim Springs) S10,000, 10LP and 1 Mystery Key
Exuberant- More Birds in Sim Springs and Completed Canal (visual changes to Sim Springs) S20,000, 10SP and 1 Mystery Key
Sim-sational- Sim Limit Increased by 1, More Birds in Sim Springs, Large Trees and Durable Roads (visual changes to Sim Springs) S30,000, 15LP, 15SP, 3 Mystery Keys, 4 hairstyles, 4 outfits and 4 shoes for female adult sims
We didn’t complete enough neighbourhood tasks in Sandy Suburbs to level up but we do in Palm Promenade so we can reach the level of Content. You will see the improved highway and birds flying over Sim Springs:
Buying Boosts
You can spend real money to help you complete these events, there are 2 options:
Budget Toolbox (this is for the lot you are currently completing only):
50% Lower Time Requirements
50% Less Sims Required
30% Cheaper ‘Skip Wait’ (skip to start the next day early cost)
The 1 hour daily task auto completed (probably Check in with Johnny)
Jumbo Toolbox (this is for all 4 lots in Palm Promenade from when you purchase it):
50% Lower Time Requirements
50% Less Sims Required
30% Cheaper ‘Skip Wait’ (skip to start the next day early cost)
The 1 hour daily task auto completed (probably Check in with Johnny)
The missed day penalties are 20% cheaper
One colour variant of Johnny Zest’s suit for male adult sims in wardrobe and create a sim (top, pants, shoes, and his glasses)
With the Jumbo Toolbox you also get benefits to help you complete the Neighbourhood Tasks too:
15% Less Sims Required for Neighbourhood Tasks
15% Off Lot Event Spend Goals for Neighbourhood Tasks


 Tab 1: Reward Progress & Café Issues


 Tab 2: Upgrading Equipment

 Tab 3: Staff Management